Connecting Nooks to Snowflake
Last updated: October 7, 2026
This guide walks through connecting Nooks to Snowflake so your team can query Nooks data in your Snowflake account. It covers how to set up and use the Nooks Data integration with Snowflake.
Applies To: All Nooks Workspaces. Which tables contain data depends on your Nooks seats.
Overview
Snowflake is a cloud data platform that teams use to centralize and analyze data from across their business, such as CRM, sales engagement, marketing, product, and customer success data. The Nooks Data Sharing integration with Snowflake makes your Nooks data available directly in your Snowflake account, enabling your team can query it like any other table in your warehouse without needing to export CSV files or build your own pipeline.
With the Nooks data sharing integration with Snowflake, you can:
Group calls and emails by the Nooks Sequence their tasks came from.
Break down calls by Nooks users.
Combine Nooks activity with your own CRM, marketing, or product data in a single reporting layer.
Build custom dashboards, or feed Nooks data into a business intelligence tool or data model.
The data share includes five tables: CALLS, EMAILS, TASKS, ACCOUNT_SIGNALS, and PROSPECT_SIGNALS. For every column in each table, see Snowflake Data Share Data Reference.
Note: The Snowflake integration is a data-sharing integration, not a data-import integration. It sends data from Nooks into your Snowflake account. It does not bring data from Snowflake into Nooks.
How Nooks Data Sharing Works
Nooks Data Sharing uses the provider-and-consumer model built into Snowflake itself.
Nooks is the Snowflake provider: Nooks publishes your Workspace data as a private Snowflake listing.
Your organization is the Snowflake consumer: Your Snowflake account accepts the listing and creates a new, read-only database from it.
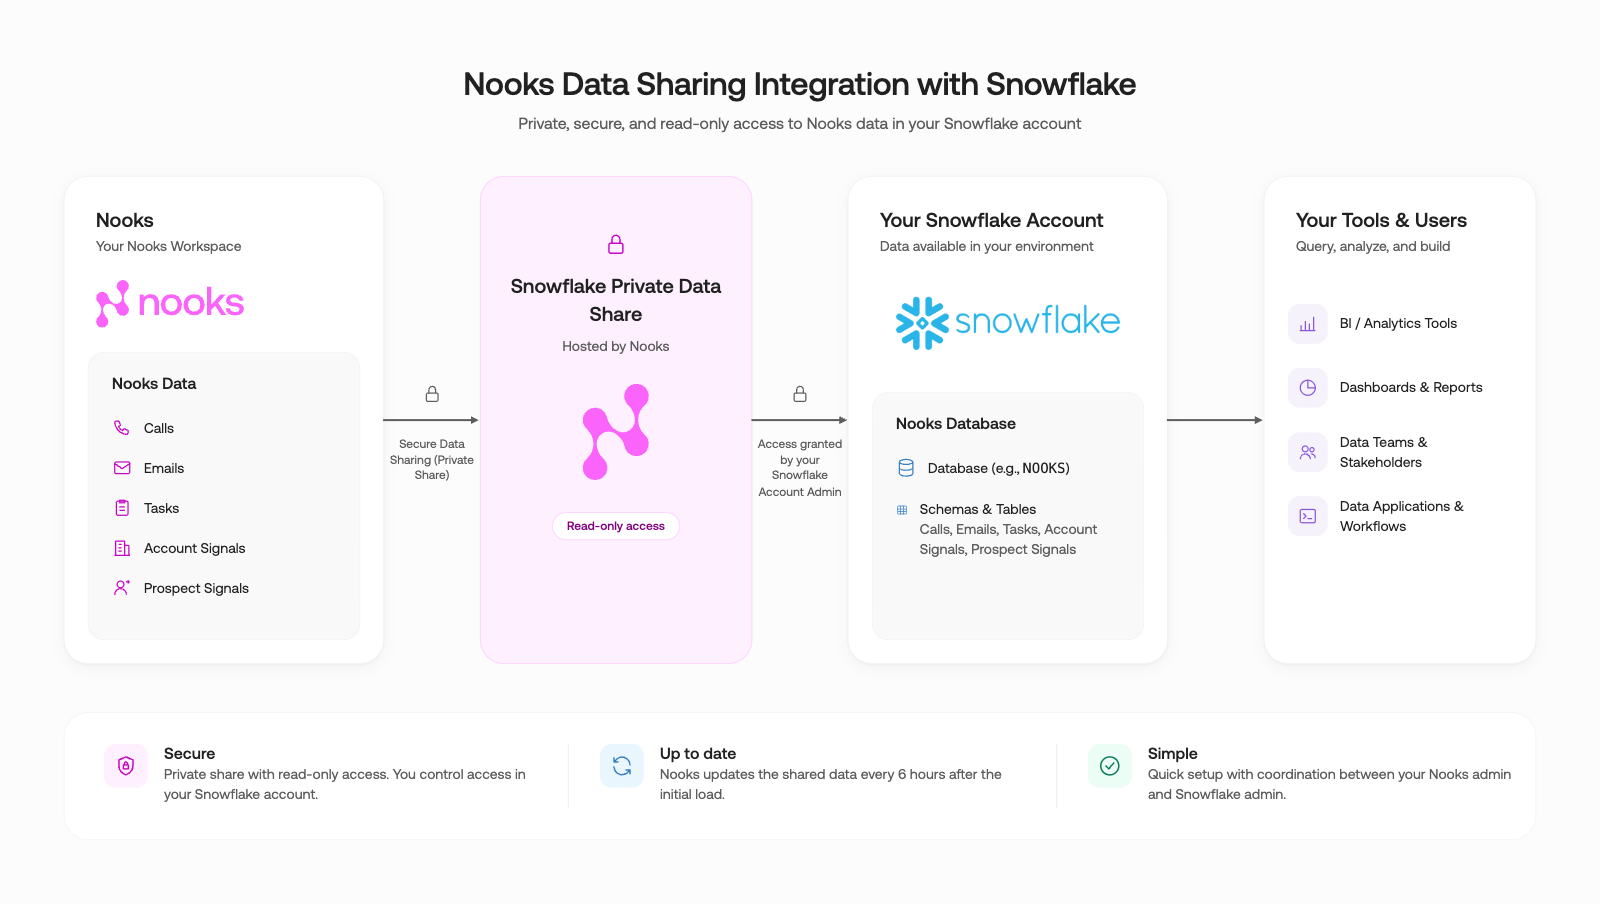
The listing currently exposes five tables (Calls, Emails, Tasks, Account Signals, and Prospect Signals). Only your named Snowflake account can see or accept it. Once your Snowflake Account Admin accepts the listing, the connection stays live. When Nooks updates the shared data, the updates appear in your Snowflake account automatically without you needing to trigger a sync or re-import.
Data flows one way, from Nooks to your Snowflake account. Nothing in your Snowflake account is sent back to Nooks.
For details on how this model works, see Snowflake Integration Data Reference.
Before You Begin
Connecting Nooks to Snowflake requires a Nooks admin and a Snowflake Account Admin. Before you start, make sure you have the following:
In Nooks: A user who can manage data exports. What that requires depends on your Workspace.
Workspaces with Nooks Sequencing: The user's Permission Profile must include the Manage Data Exports" permission. Admin and Manager roles include it by default.
Workspaces without Nooks Sequencing: The user must have the Admin or Manager role.
In Snowflake: A Snowflake Account Admin, or another user who can accept a private listing and create a database from it.
Your Snowflake account details: Your Snowflake account's organization name and account name. Step 1 in this guide shows shows how to find them.
Nooks data sharing works across Snowflake regions and cloud providers. If your Snowflake account is in a different region or cloud than Nooks, Snowflake copies the shared data to your account’s region the first time you access it. The first copy may take a few minutes.
Setup Steps
To connect Nooks to Snowflake, complete the following steps in order. Each step names the person who completes it in parentheses.
Step 1 (Your Snowflake Team): Generate Your Snowflake Account Details
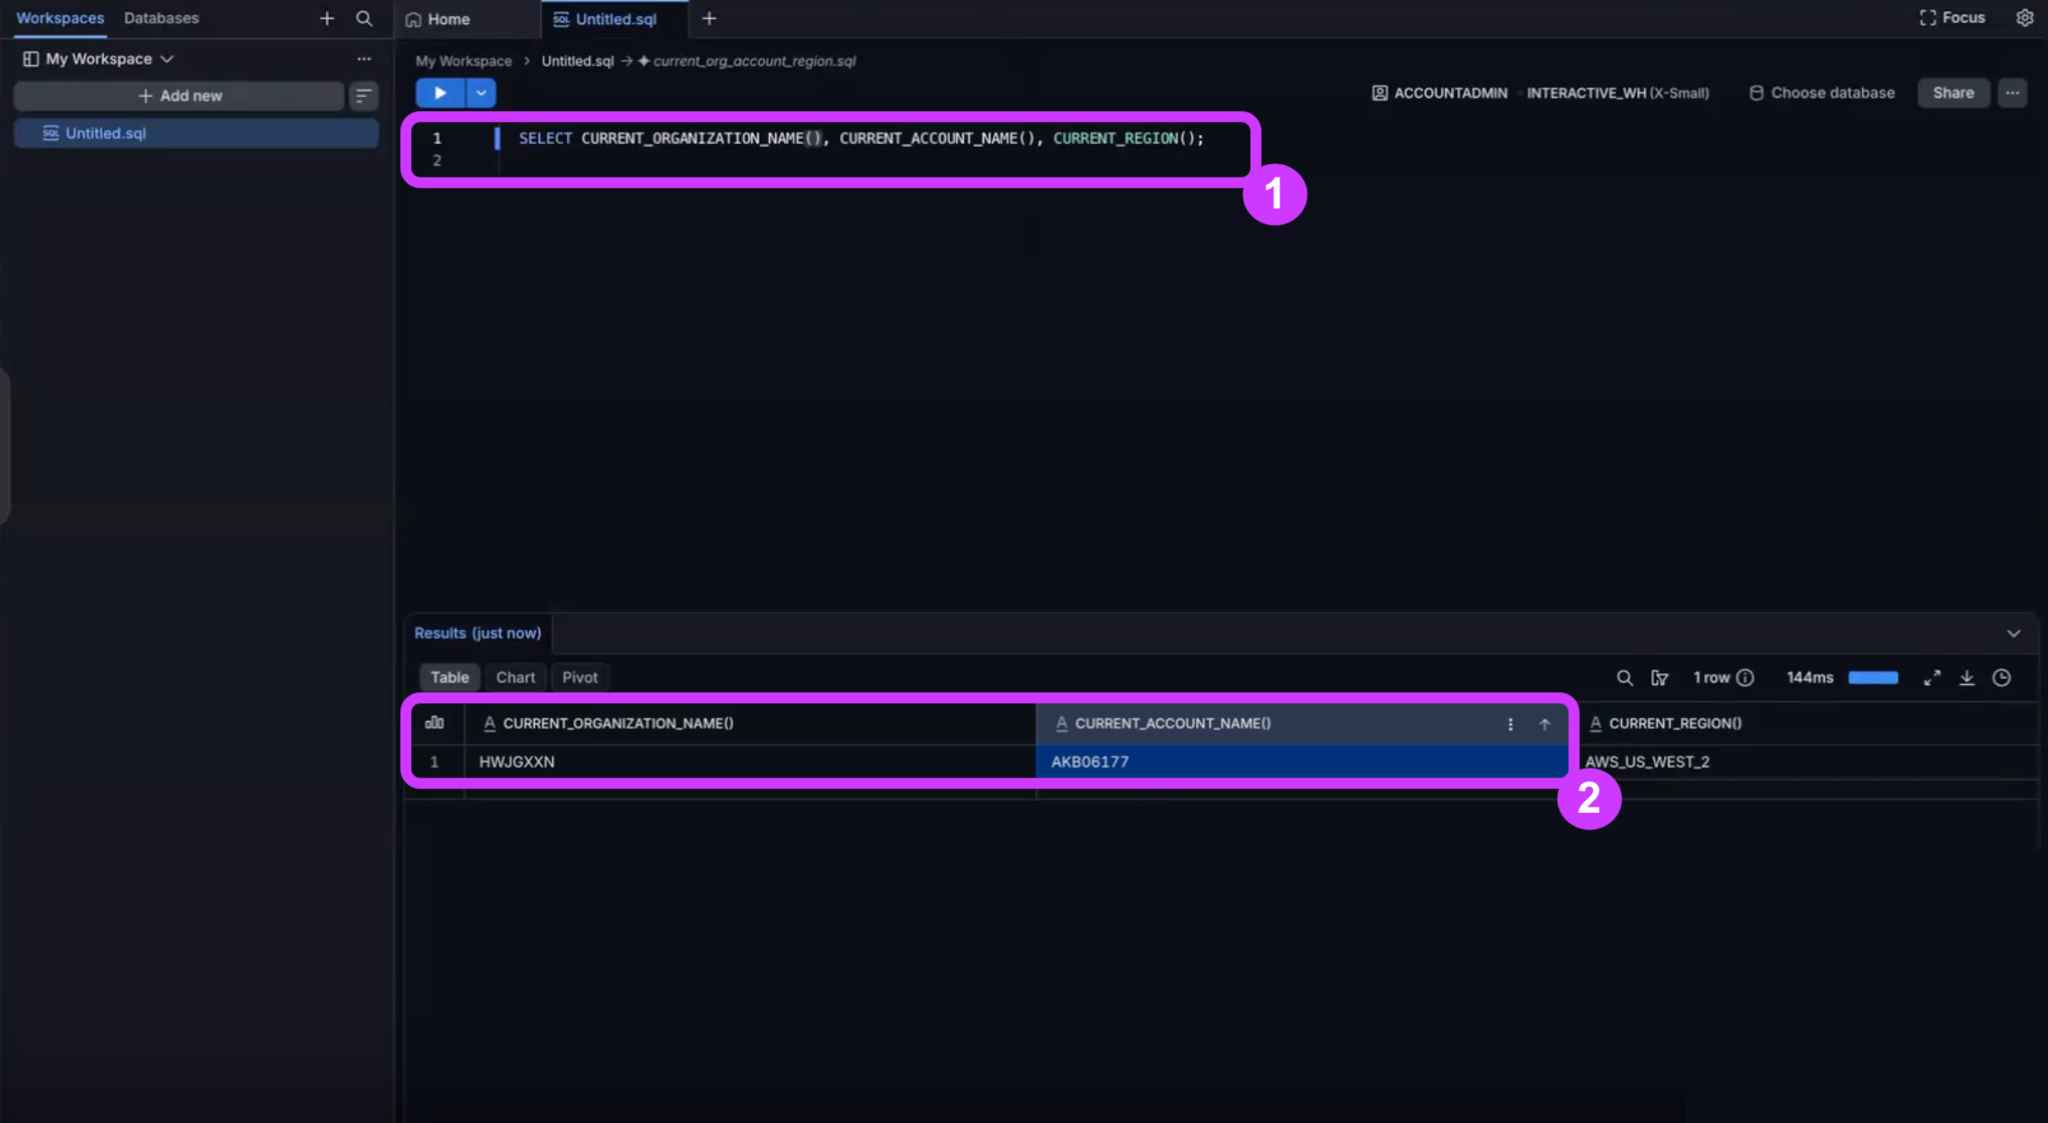
Before you enter anything into Nooks, gather the organization anme and account name of the Snowflake account that will receive teh data. To find your Snowflake account details:
In Snowflake, open a Worksheet in the account you want to connect to Nooks.
Run the following query:
SELECT CURRENT_ORGANIZATION_NAME(), CURRENT_ACCOUNT_NAME(), CURRENT_REGION();Copy the output values in the
CURRENT_ORGANIZATION_NAME()andCURRENT_ACCOUNT_NAME()columns, and send them to your Nooks admin.
Step 2 (Nooks Admin): Create the Data Share in Nooks
Ise the Snowflake account details from Step 1 to create the data share in Nooks. To create the data share:
In Nooks, go to Settings → All Settings.
Under Integrations, click Snowflake.
In the Organization name field, enter the
CURRENT_ORGANIZATION_NAME()value from Snowflake.In the Account name field, enter the
CURRENT_ACCOUNT_NAME()value from Snowflake.Click Save and create listing. Nooks shows "Setting up Snowflake sharing" while it creates the secure share and private listing, which can take up to a minute.
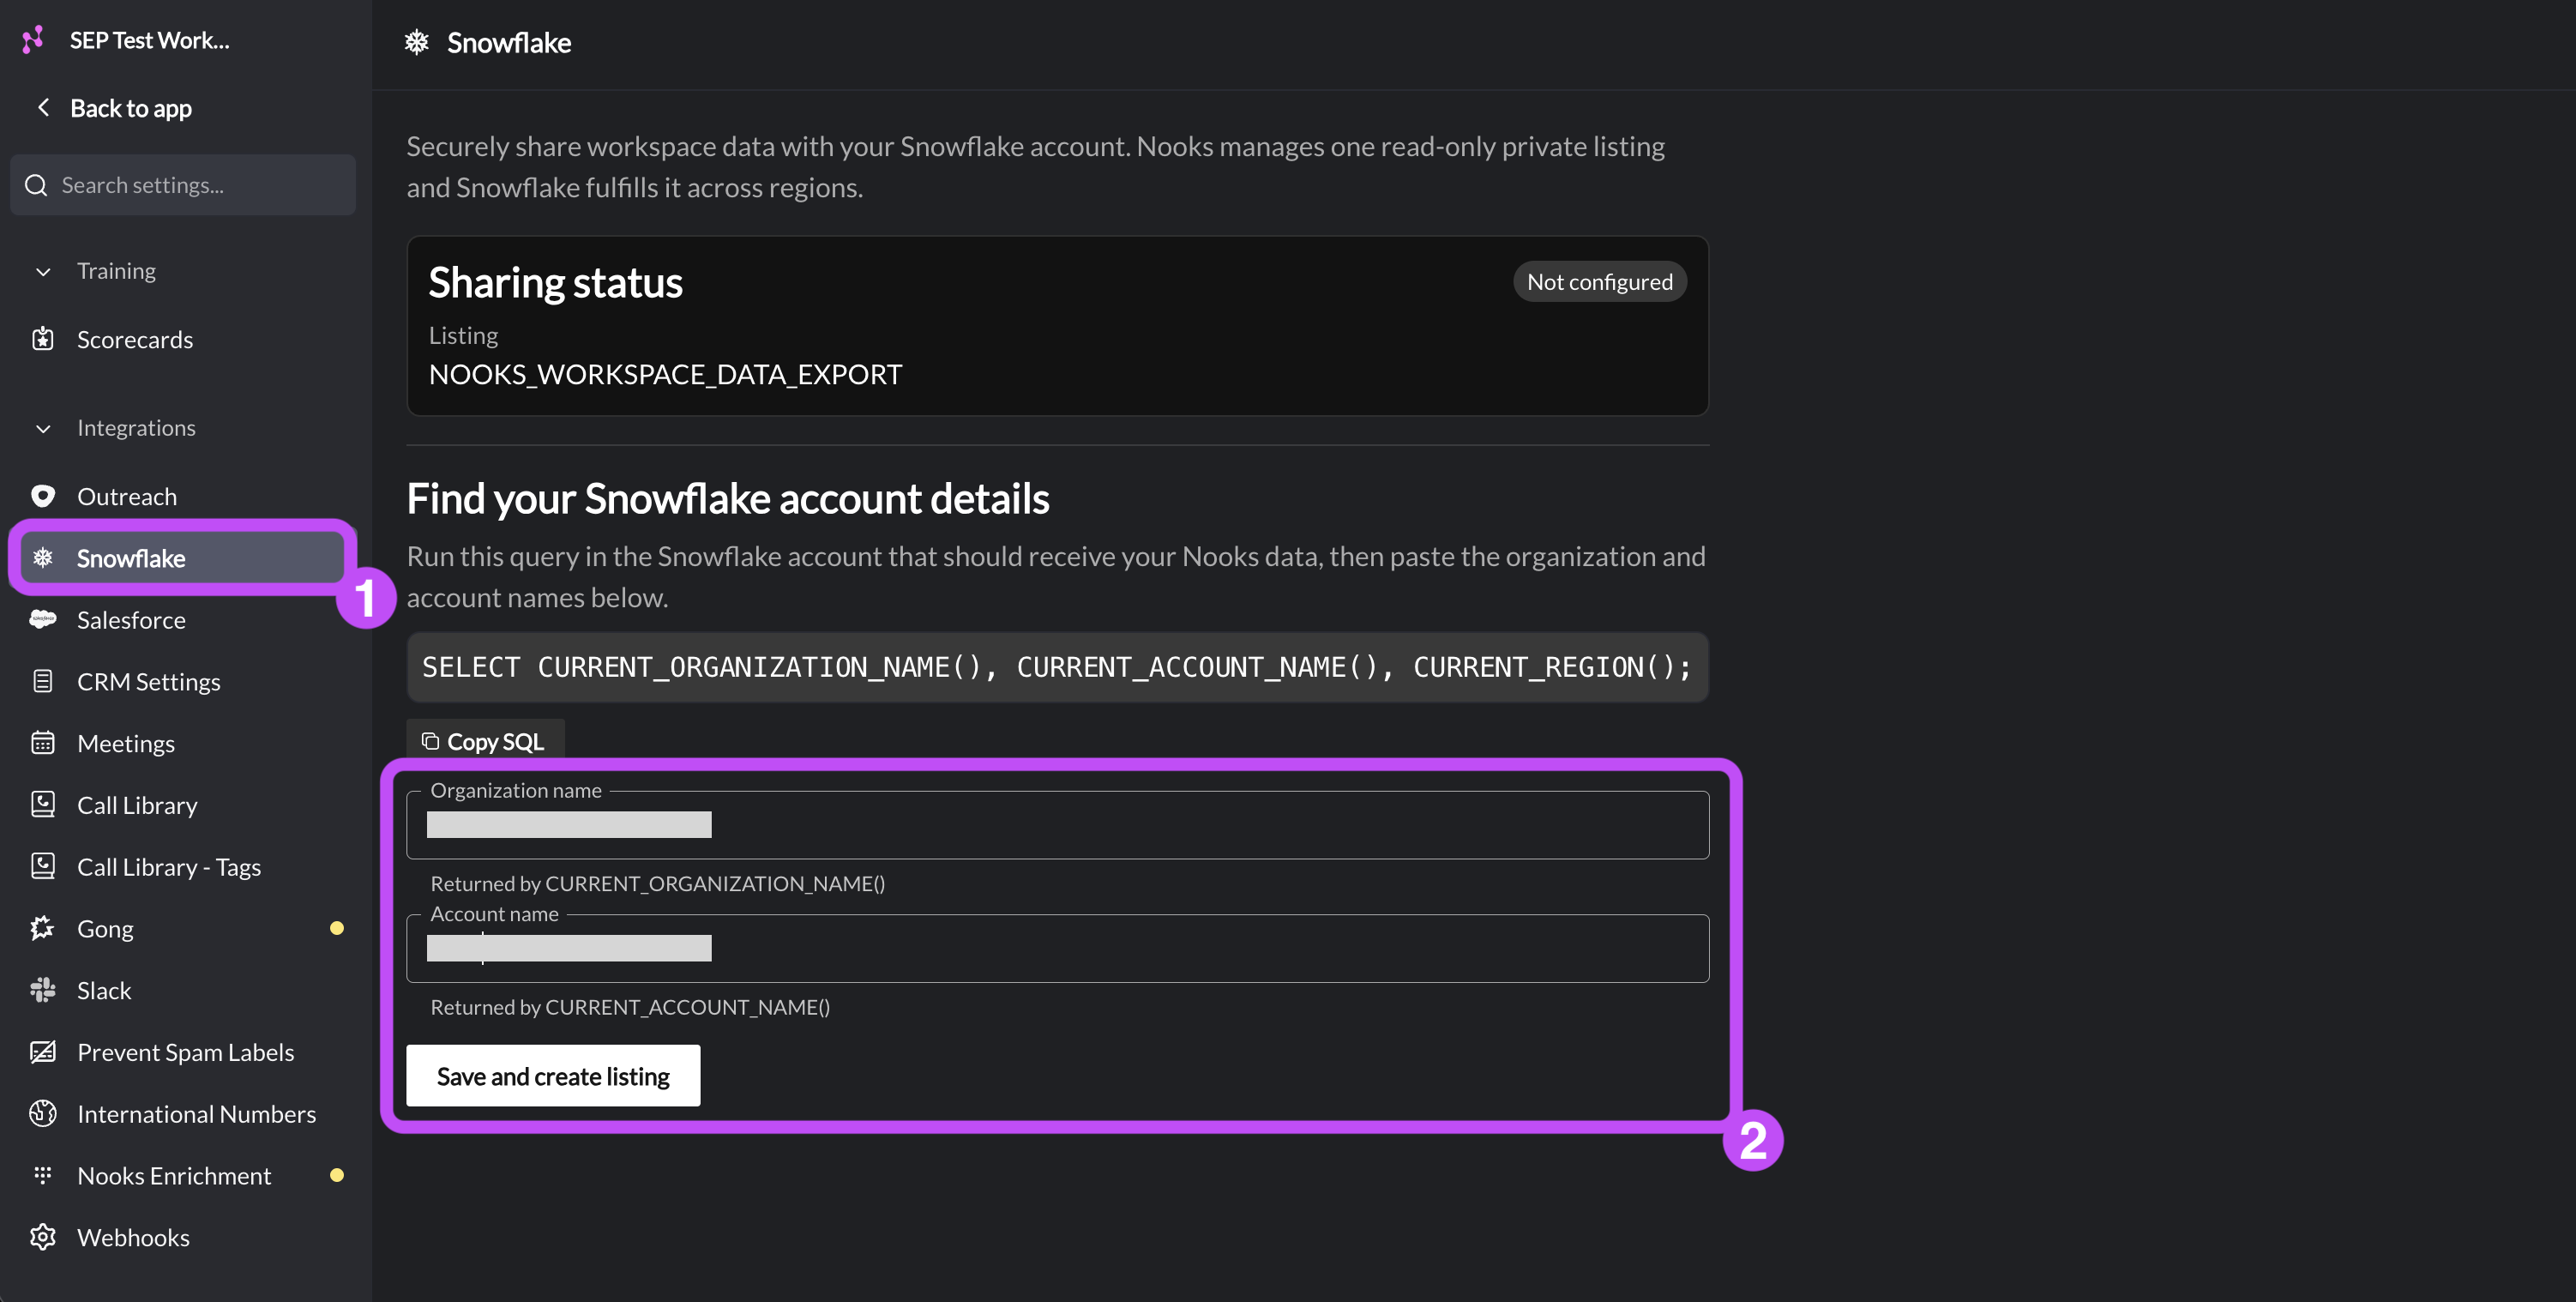
You can leave the page while Nooks creates the listing and come back later. When Sharing status shows Active continue to the next step.
Step 3 (Snowflake Account Admin): Accept the Nooks Data Share in Snowflake
After the listing is active in Nooks, your Snowflake Account Admin accepts it from Snowflake. To get the Snowflake listing:
In Snowflake, go to Data Sharing → External Data Sharing.
Under Privately shared listings, find Nooks workspace data export, and click Get. Note that it may take a few minutes for this listing to appear in Snowflake from the time you created the share in Nooks.
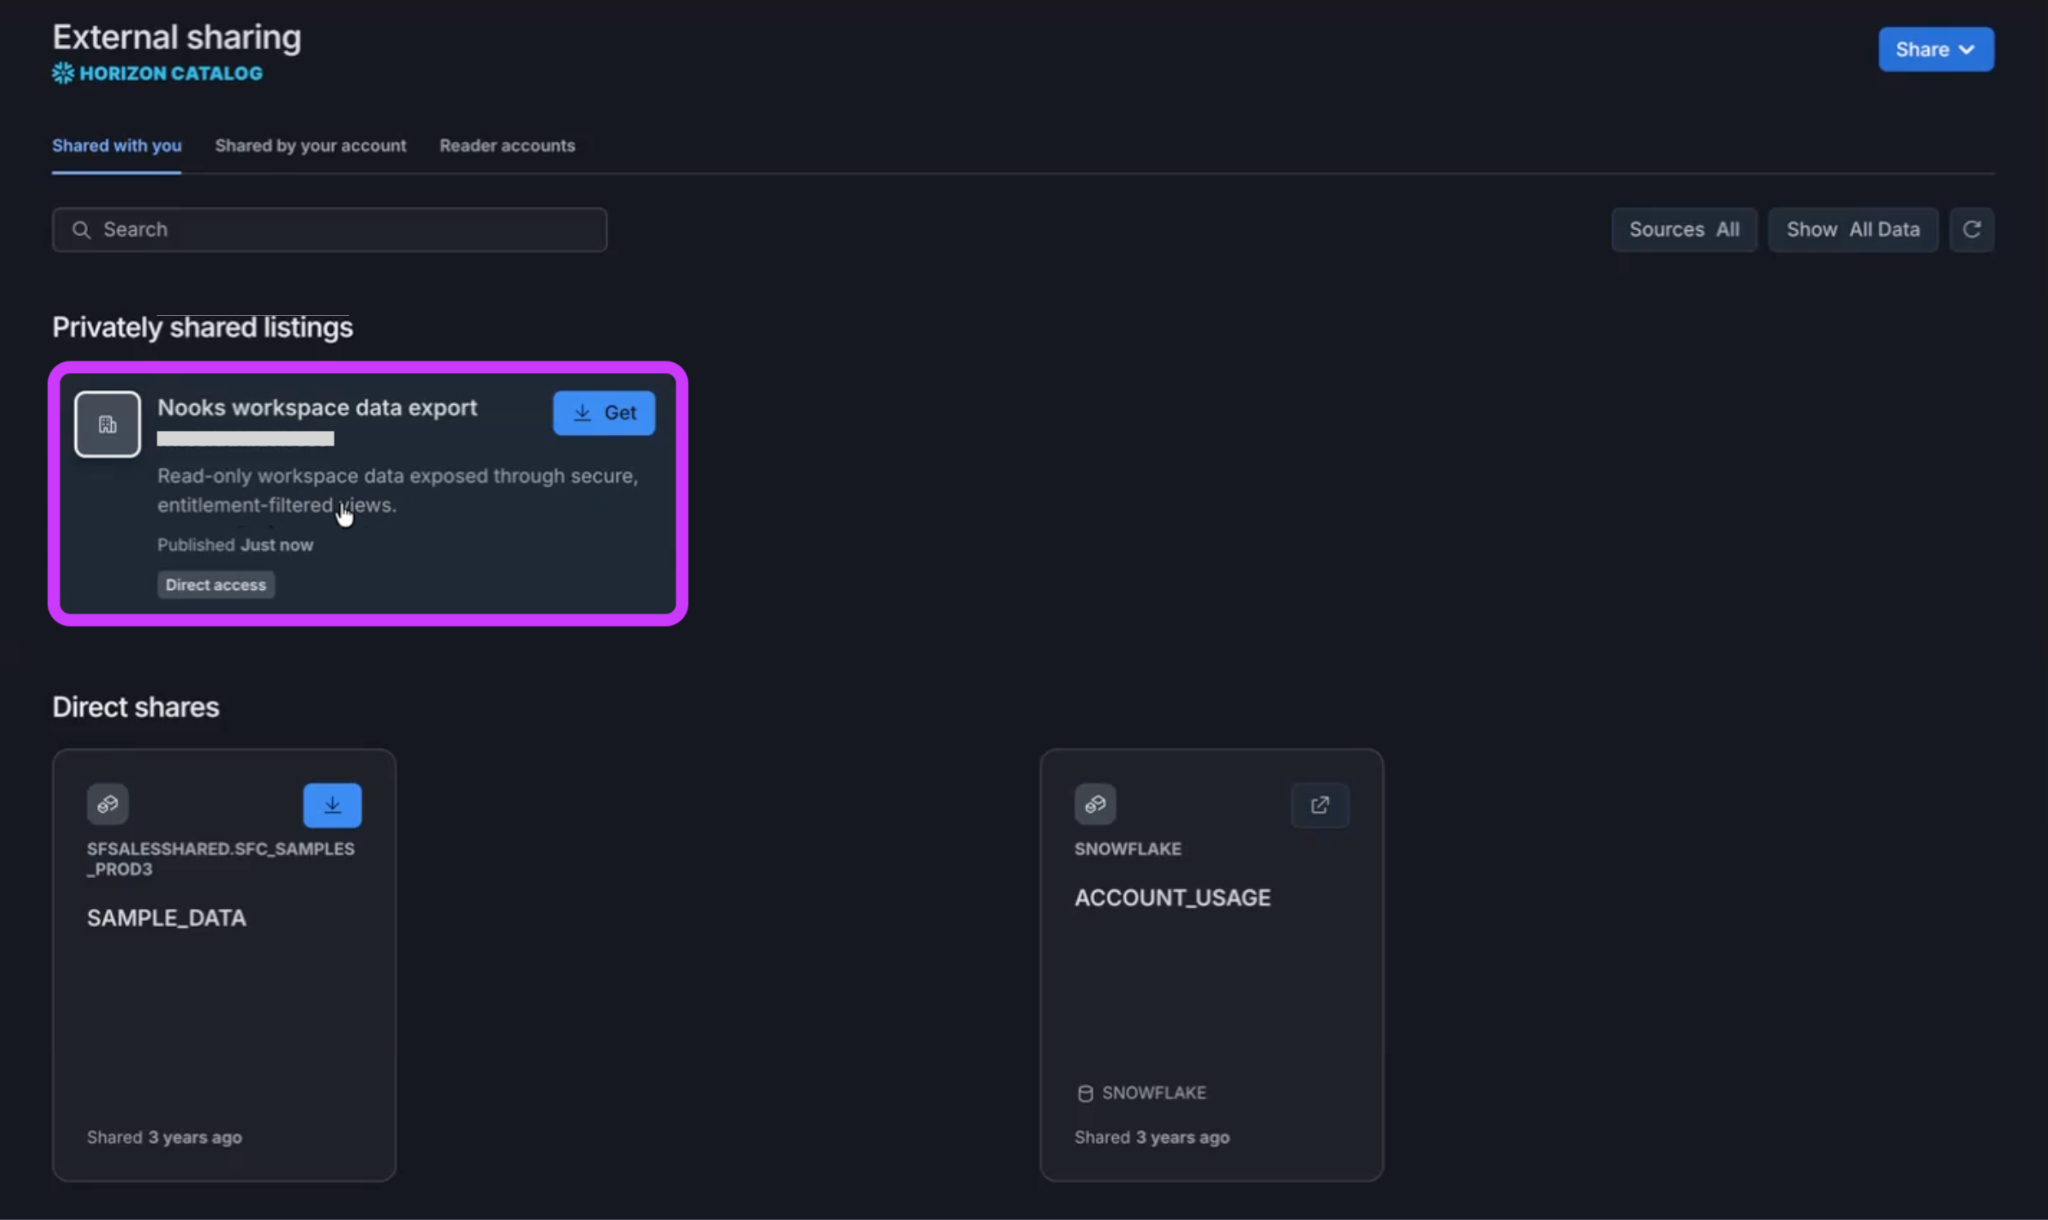
Snowflake starts coping the data and sends you an email when it is done. This process generally takes about 10 minutes.
Step 4 (Snowflake Account Admin): Create a Database from the Nooks Data Share
After you receive the confirmation email from Snowflake, create the database that holds your Nooks data.
In Snowflake, go to Data Sharing → External Data Sharing.
Under Privately shared listings, click Nooks workspace data export.
Click Get in the top-right corner.
In the dialog that opens, complete the following:
In the Database name field, enter a name for the database, such as
NOOKS. Snowflake uses this name to make the data queryable in your account.In the Wich roles, in addition to ACCOUNTADMIN, can access this database? dropdown, select the roles that can query the data.
Click Get.
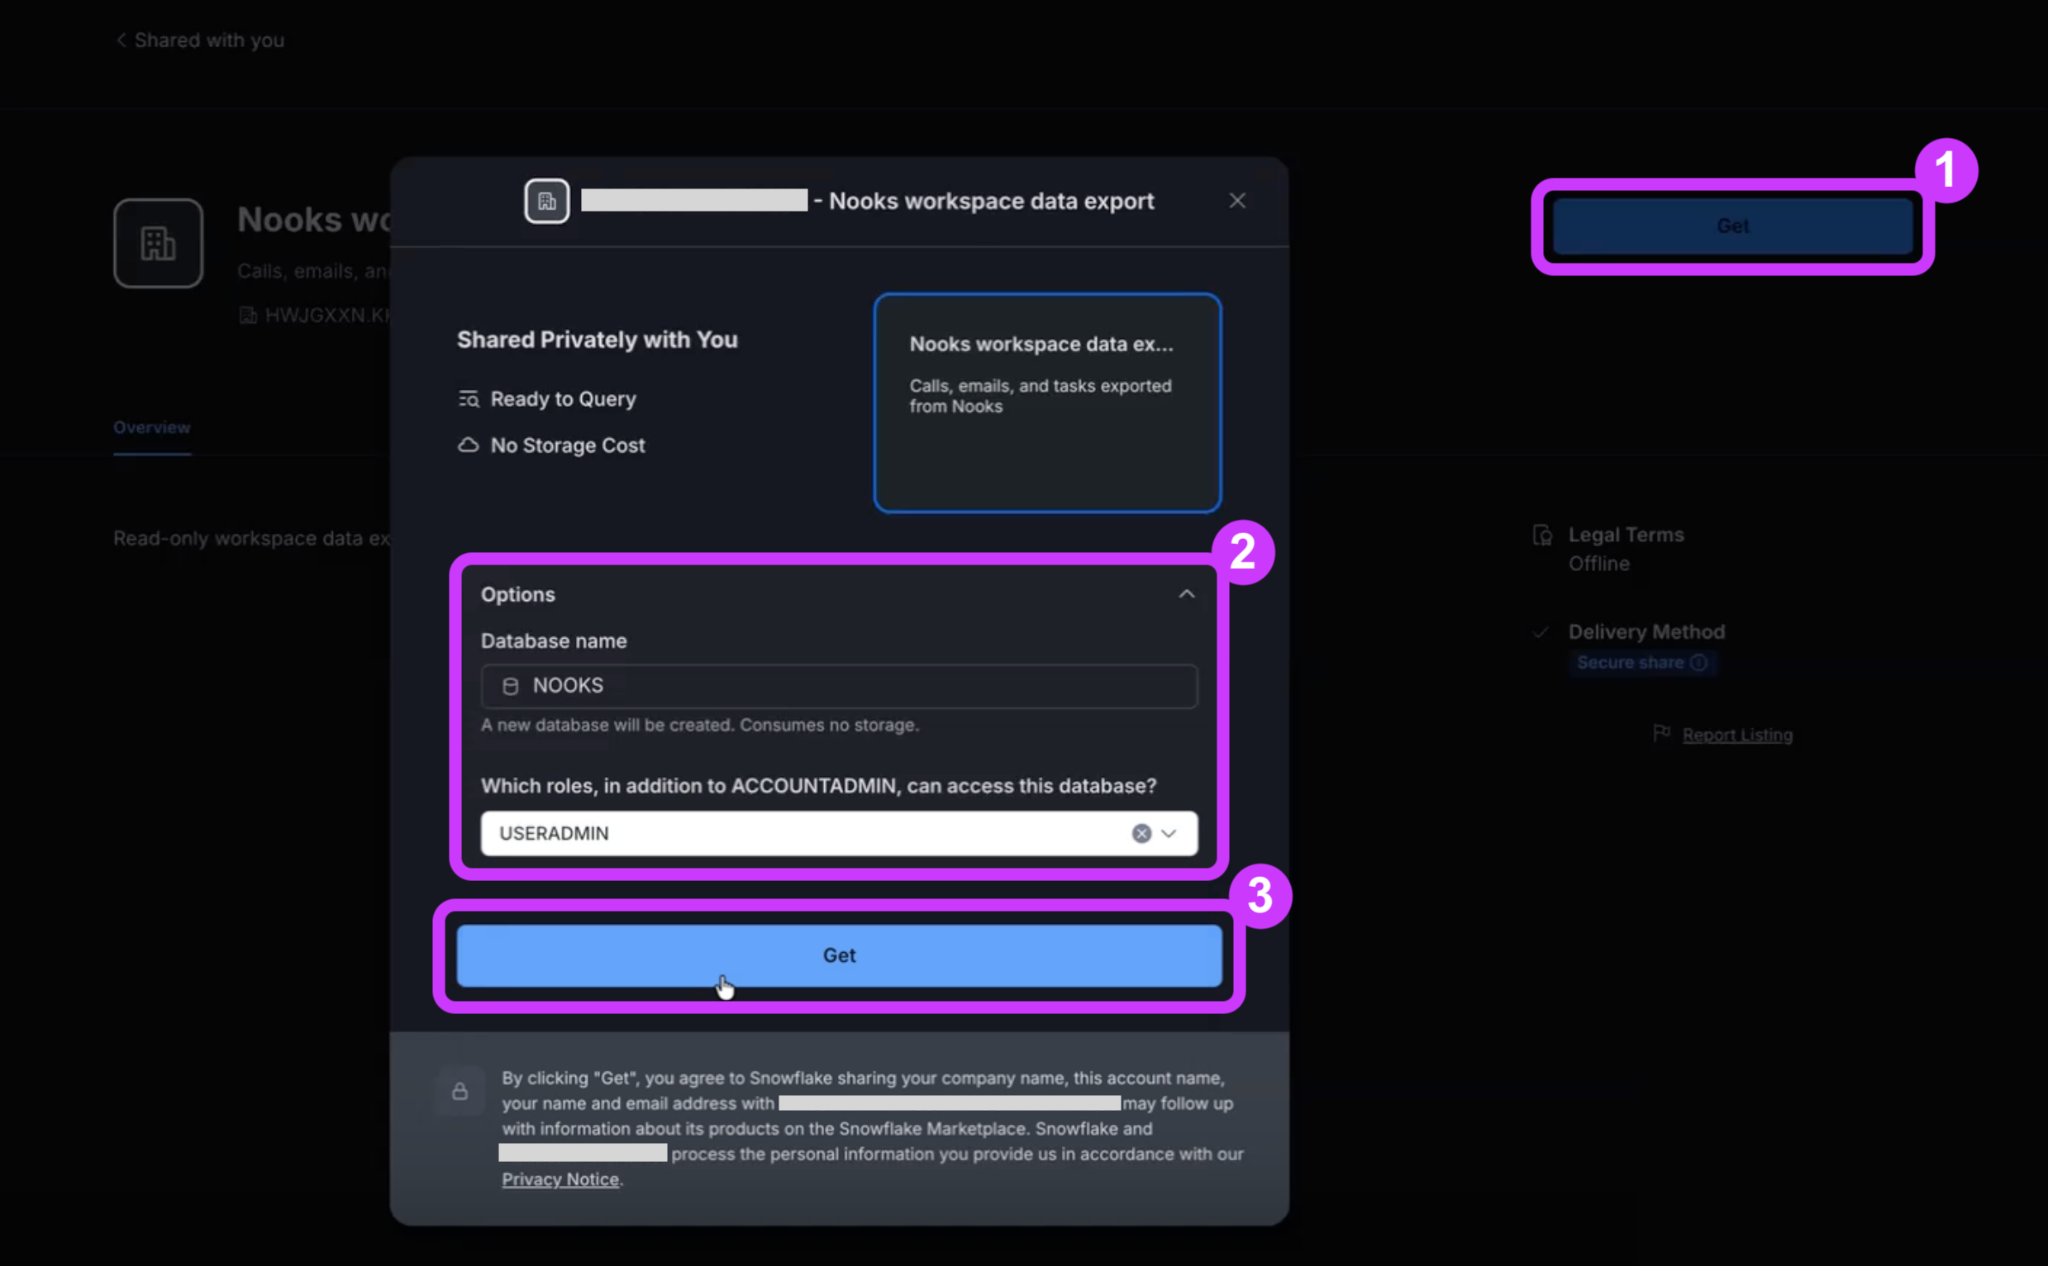
Your organization now has a read-only database containing your Nooks Workspace’s shared data.
Verifying Your Setup
After setup, you can confirm that the data share is working in both Nooks and Snowflake.
In Nooks: On the Snowflake settings page, Sharing status shows Active.
In Snowflake: Your new database contains a
schemanamed shared with all five Nooks tables.
After you verify your setup, you can start querying your Nooks data. For every table and column in the data share, and the data availability of each, see Snowflake Integration Data Reference.
Data Availability and Refresh Schedule
After setup, Nooks keeps the shared data current on a regular schedule, with no action required from you.
Initial Data Share: The initial data share populates within 1 hour ofn setup and contains your Workspace's all-time Nooks data. Data from the most recent 6 hours may be missing from the initial share, but appears in the next one.
Later Data Shares: After the initial data share, Nooks updates the data every 6 hours.
Nooks may add new datasets, tables, or columns to this integration over time. The Data Dictionary above will be updated to reflect the current schema.
Manage the Integration
After Nooks Data Sharing is set up, you can change who can query the data, add tables to your data share, or point it at a different Snowflake account.
Manage Snowflake Access
After your Snowflake admin creates a database from the Nooks listing, you grant other roles and users access to it the same way as any other Snowflake database.
Access in Snowflake and permissions in Nooks are independent. Changing who can query your Nooks database in Snowflake has no effect on anyone's Nooks permissions. Similarly, changing a user’s permissions in Nooks has no effect on who can query the database in Snowflake.
Connecting a Different Snowflake Account
Nooks shares each Workspace's data with one Snowflake account at a time. To connect a different Snowflake account:
Revoke access for the current account. See the Disconnecting Nooks from Snowflake section below.
Repeat the integration setup steps using the details of the account you want to share data with.
Disconnecting Nooks from Snowflake
If you no longer need Nooks Data Sharing, you can turn it off from within Nooks. To disconnect Nooks from Snowflake:
Go to Settings → All Settings.
Under Integrations, click Snowflake.
At the bottom of the page, click Revoke access.
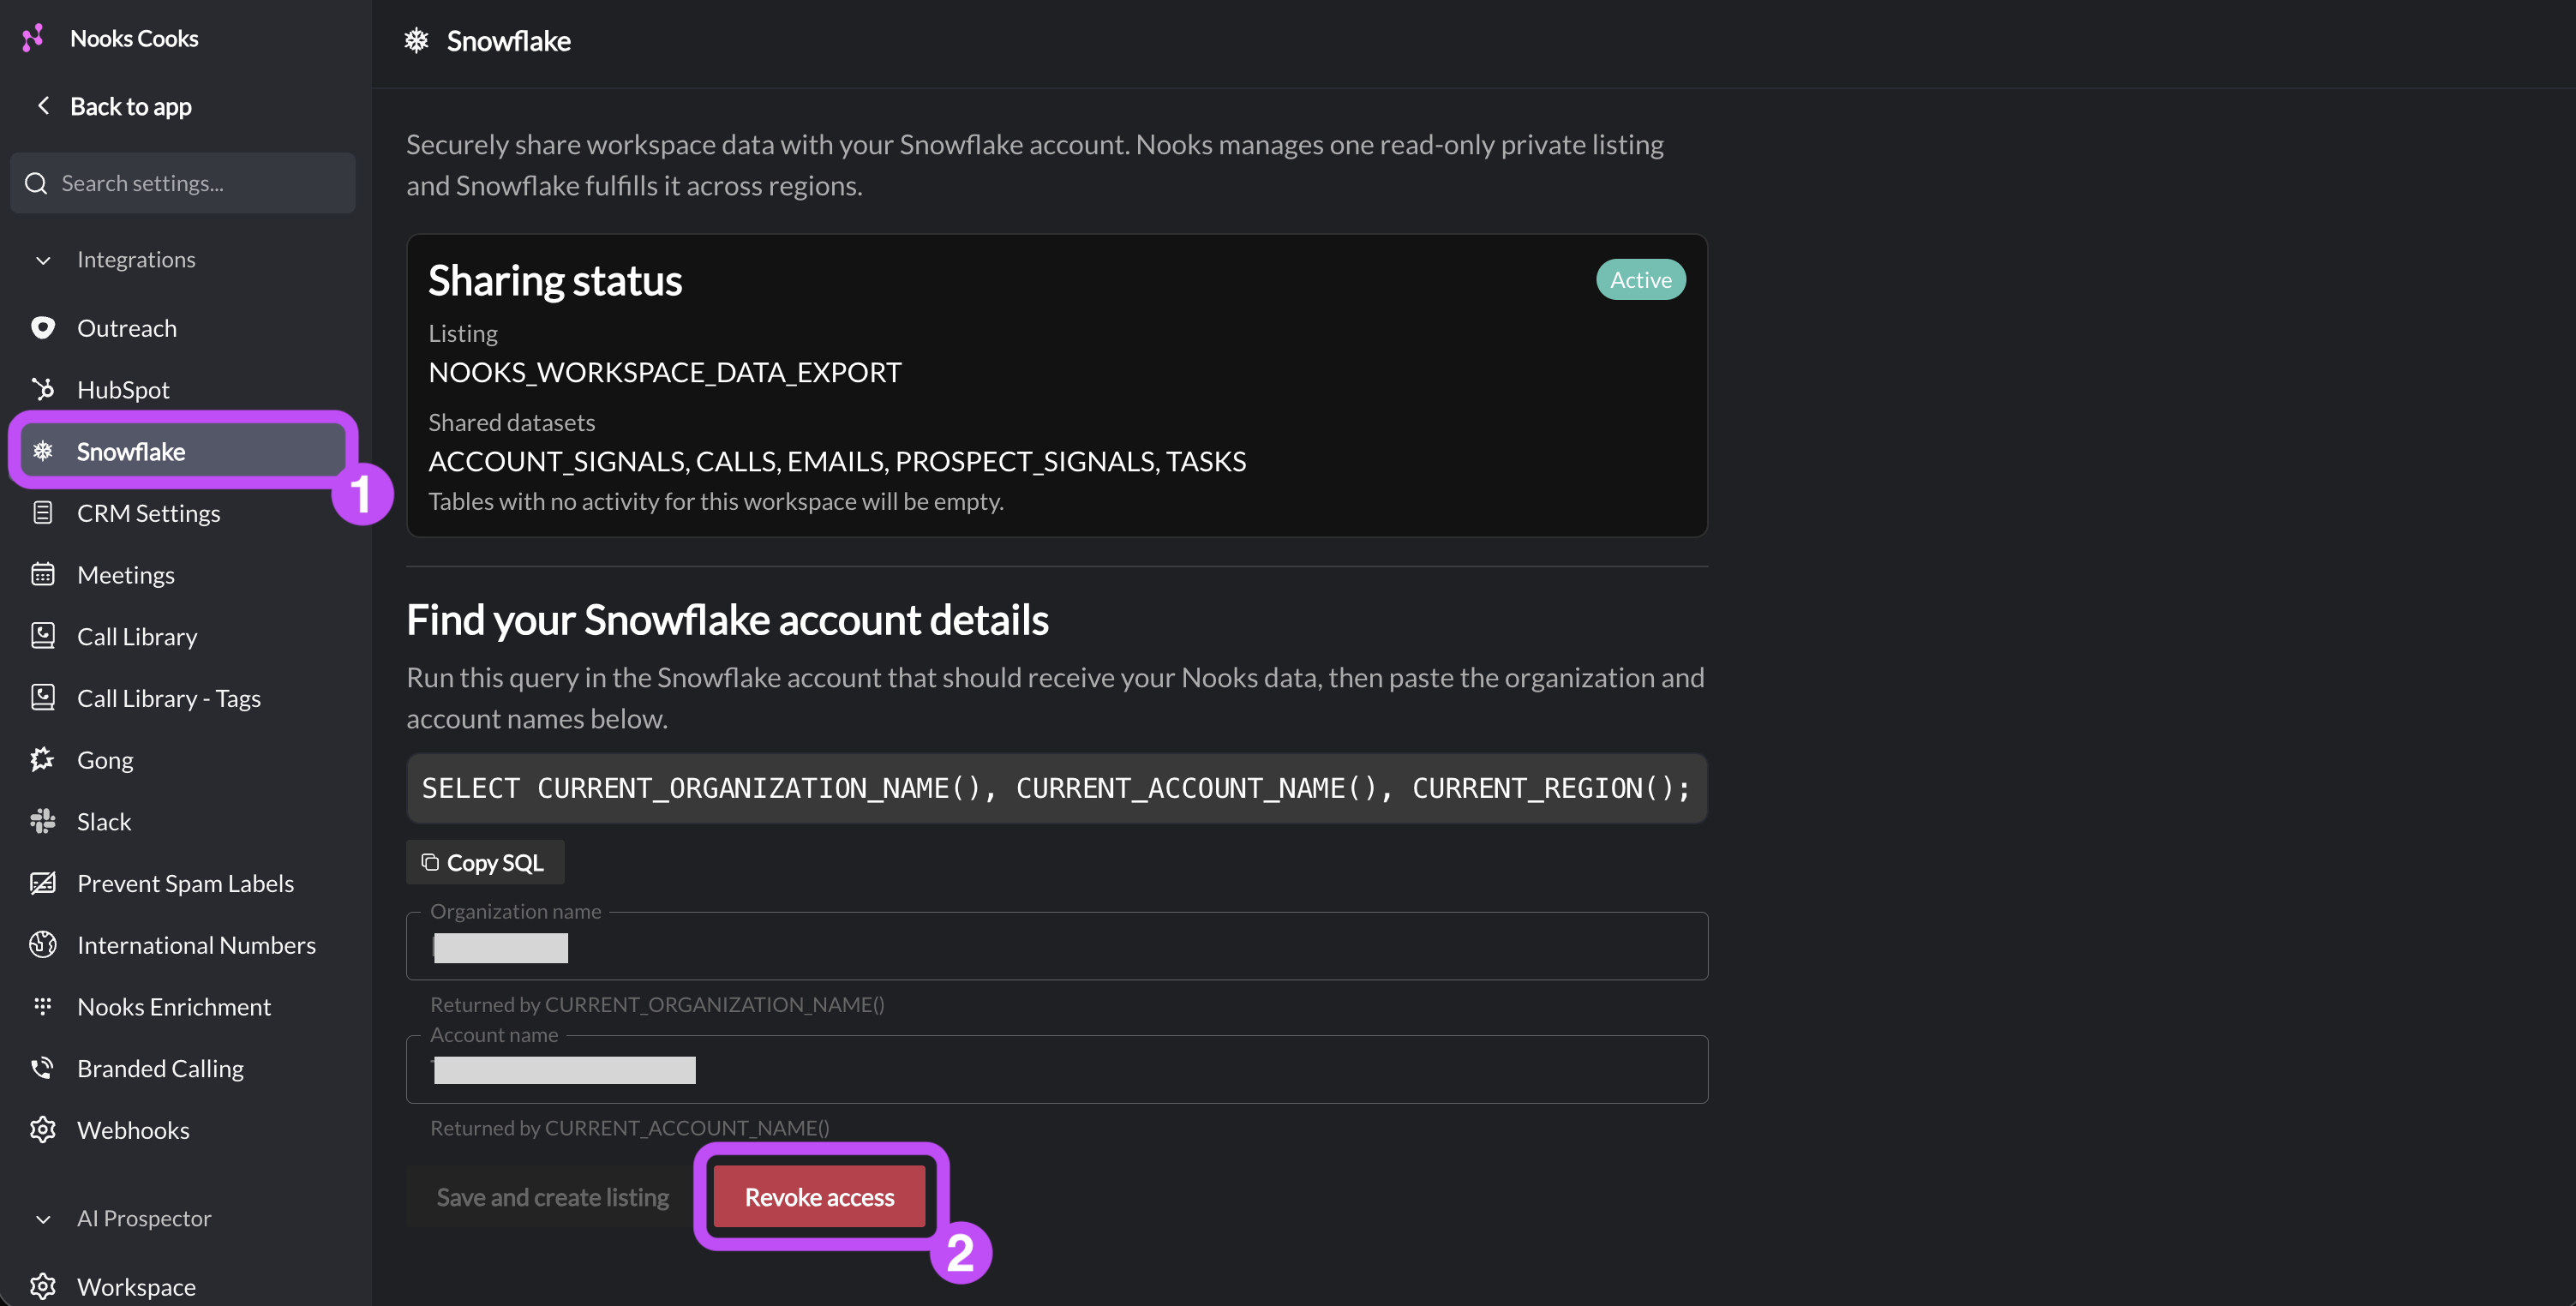
Once you revoke access, the shared views immediately return no rows for your account. Your Snowflake admin does not need to delete the database you. If you turn data sharing back on later for the same Snowflake account, the existing database becomes accessible again without you needing to recreate it.
Security, Privacy, and Data Governance
Use of the Nooks Data Share is governed by your existing agreement(s) with Nooks. Once data is shared into your Snowflake environment, you control that environment and are responsible for its configuration, access controls and any onward use. This article is provided for guidance and doesn't vary your agreement(s) or create additional warranties.
Get Help
If you encounter a problem with the Nooks Data Sharing integration, contact Nooks Support with a description of what you are seeing versus what you expect to see.
FAQs
How frequently is data updated?
Nooks refreshes your shared data on a regular, 6 hour cadence.
Can I modify the shared tables?
No. The shared tables are read-only, secure views.
Is Data Sharing available in every Snowflake region or cloud?
Yes. Nooks Data Sharing works across Snowflake regions and cloud providers. Snowflake handles the cross-region replication automatically.
How much historical data is available?
The integration shares all of your Workspace's historical Nooks data with your Snowflake account.
Our team has the Nooks Dialer but not Nooks Sequencing. Can we use the Snowflake integration?
Yes. The Nooks Data Share integration is available to all Nooks Workspaces. Without Nook Sequencing, the Calls table contains your data and its sequence_ columns are null. The Account Signals and Prospect Signals also contain data if your Workspace has AI Prospector. The Emails and Tasks tables appear in you data share but contain no data.
For more information on what data is shared based on the seats your Workspace holds, see this guide.
Can I share our Nooks Workspace's data with more than one Snowflake account?
No. Each Nooks Workspace shares data with one Snowflake account at a time. To change accounts, see the Connecting a Different Snowflake Account section in this guide.