How to Set Up a Nooks OAuth App
Last updated: September 24, 2026
This guide walks you through creating an OAuth application in Nooks, configuring its scopes and redirect URI, and using it to authenticate users on your end via the standard OAuth 2.0 authorization-code flow.
Availability: Creating a Nooks OAuth app is available only to users with a Nooks Sequencing seat, a Nooks Coaching seat, or both.
Background
OAuth lets your application access Nooks data on behalf of a user without that user ever sharing their password or a long-lived API key. Each user that connects to your app grants a specific set of permissions (scopes), and your app receives short-lived access tokens it can use to call the Nooks API.
Use an OAuth app instead of an API key when:
You are building an integration that will be installed by multiple Nooks workspaces or users.
You want users to grant — and revoke — access themselves.
You need scoped permissions rather than full account access.
For background on the Nooks public API, see the Nooks API documentation. If you only need to script against your own account, see How to Generate a Nooks API Key instead.
Creating a New OAuth App
This section will walk through creating a new OAuth App in Nooks. You will need to be a Workspace admin with a Nooks Sequencing or AI Coaching seat to complete these steps.
Step 1: Navigate to the OAuth Apps Tab
First, head to the OAuth Apps tab in the Developer page.
In Nooks, go to Developer in the left-hand navigation menu.
Open the OAuth Apps tab.
You'll see a list of any existing OAuth apps in your workspace.
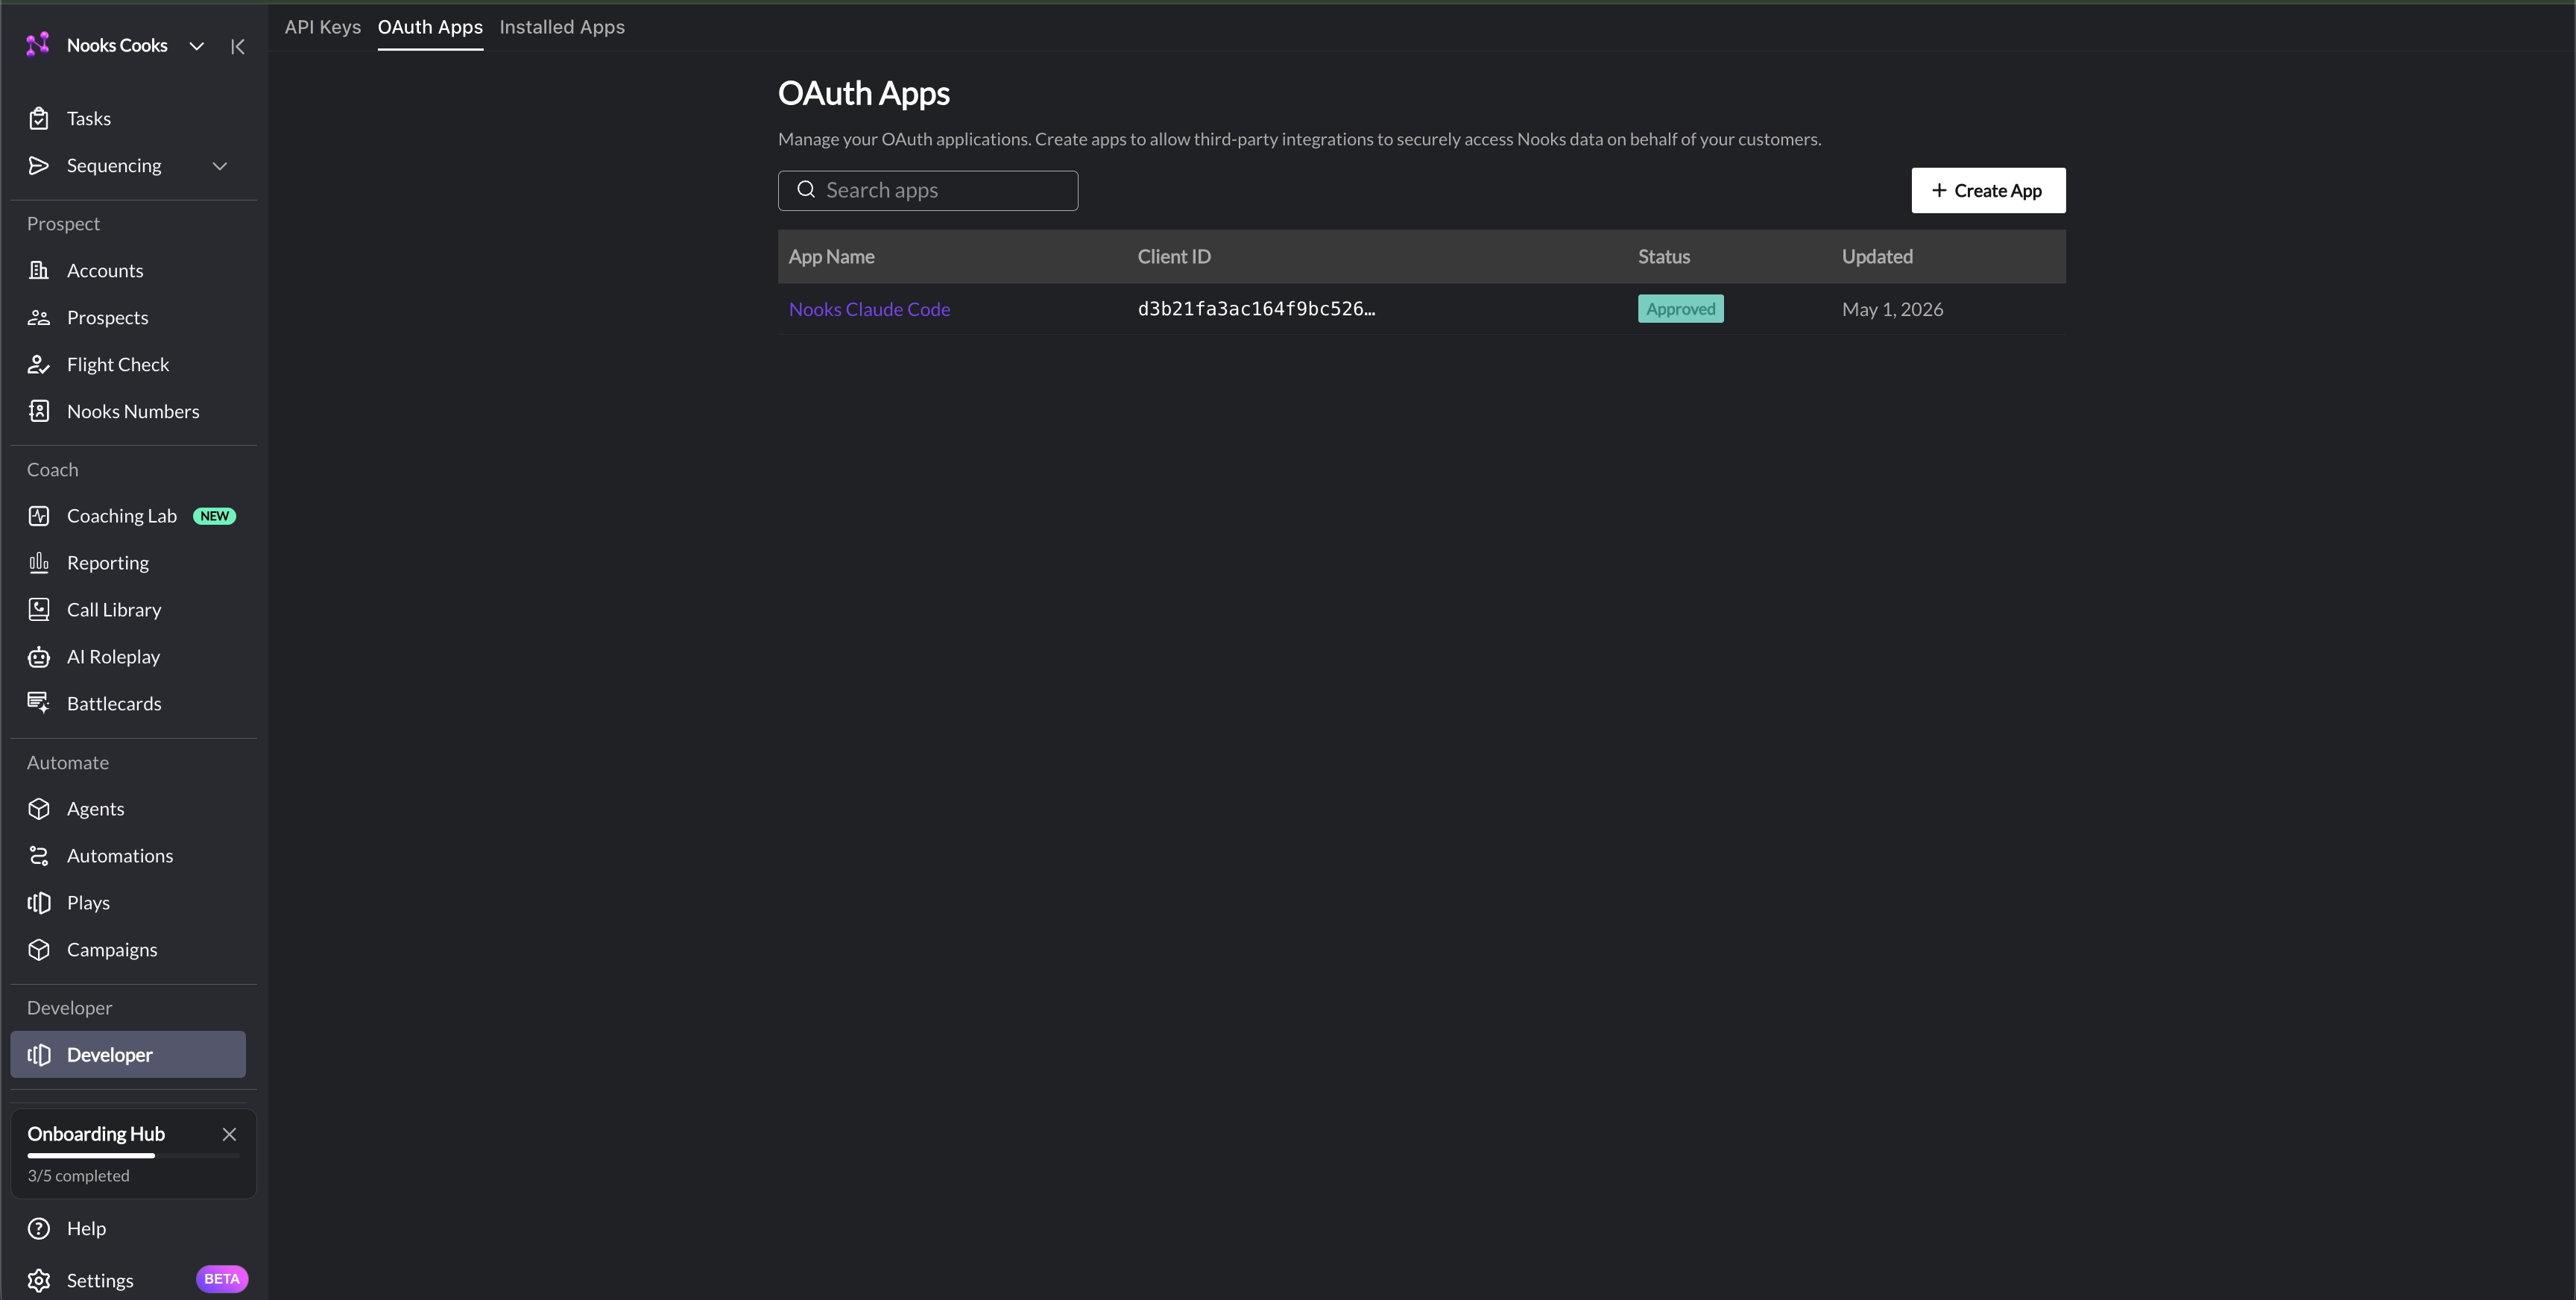
The table on this page contains the following columns.
Column | Description |
Name | The display name shown to users on the consent screen. |
Client ID | The public identifier for your app. Safe to embed in client-side code. |
Status | Indication of whether the app is "Private," "In Review," "Published," or "Rejected." Refer to OAuth App Statuses for more information. |
Updated | The date the app was last updated. |
Step 2: Create a New OAuth App
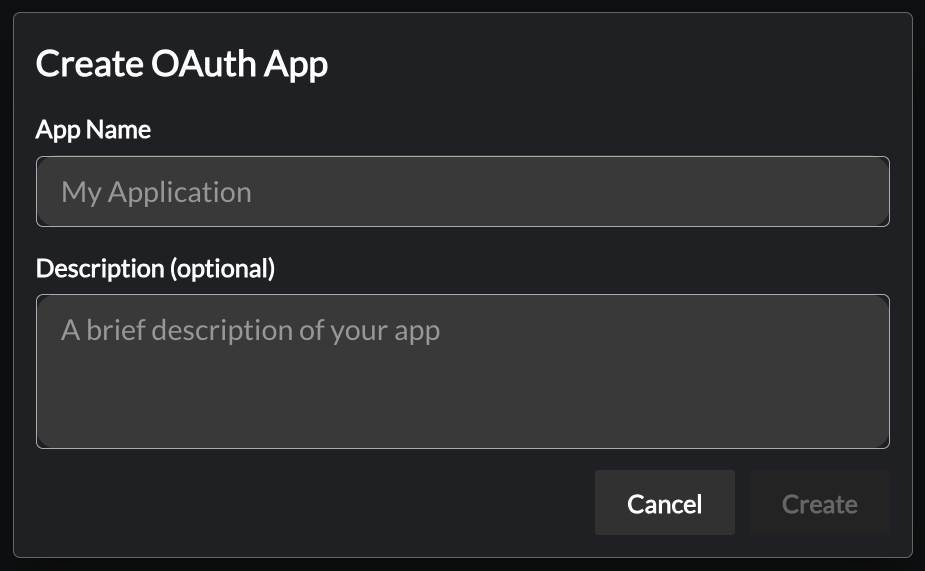
Click + New OAuth App in the top right.
Fill in the form:
App Name – Shown to users on the consent screen. Keep it short and recognizable (e.g., "Acme CRM Sync").
App Description (optional) – One-line summary of what your app does. Also shown on the consent screen.
Click Create.
Step 3: Copy Your Client Credentials
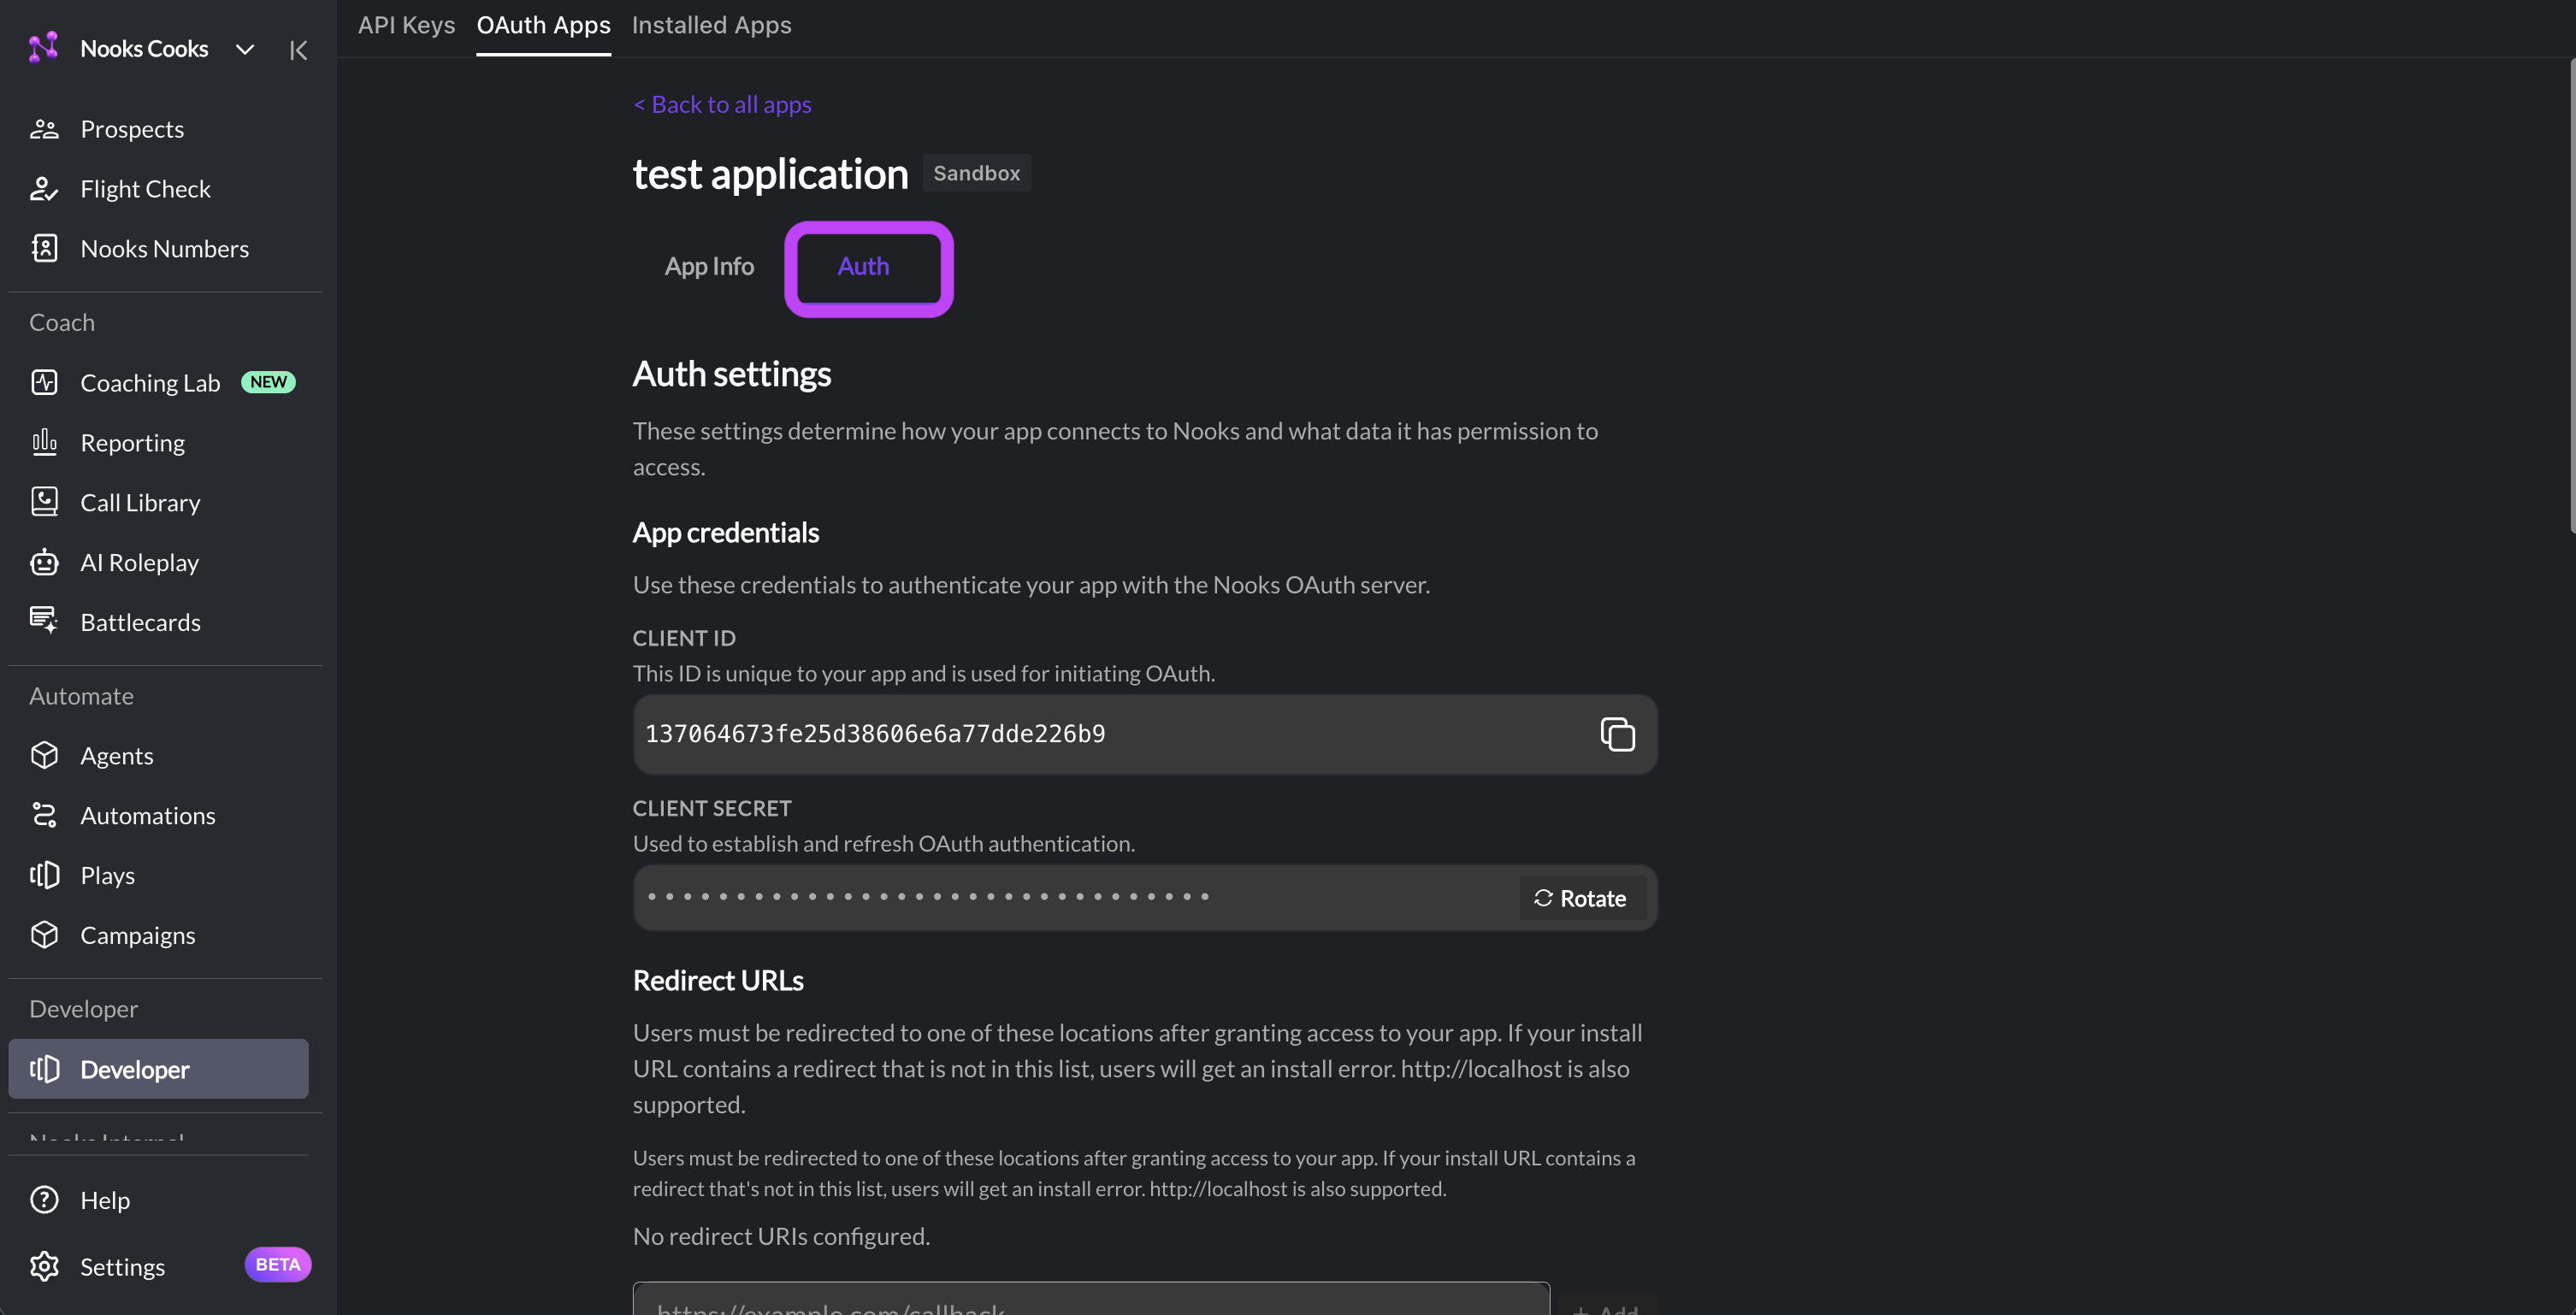
Once created, you'll see your Client ID and Client Secret.
Client ID is public — it appears in authorization URLs and can be safely embedded in your frontend.
Client Secret is private — it must only be used from your backend when exchanging codes for tokens or refreshing tokens. Never embed it in client-side code.
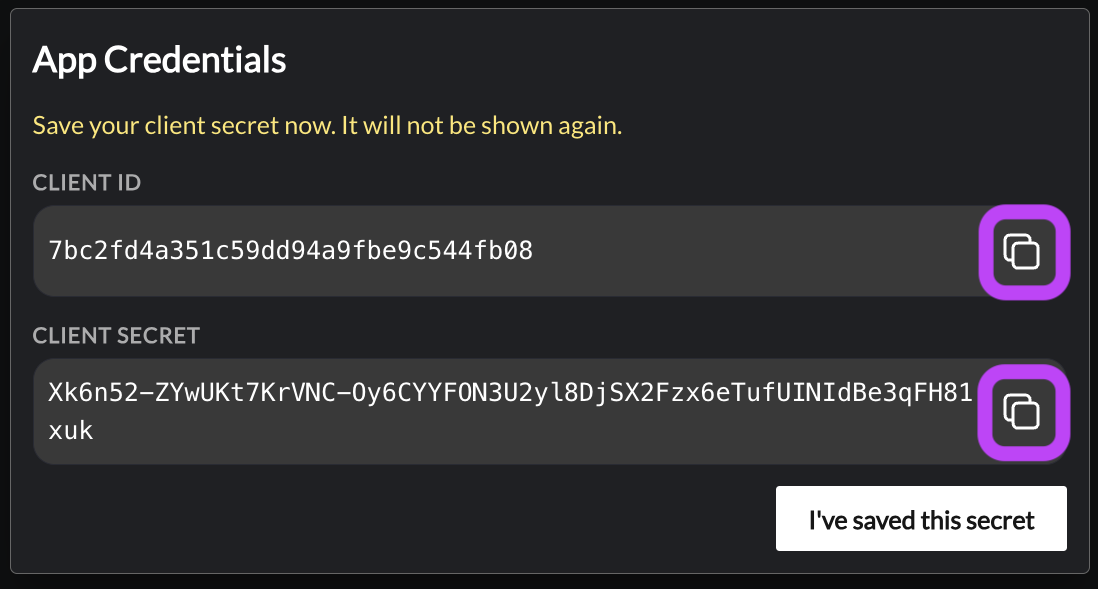
Your client secret will only be shown once. Copy it now using the clipboard icon and store it somewhere secure (e.g., a secret manager). If you lose it, you'll need to rotate the secret from the app's settings page.
Step 4: Fill in the App Details
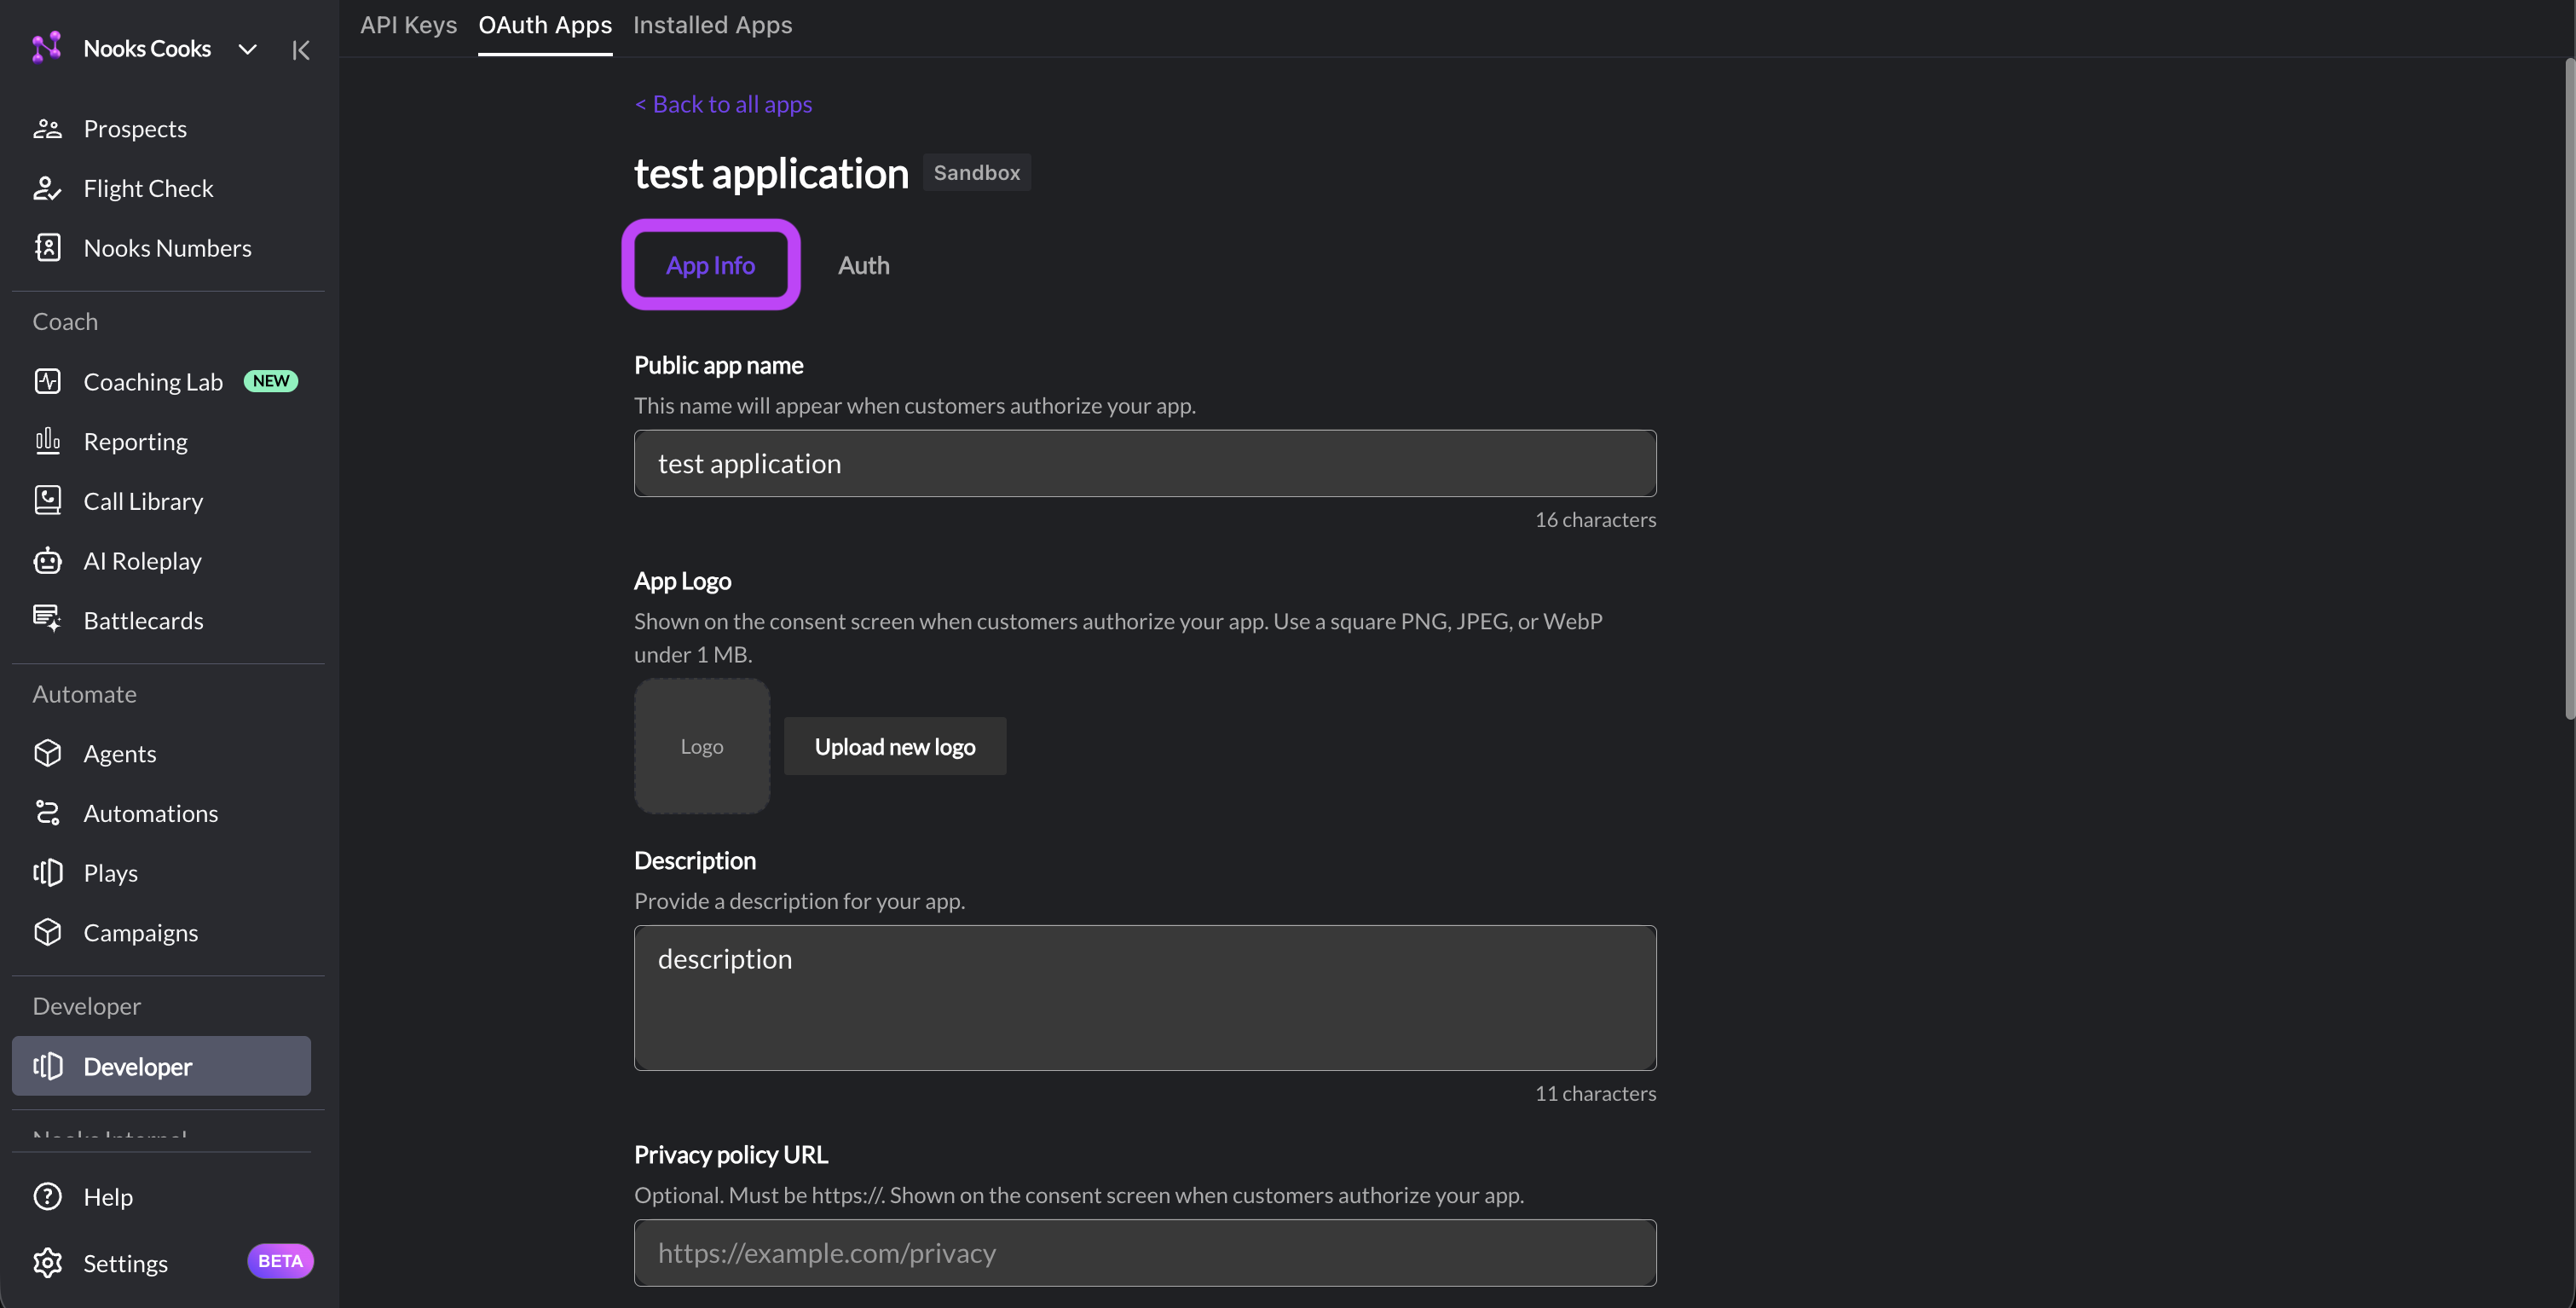
You should now see the full form to edit your application. Ensure that these fields are filled in.
First, in the App Info tab:
Logo URL (optional) — A square image (PNG/SVG) shown on the consent screen.
Privacy Policy URL (optional) – Shown on the consent screen when users authorize your app. Must be in
https://format.Terms of Service URL (optional) – Shown on the consent screen when users authorize your app. Must be in
https://format.
Next, in the Auth tab:
Redirect URI(s) — One or more URLs that Nooks will redirect users back to after they authorize your app. Production redirect URIs must use HTTPS. You can add multiple URIs (e.g. one for production, one for local development like
http://localhost:3000/oauth/callback).
Scopes
Scopes define which Nooks API endpoints your app is allowed to call on behalf of a user. Only request the scopes your app actually needs — users will see every scope you request on the consent screen, and over-requesting reduces install conversion.
Common scopes include:
Scope | What Claude Can Do | New As Of |
| View your accounts | |
| View your prospects | |
| Update prospects based on data from your CRM | |
| Create notes on CRM-backed prospects and accounts | |
| View your Nooks Sequences | |
| Create, edit, and manage Sequences | August 2026 |
| View Nooks Sequence steps | |
| Create, edit, reorder, and delete Sequence steps | August 2026 |
| View Nooks Sequence enrollments | |
| Manage your Nooks Sequence enrollments (i.e., enroll prospects, and finish, stop, or delete enrollments) | |
| View your tasks created via Nooks Sequencing | |
| Create, update, complete, skip, delete Nooks Sequencing tasks | |
| View your calls placed via Nooks Sequencing | |
| View call dispositions | |
| View your emails sent, received, or synced via Nooks Sequencing | |
| Send emails on your behalf and log an email activity | August 2026 |
| View Nooks email templates | |
| View connected mailboxes | |
| View users in your workspace | |
| View teams in your workspace | July 2026 |
| View call transcripts and reporting data | July 2026 |
You can select which scopes to request within the app's Auth tab.
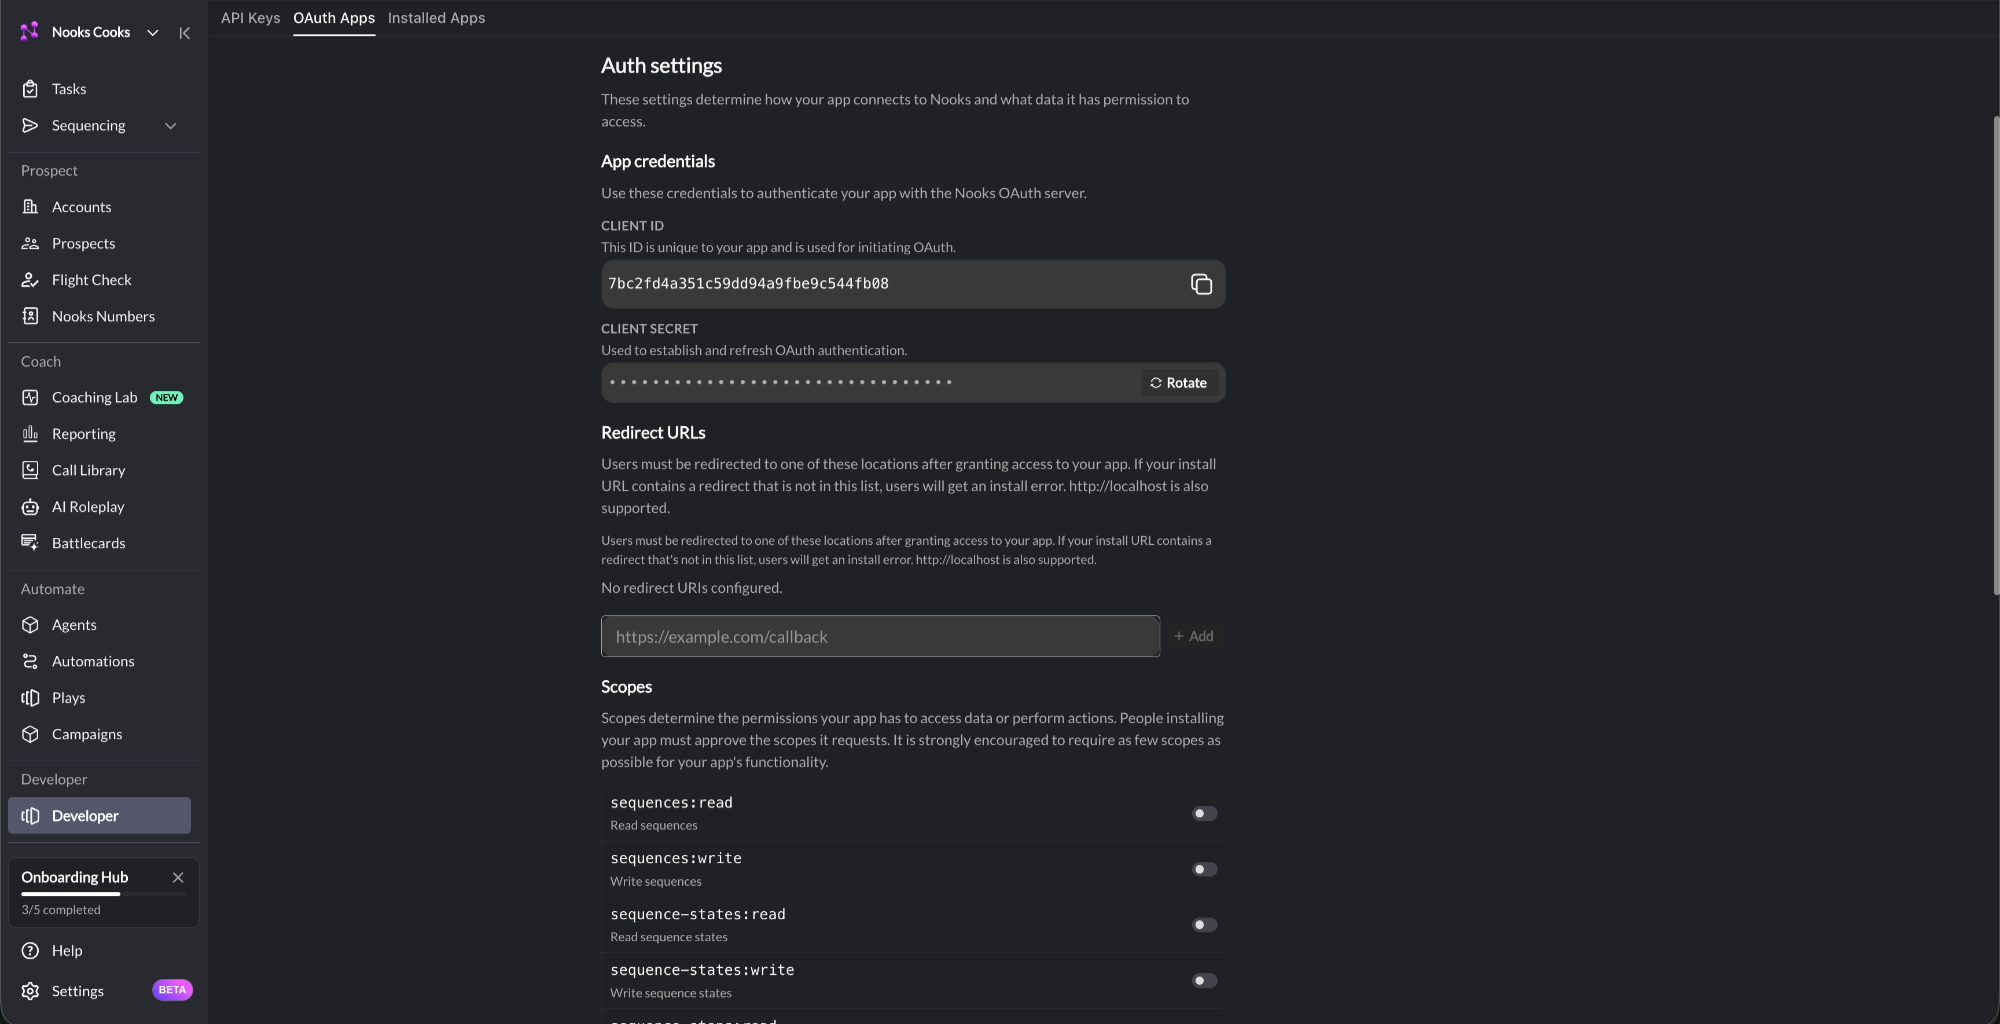
The access tokens your app receives will reflect the scopes the user consented to. Calls to endpoints outside those scopes will return a 403 Forbidden.
Submitting an OAuth App for Review
When you create an OAuth app, it is immediately available for use within your own Nooks Workspace. To make your app available for installation in other Nooks Workspaces, you must submit it for review and publication.
Before submitting your app, confirm that it meets the following requirements:
The app name and description are complete and accurate.
At least one redirect URL is configured.
Only the minimum required OAuth scopes are enabled.
Your app correctly handles token refresh and OAuth error responses. (See The OAuth 2.0 Flow section below.)
To submit your app for review:
Go to Developer → OAuth Apps.
Select the OAuth app you want to publish.
On the App Info tab, click Submit for Review.
After submission, your app's status changes to In Review while the Nooks team evaluates it. Reviews typically take 1–2 business days. During this time, the app remains fully available for use within your own Nooks Workspace.
Once your app is approved, its status changes to Published. Published apps can be installed and used by other Nooks Workspaces.
OAuth App Statuses
Every OAuth app you create is immediately available within your own Nooks Workspace. An app's status indicates whether it is also available for installation by other Nooks Workspaces after it has been submitted for review.
Status | Meaning |
Private | The app is able to run in your own Nooks Workspace without any approval required. Submit it for review to let other Nooks Workspaces install it. |
In Review | Nooks is reviewing your app before other Nooks Workspaces can install it. This process usually takes 1–2 business days. The app remains available for use in your own Nooks Workspace throughout this process. |
Published | Nooks has approved your app. It is now able to be installed in and used by other Nooks Workspaces. |
Rejected | Nooks did not approve your app for publication. The app remains available for use within your own Nooks Workspace, but it cannot be installed by other Nooks Workspaces yet. Contact Nooks support for details about the rejection and guidance on the changes needed before resubmitting your app for review. |
The OAuth 2.0 Flow
Nooks uses the standard OAuth 2.0 authorization-code flow with PKCE. PKCE (Proof Key for Code Exchange) is required for all clients, including confidential server-side apps. It prevents an attacker who intercepts your authorization code from being able to redeem it.
Step 1: Generate a PKCE Code Verifier and Challenge
Before redirecting the user to the Nooks authentication page, generate a one-time PKCE pair for this auth attempt and store the verifier in the user's session:
code_verifier— A cryptographically random string, 43–128 characters long, using[A-Z] [a-z] [0-9] - . _ ~.code_challenge— The base64url-encoded SHA-256 hash of the verifier (no padding).
Example (Node.js):
import crypto from "node:crypto";

const codeVerifier = crypto.randomBytes(32).toString("base64url");
const codeChallenge = crypto
  .createHash("sha256")
  .update(codeVerifier)
  .digest("base64url");
Store codeVerifier server-side (keyed by session or state) — you'll need it in Step 4.
Step 2: Redirect the User to the Authorization URL
Send the user to:
https://app.nooks.ai/oauth/authorize
  ?client_id=YOUR_CLIENT_ID
  &redirect_uri=YOUR_REDIRECT_URI
  &scope=prospects:read%20sequences:write
  &state=RANDOM_STRING
  &response_type=code
  &code_challenge=YOUR_CODE_CHALLENGE
  &code_challenge_method=S256
Parameter | Required | Description |
| Yes | Your app's Client ID. |
| Yes | One of the redirect URIs registered on your app. Must match exactly. |
| Yes | Space-separated list of scopes your app is requesting. |
| Recommended | An opaque, unguessable value your app generates per-request. Nooks will return it unchanged on the redirect, allowing you to verify the response and prevent CSRF. Distinct from PKCE — |
| Yes | Must be |
| Yes | The base64url-encoded SHA-256 hash of your |
| Yes | Must be |
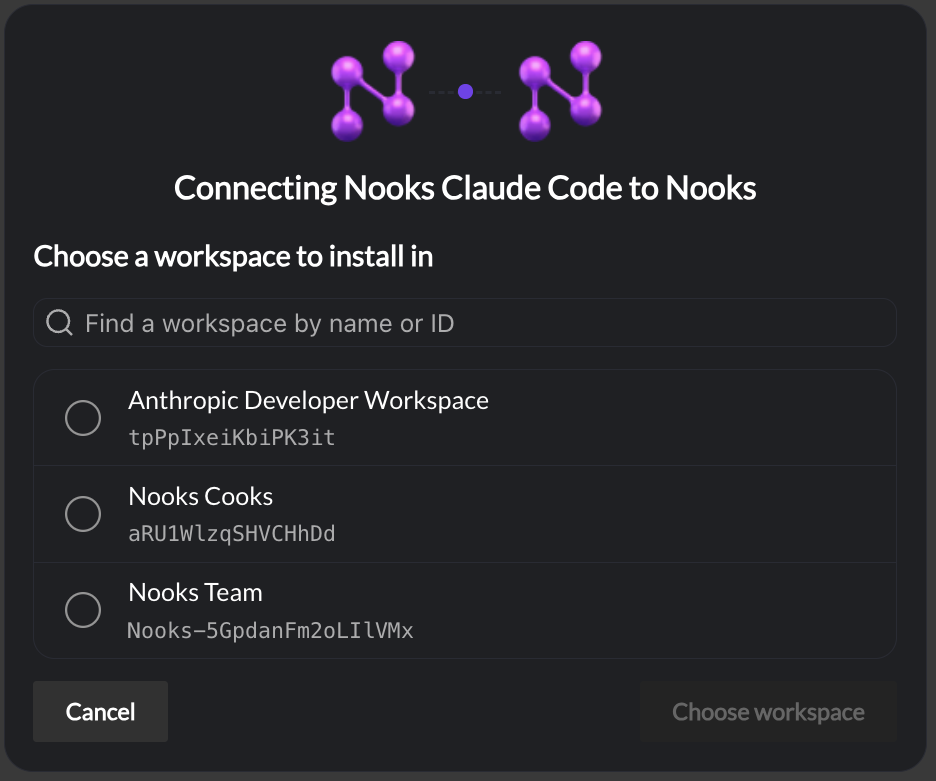
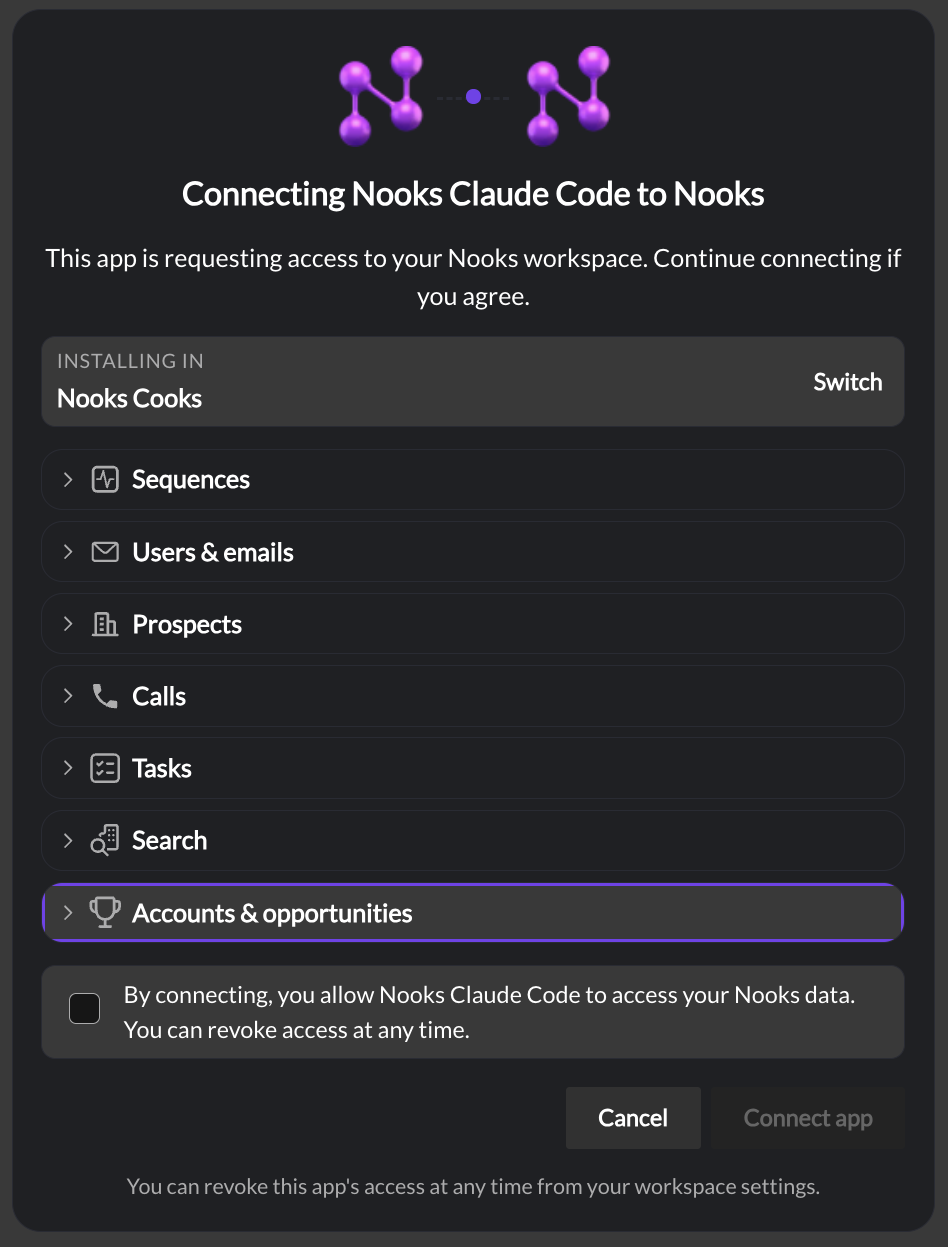
The user will be shown a consent screen listing your app's name, logo, and the scopes you've requested.
Step 3: Handle the Redirect
After the user clicks Allow, Nooks redirects them to your redirect_uri with an authorization code:
https://your-app.com/oauth/callback?code=AUTH_CODE&state=RANDOM_STRINGIf the user denies access, you'll receive ?error=access_denied instead. Always verify that the returned state matches the one you generated before continuing, and look up the matching code_verifier you stored in Step 1.
Step 4: Exchange the Code for Tokens
From your backend, exchange the authorization code for an access token and refresh token. Include the original code_verifier — Nooks will hash it and compare against the code_challenge you sent in Step 2.
POST https://app.nooks.ai/oauth/token
Content-Type: application/x-www-form-urlencoded

grant_type=authorization_code
&code=AUTH_CODE
&client_id=YOUR_CLIENT_ID
&client_secret=YOUR_CLIENT_SECRET
&redirect_uri=YOUR_REDIRECT_URI
&code_verifier=YOUR_CODE_VERIFIER
If the code_verifier is missing or doesn't match, the token endpoint returns 400 invalid_grant.
A successful response looks like:
{
  "access_token": "...",
  "refresh_token": "...",
  "expires_in": 3600,
  "token_type": "Bearer",
  "scope": "prospects:read sequences:write"
}
Authorization codes are single-use and expire within a few minutes — exchange them immediately.
Step 5: Call the Nooks API
Use the access token in the Authorization header on each API request:
Authorization: Bearer <access_token>Step 6: Refresh the Access Token
Access tokens expire after expires_in seconds (currently 1 hour). When yours is close to expiring, use the refresh token to get a new one:
POST https://app.nooks.ai/oauth/token
Content-Type: application/x-www-form-urlencoded

grant_type=refresh_token
&refresh_token=YOUR_REFRESH_TOKEN
&client_id=YOUR_CLIENT_ID
&client_secret=YOUR_CLIENT_SECRET
Refresh tokens are long-lived but can be revoked by the user at any time from their Nooks settings. If a refresh call returns 400 invalid_grant, the user has disconnected your app and must re-authorize.
Rotating or Revoking Client Secrets
If a client secret is leaked, rotate it immediately:
Go to Developer → OAuth Apps and open your app.
Click Rotate secret.
Copy the new secret and deploy it to your backend.
The old secret stops working immediately — any in-flight token exchanges using it will fail.
Allowing Additional Scopes on an OAuth App
After creating an OAuth app, you can update its allowed scopes as needed. For example, you may need to add scopes when Nooks MCP introduces new tools and capabilities, or as your team's needs change.
In Nooks, go to Developer → OAuth Apps.
Click into the OAuth app you want to update.
In the Auth tab, toggle scopes on or off.
Click Save.
After saving the updated scopes for your OAuth app, end-users may need to reconnect to the OAuth app to authorize any newly added scopes.
Deleting an OAuth App
Deleting an app immediately invalidates all access and refresh tokens issued under it. Any users who had connected the app will need to re-authorize if you create a new one.
In Nooks, go to Developer → OAuth Apps.
Click into the OAuth app you want to delete.
In the App Info tab, click Delete.
Click Delete in the confirmation dialog.
You'll see an "App deleted" confirmation notification in the top-right of the screen.
Warning: Deleting an OAuth app is permanent and cannot be undone. Only delete OAuth apps you do not plan to use in the future.