Nooks SCIM User Guide
Last updated: September 30, 2026
This guide explains how to set up and manage the SCIM integration between your identity provider (IdP) and Nooks. Once it has been configured, you can provision users, assign seats and roles, and grant add-on entitlements (such as Coaching, Interantional, and Sequencing) all from your IdP.
Overview
SCIM lets your IdP, such as Okta or Azure AD, automatically create, update, and deactivate users in Nooks. Nooks reads two attributes on each user to decide what the user can access:
Entitlements set the user's seat (Bullpen, Bullpen + Power Dialer, or Bullpen + Parallel Dialer) and any add-ons (Coaching, International, or Sequencing).
Roles set the user's permission level (User, Manager, or Admin).
Workspace admins can also configure Admin Group Configuration Overrides in Nooks., These set access for every member of a SCIM group and take priority over individual user entitlements.
Assigning Sequencing access through SCIM requires a few additional steps. The Sequencing entitlement gives a user access to Nooks Sequencing. Mapping the user's SCIM group to a Sequencing Plan then sets how many AI Credits that user receives per week. Refer to the Managing Sequencing Access via SCIM section for more.
Quick Start
Setting up SCIM consists of main two steps. First, enable SCIM in Nooks. Next, connect your IdP using the Base URL and Bearer Token that Nooks generates.
Step 1: Enable SCIM in Nooks
To enable SCIM and generate credentials for your Workspace, you must be an admin in Nooks.
Log into Nooks.
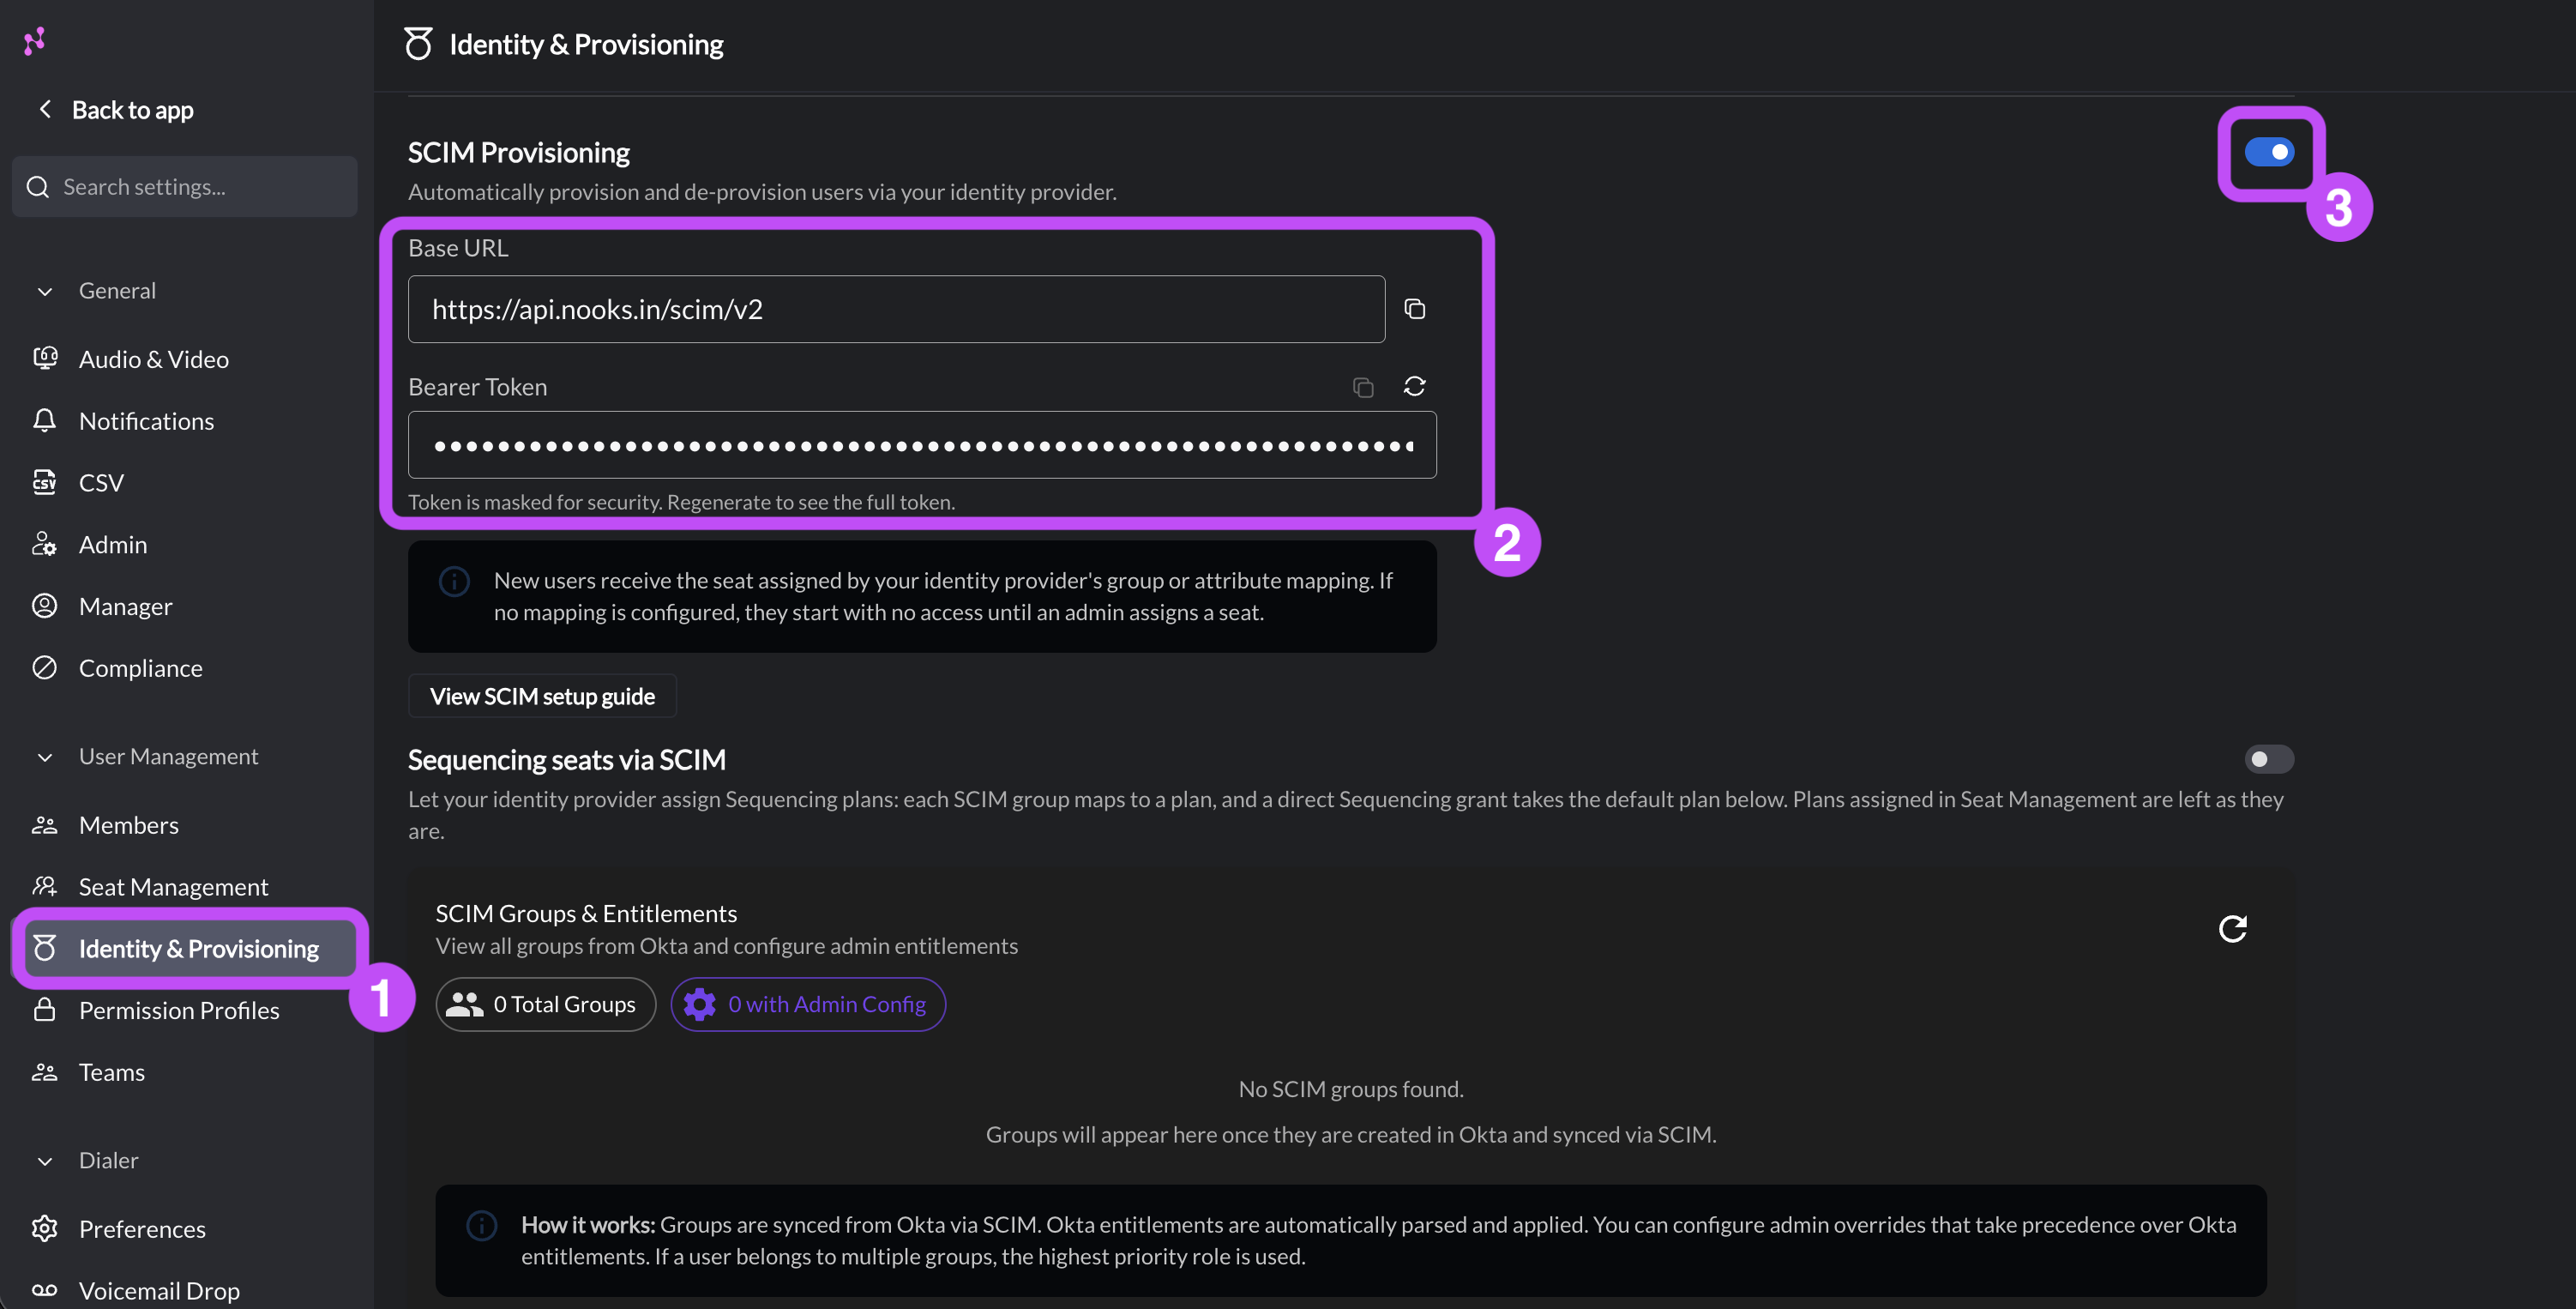
Go to Settings → All Settings.
Under User Management, select Identity and Provisioning.
Turn on the SCIM Provisioning toggle.
Click the regenerate (🔄) icon to generate your bearer token. Then, click the copy button by both the Base URL and Bearer Token copy them to a secure location. You will need these when configuring your IdP.
Note: The token is masked after it is generated for security reasons. If you cannot copy the token, click the regenerate icon to generate a new token.
Step 2: Configure Identity Provider
Follow the instructions for your IdP below.
Okta
Create the SCIM App:
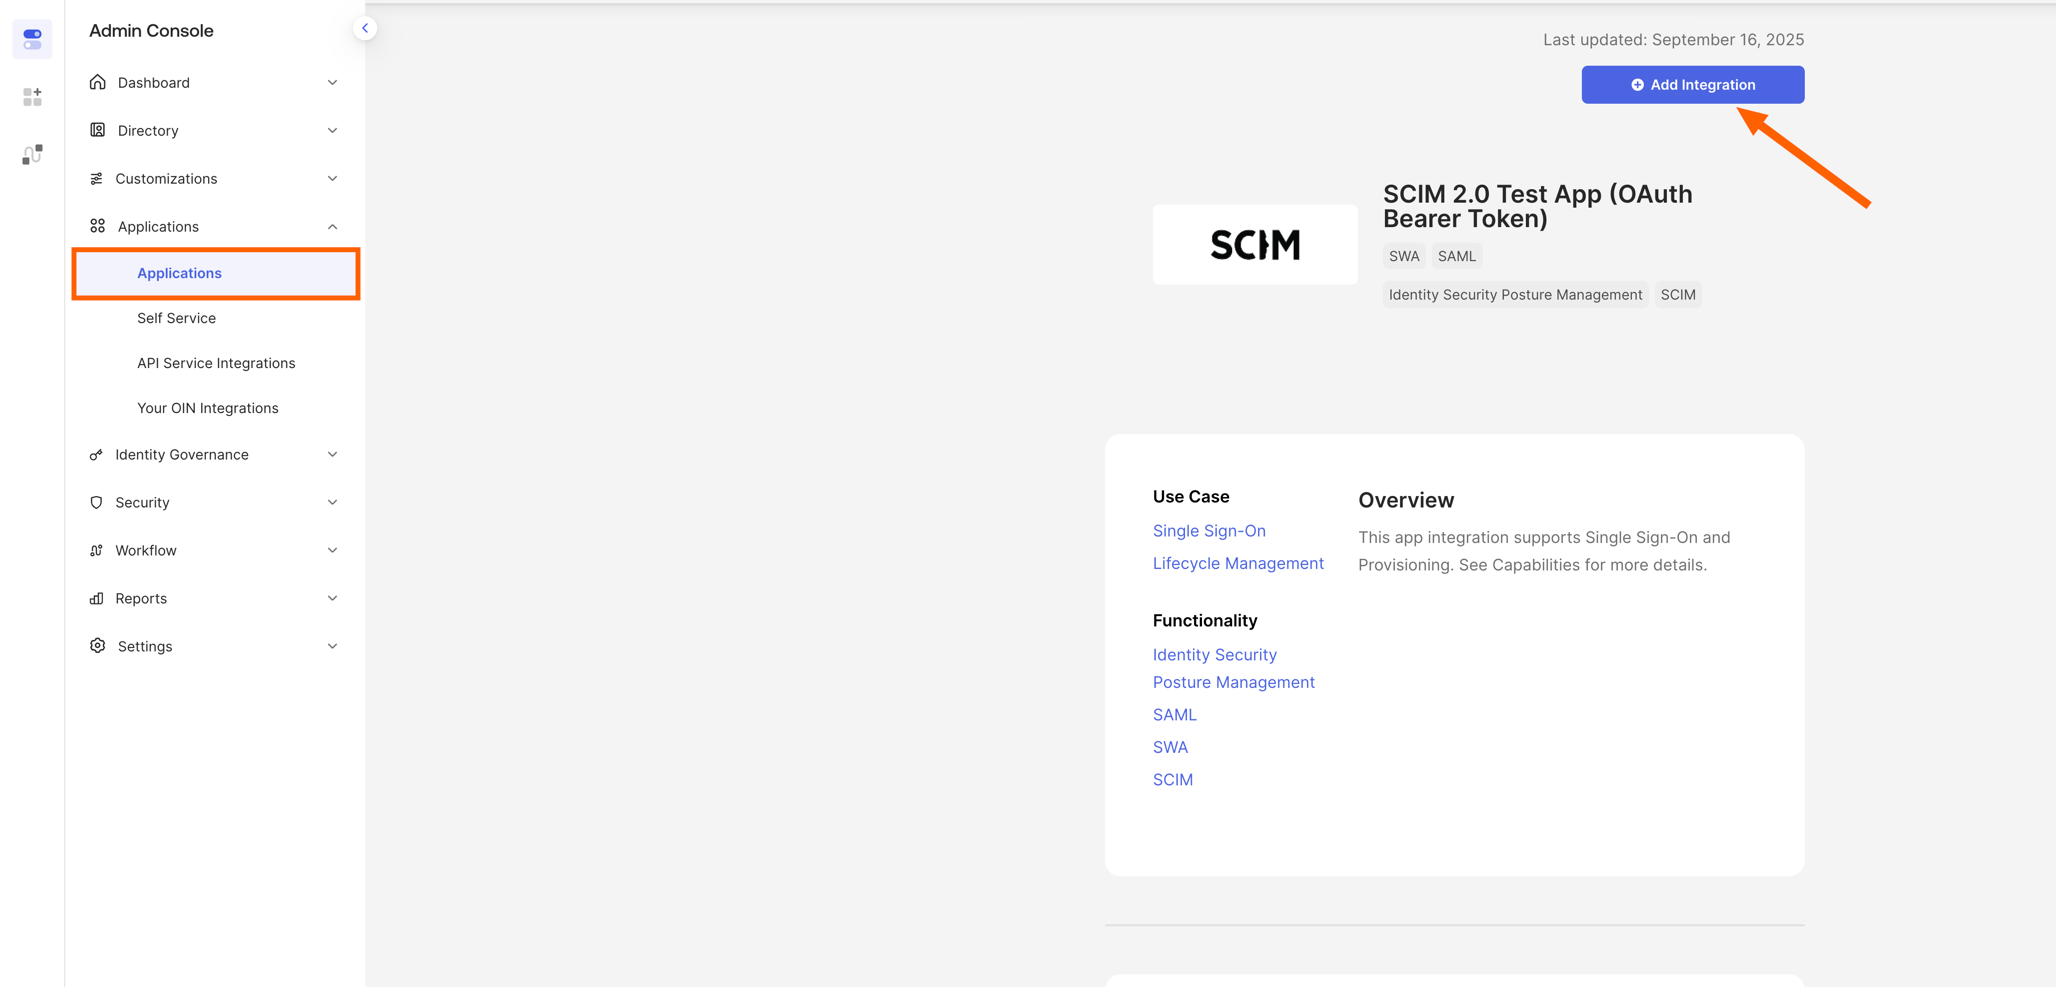
In the Okta Admin Console, go to Applications → Applications → Browse App Catalog.
Search for SCIM 2.0 Test App (OAuth Bearer Token) and select Add Integration.
Configure the API Integration:
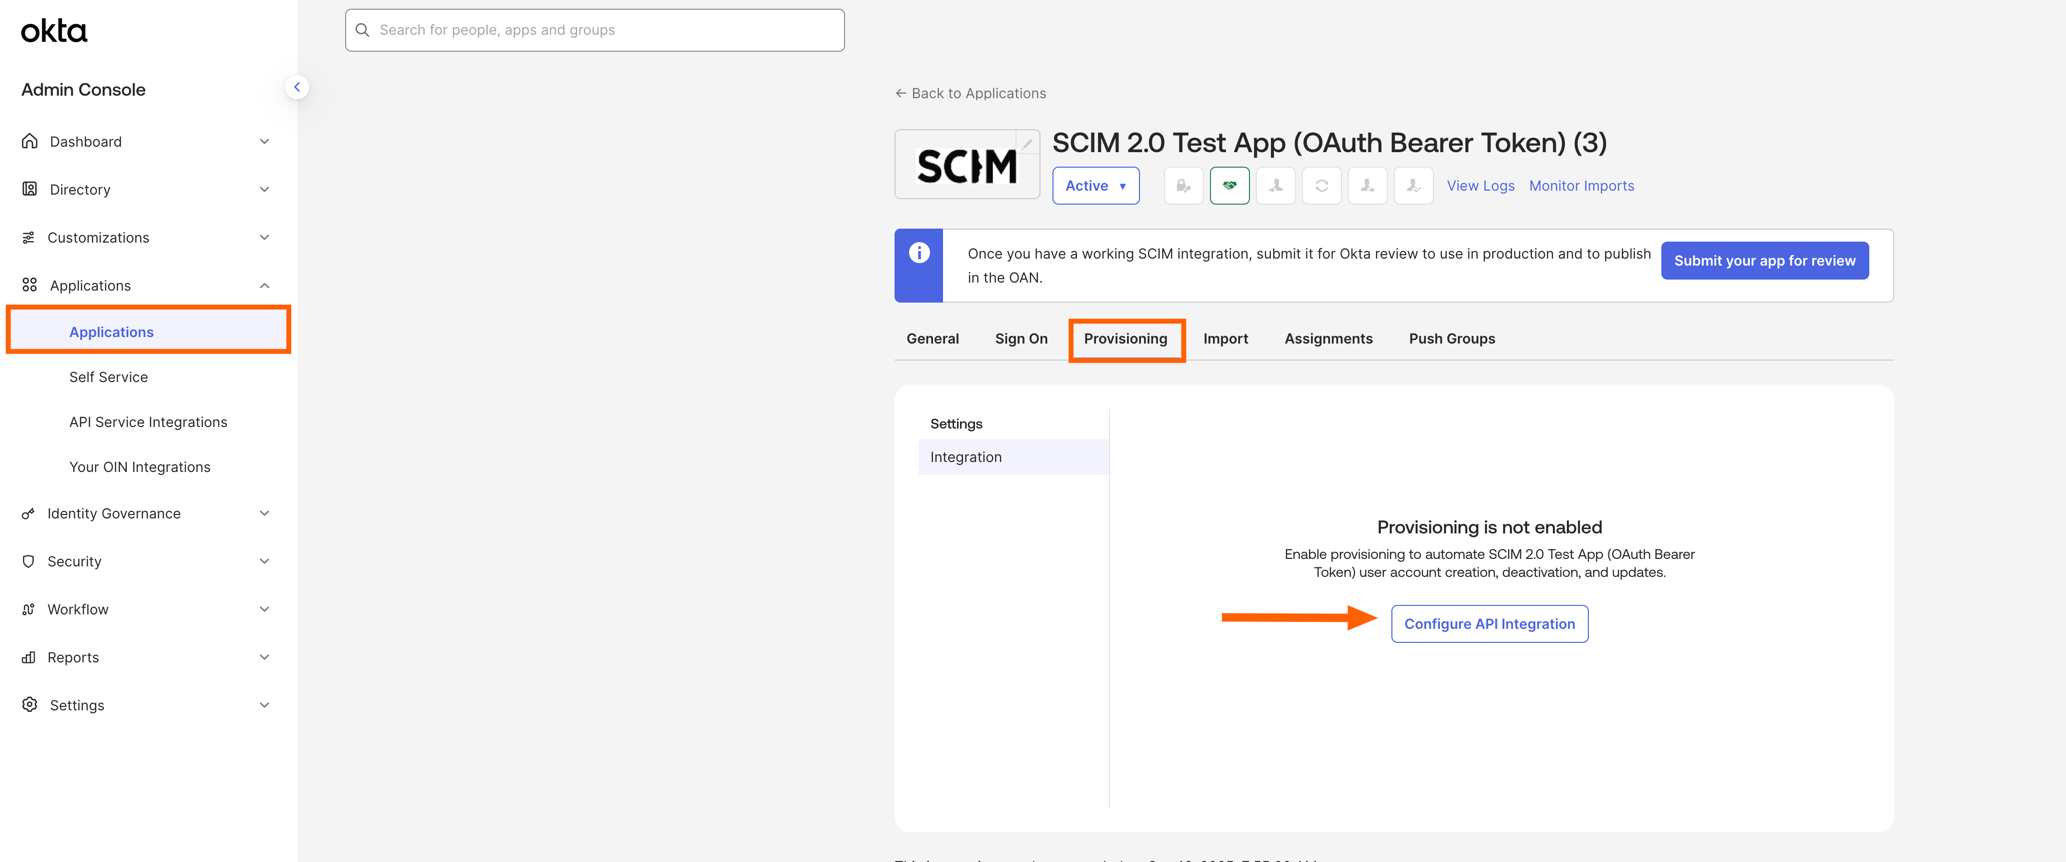
In Okta Admin Console, go to Applications → Applications, and select the new SCIM App.
Select the Provisioning tab and click Configure API Integration.
Select the Enable API Integration checkbox.
Enter the following values:
SCIM 2.0 Base URL:
https://api.nooks.in/scim/v2OAuth Bearer Token: The Nooks bearer token you generated and copied in Step 1.
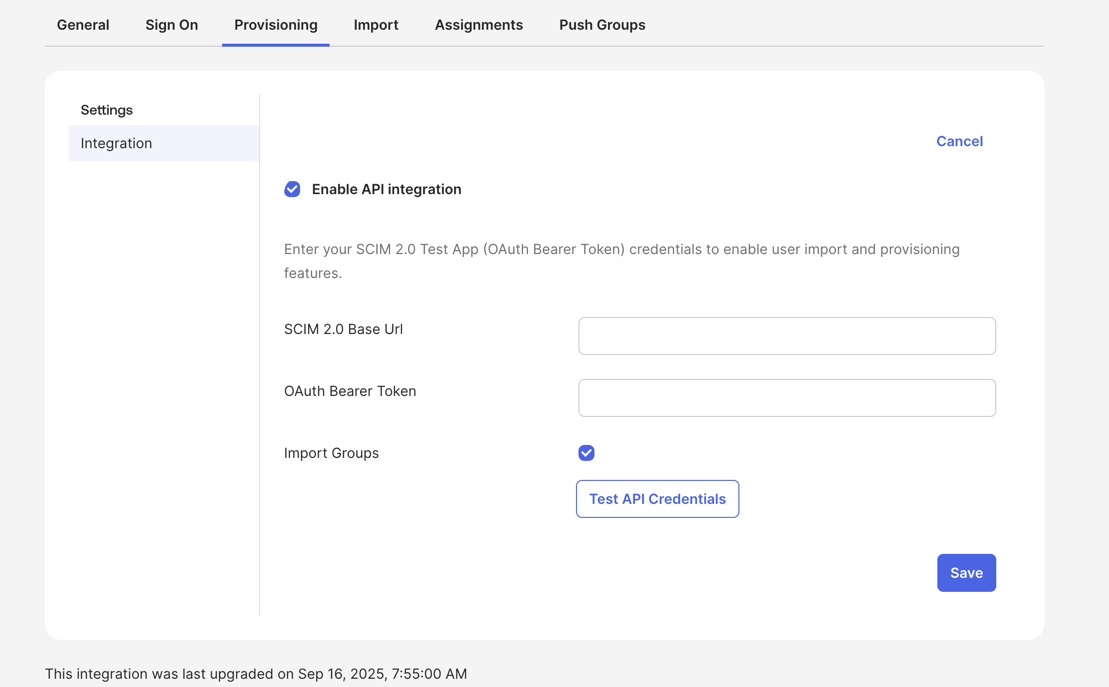
Click Save.
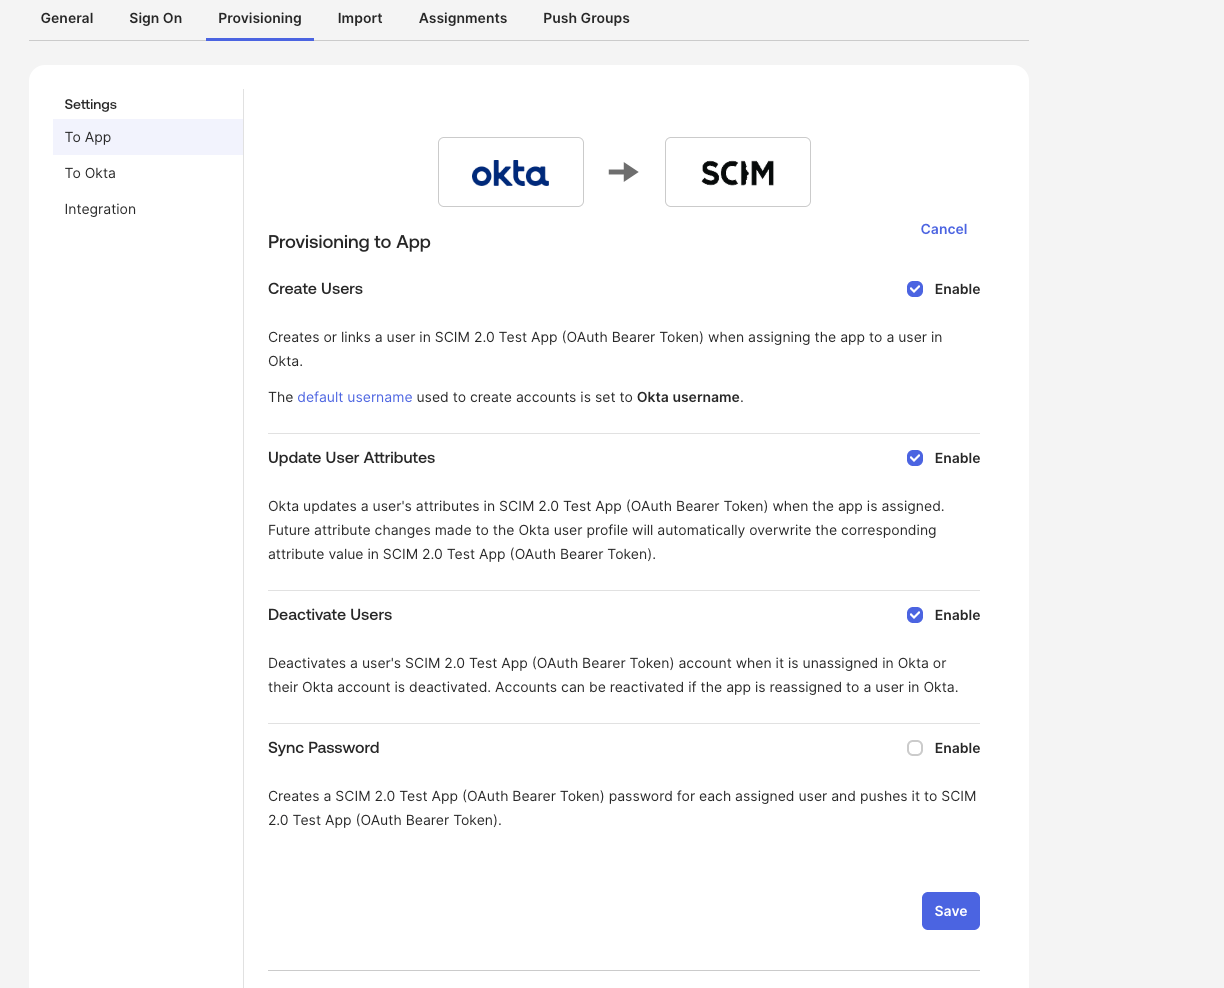
Add Provisioning to App permissions. Typically, you want the SCIM connector to handle all provisioning, de-provisioning, and permissions updates based on Okta roles. To allow this:
In Okta Admin Console, go to Applications → Applications, then select the new SCIM App.
Select the Provisioning tab, then To App.
Enable Create Users, Update User Attributes, and Deactivate Users.
Click Save.
Create Custom Attributes.
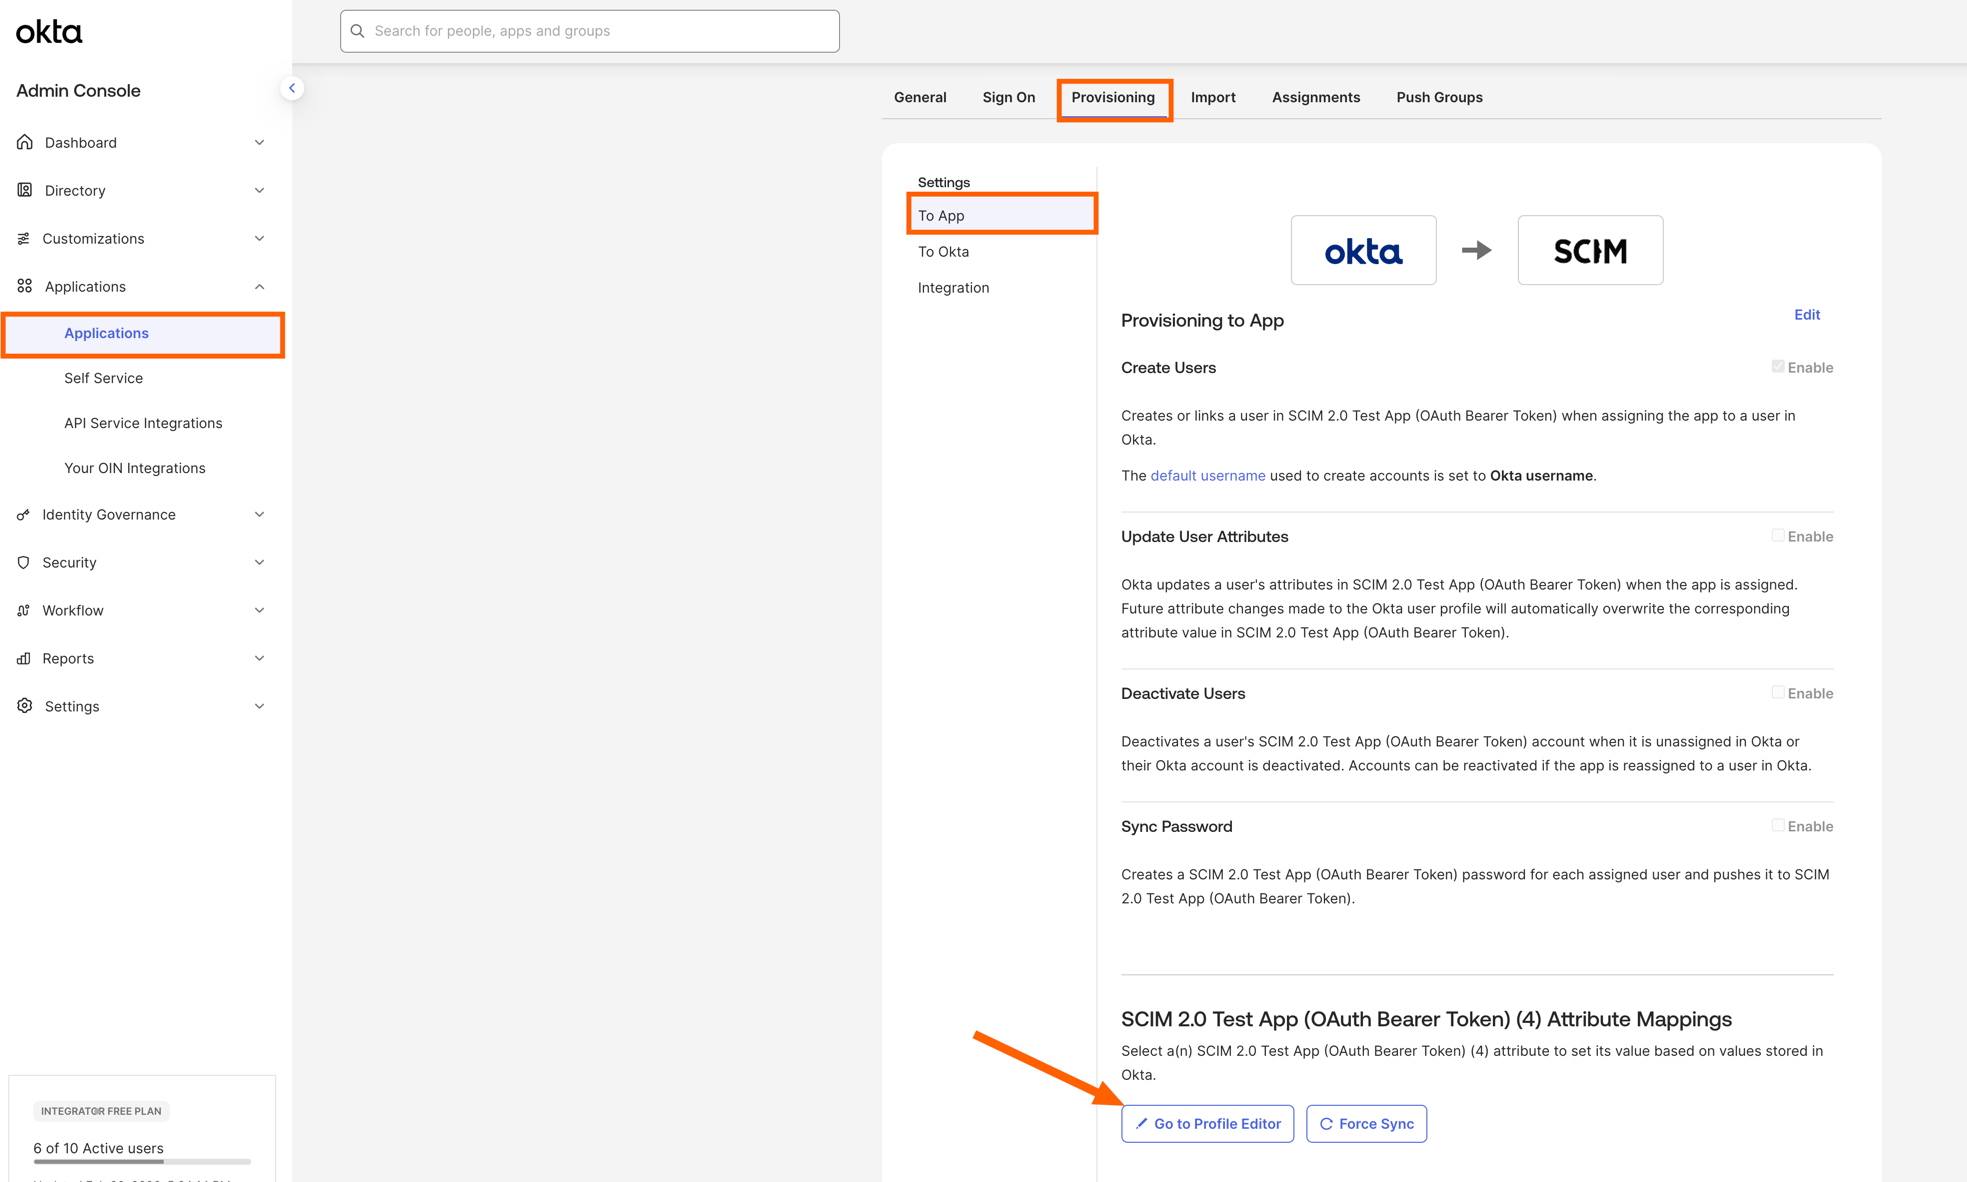
In Okta Admin Console, go to Applications →Applications, then select the new SCIM App.
Select the Provisioning tab, then To App.
Scroll down and click Go to Profile Editor.
Click + Add Attribute.
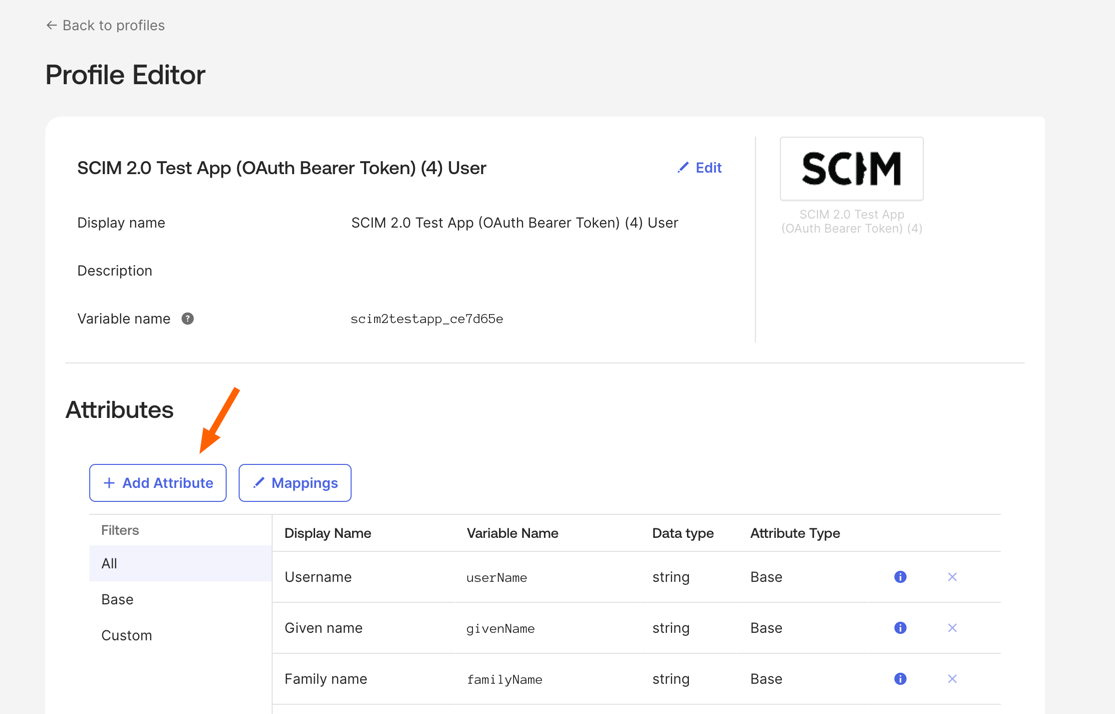
Create two attributes,
entitlementsandroles, with the following settings.Settings
entitlementsrolesData Type
string array
string array
External Name
entitlementsrolesExternal Namespace
urn:ietf:params:scim:schemas:core:2.0:Userurn:ietf:params:scim:schemas:core:2.0:UserAttribute Group
Group
Group
Group Priority
Combine values across groups
Combine values across groups
Note: When Attribute Type is set to Group, Okta exposes two combination strategies. They behave differently, so choose carefully. The table below compares them.
Strategy
Behavior
When to Use
Combine values across groups
UNIONs the values from every group the user belongs to. A user in
Nooks-Power-Dialer(entitlement valuepowerDialerBullpen) ANDNooks-Coaching(entitlement valuetraining) is sent to Nooks withentitlements: ["powerDialerBullpen", "training"].This configuration enables one-group-per-dimension setups in Okta (one group per dialer tier, one per add-on like Coaching/International, one per role) and can help avoid combinatorial group explosion.
Use Group Priority
Only the highest-priority group’s value is sent. A user in both
Nooks-Power-DialerandNooks-Coachingwould receive only the top-priority group’s value (e.g.,powerDialerBullpen) — the other group’s value is dropped.Useful when you want exactly one group to win for an attribute and no merging across groups. If you want this, but need to support lot’s of combinations, you’d end up forced into combo groups like
Nooks-Power-Dialer-with-Coaching, Nooks-Power-Dialer-with-International, etc.
Assign Groups:
Go to Applications → Applications, then select the new SCIM app.
Select the Assignments tab, then Assign → Assign to Groups.
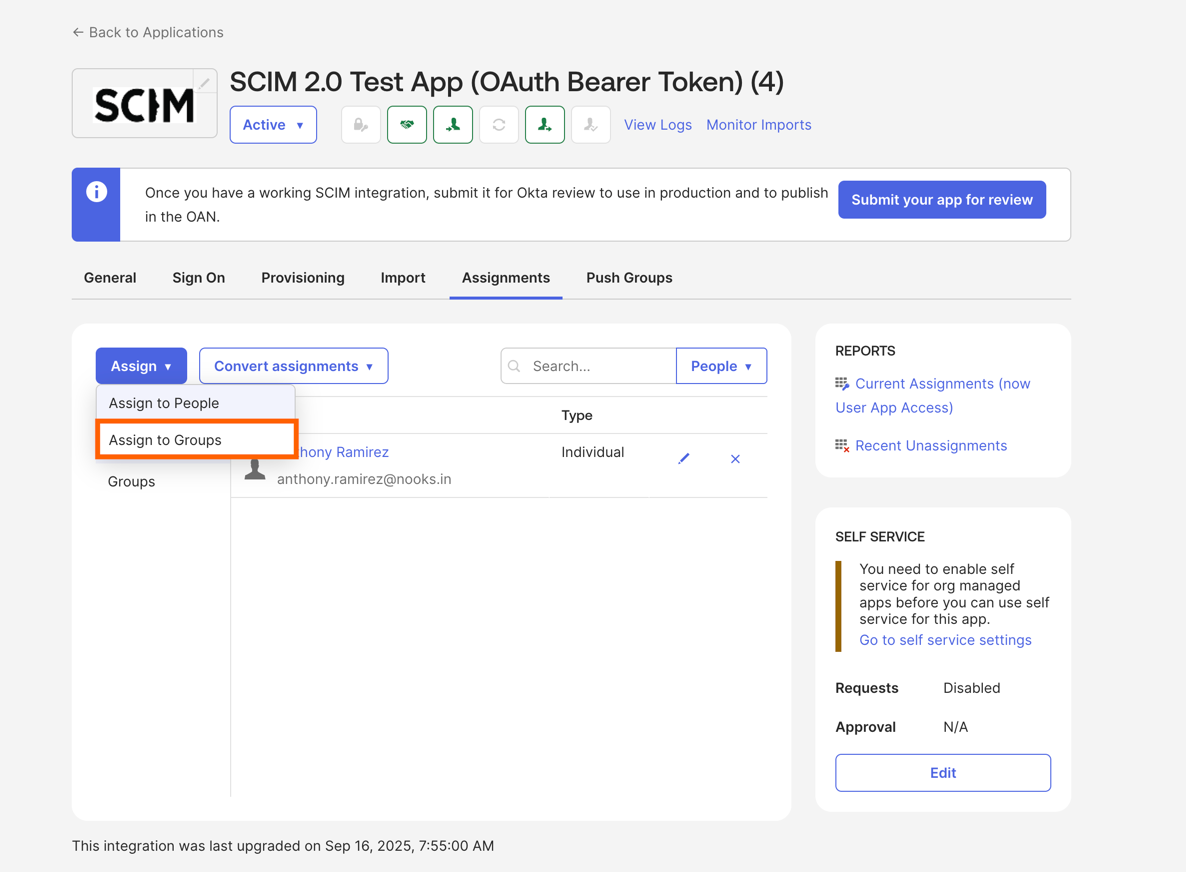
Select the group you wish to add and click Assign.
Scroll to Entitlements and Roles, and click Add Another for each value you want to add
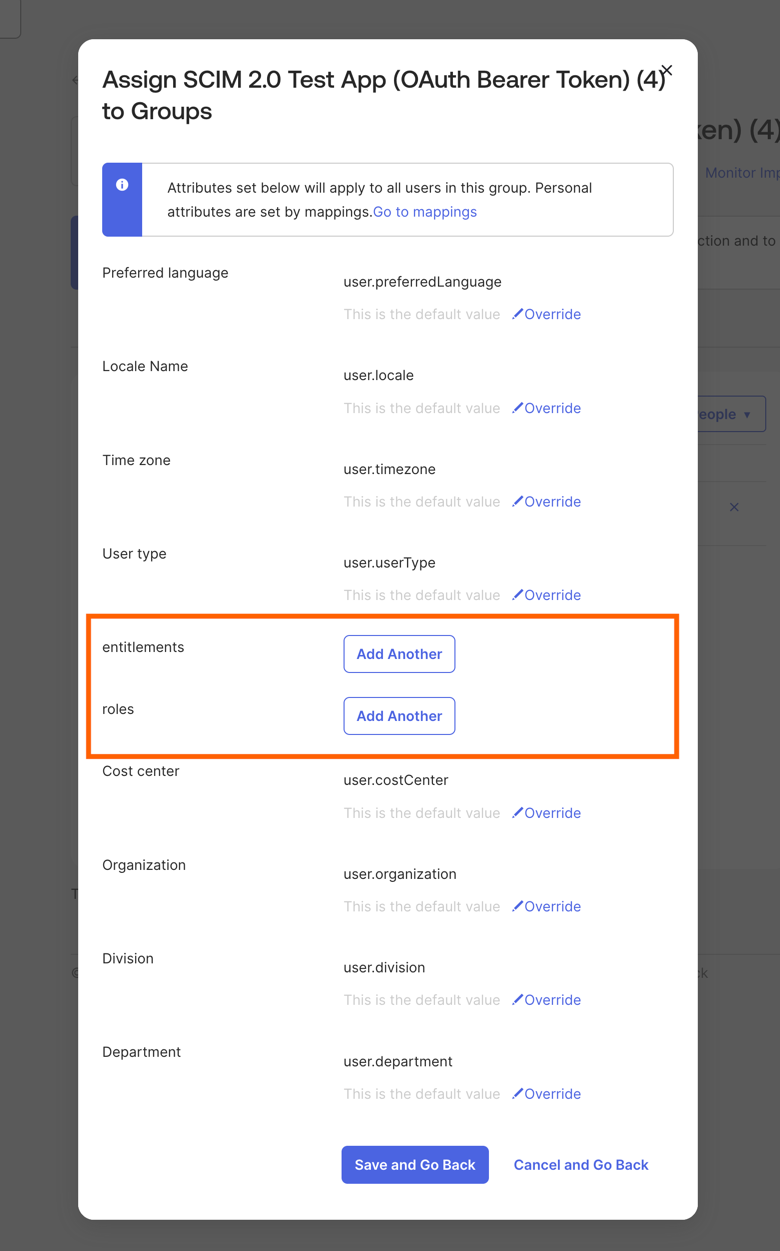
Enter the strings from the Access Types section below for the access you want to assign.
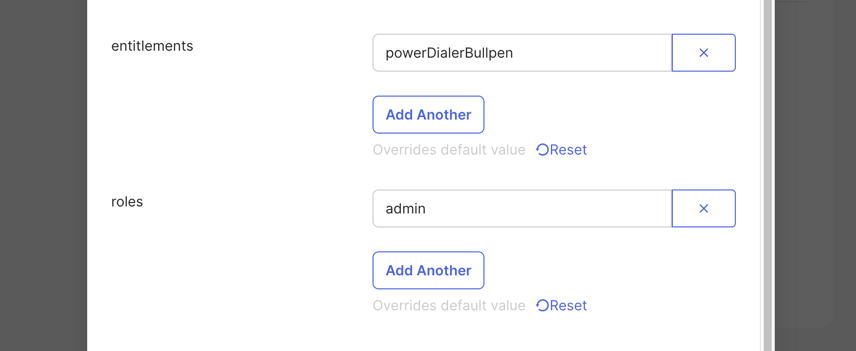
Click Save and Go Back at the bottom when finished.
Push groups to Nooks.
Go to Applications → Applications, then select the new SCIM app.
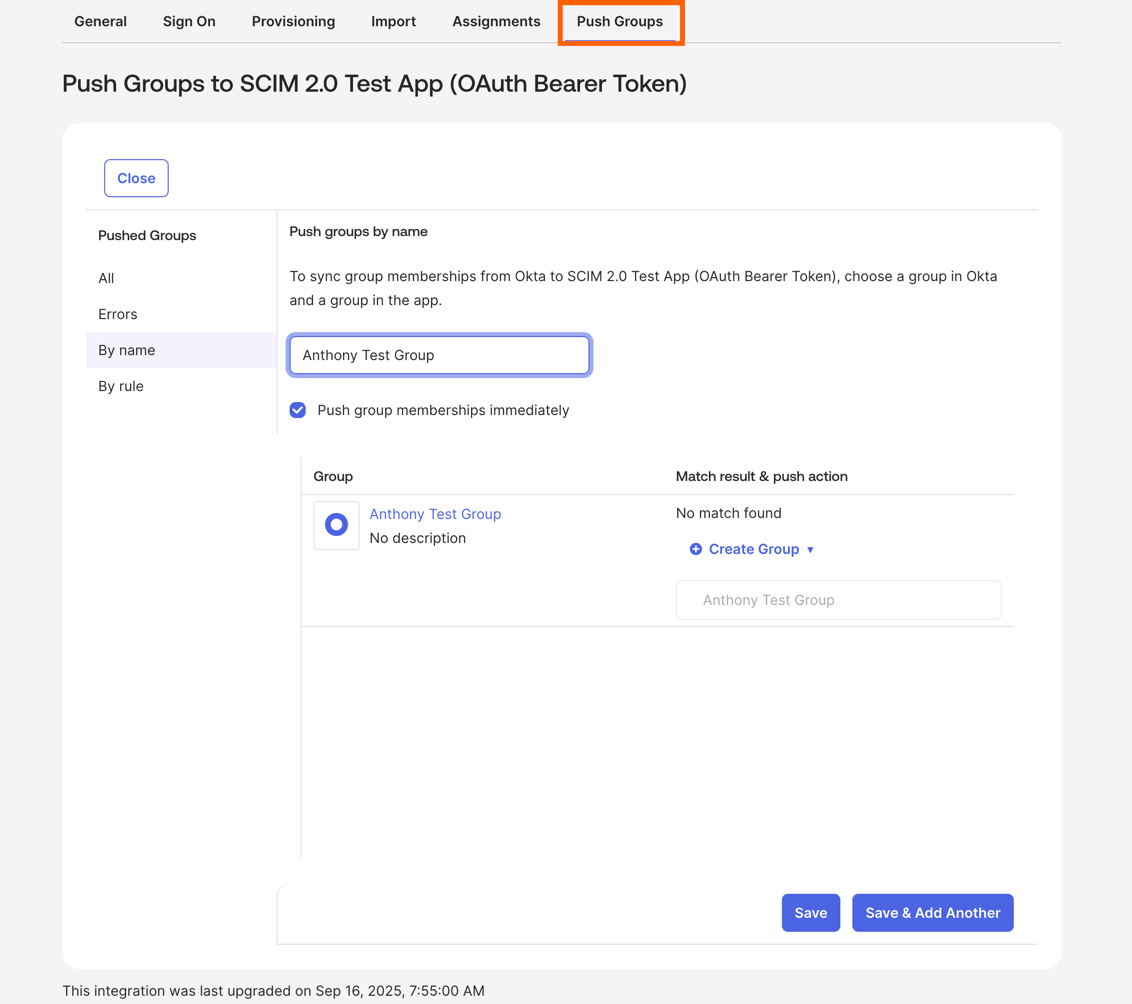
Select the Push Groups tab, then +Push Groups → Find Groups By Name.
Search for the group you want to push, then click Save or Save & Add Another.
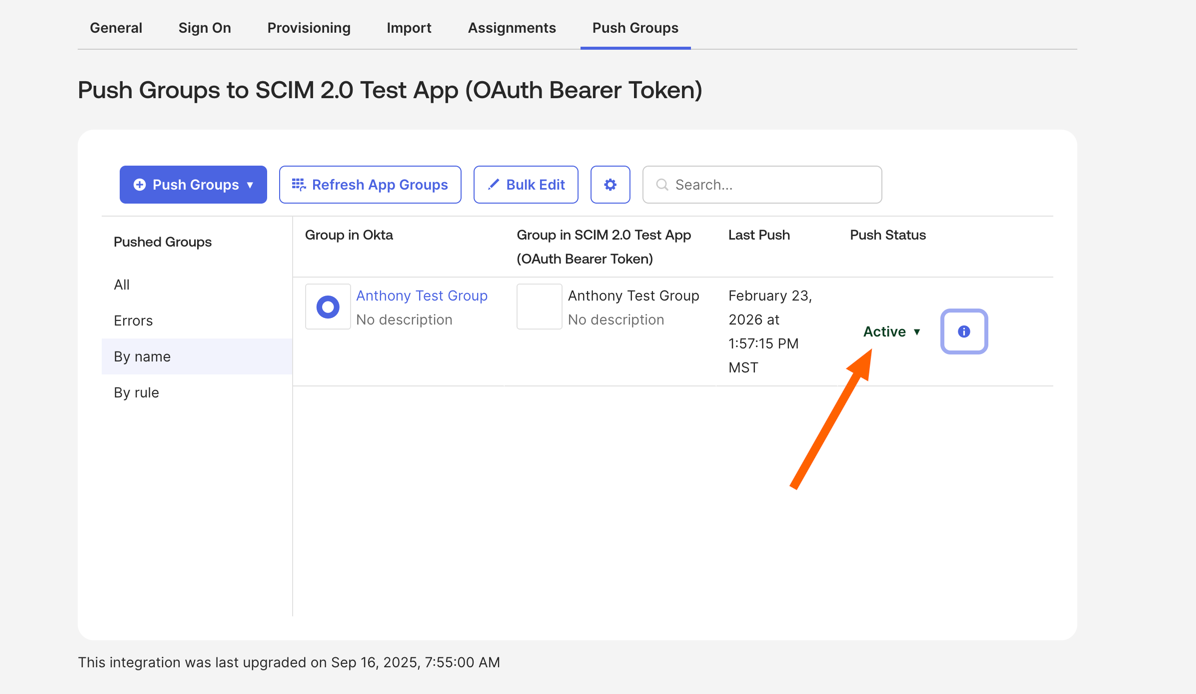
When Push Status shows Active, the group's entitlements and roles have been pushed to Nooks.
Azure AD
In Azure Portal, create an enterprise app.
Set up provisioning with the Base URL and Bearer Token from Step 1.
Configure attribute mappings for
entitlementsandroles.Turn on automatic provisioning.
Access Types
When SCIM provisioning is enabled, Nooks manages each user's access through the entitlements and roles fields on the SCIM user object. Both fields are arrays of strings.
How Access Is Determined
Entitlements set both a user's seat and their add-ons. Roles set a user's Nooks role. They combine differently:
Seats: Each user gets only one seat. If multiple seat assignments are present, the highest priority one wins.
Add-ons: A user can hold any number of add-ons alongside their seat.
Roles: Each user gets only one role alongside their seat and add-ons. If multiple role assignments are present, the highest priority-one wins.
Seat Entitlements
Use one of the following strings to assign a seat.
Access Level | Entitlement String | Synonyms | Description | Use Case |
Bullpen |
|
| Salesfloor access | Sales reps without dialer access |
Power Dialer |
|
| Power dialer | Sales reps with dialer access (no parallel dialing) |
Parallel Dialer |
|
| Parallel and power dialer | Sales reps with parallel dialing capability |
Add-on Entitlements
Add-ons grant features on top of a seat. Unlike seats, add-ons combine, so a user can hold any seat and any number of add-ons at the same time. A user cannot hold an add-on without holding a seat.
Add-on | Entitlement String | Description | Use Case |
Coaching |
| Grants access to AI Coaching features | Reps and managers who use Nooks AI Coaching |
International |
| Enables international dialing | Reps who make calls to destinations outside the US and Canada |
Sequencing |
| Grants access to Nooks Sequencing. Weekly AI Credits come from a Sequencing plan; see the Managing Sequencing Access via SCIM section for more information. | Reps who are going to use Nooks for Sequencing |
Roles Access
Use one of the following strings to set a user's role.
Access Level | Role String | Synonyms | Description | Use Case |
User |
| None | Standard access | Sales reps |
Manager |
| None | Management access | Team leaders and managers |
Admin |
| None | Admin access (highest level) | Admins for org-wide configuration |
Admin Group Configuration Overrides
Admin Configuration Overrides let Nooks Workspace admins set access for every member of a SCIM group, regardless of the individual user entitlements in SCIM. Overrides always take precedence.
Configuration Process
To configure an override for a group:
In Nooks, go to Settings → All Settings.
Under User Management, select Identity & Provisioning.
Scroll to SCIM Groups & Entitlements, then click the pencil icon next to the group.
Set the group's access, then click Save Configuration.
Changes apply immediately to all group members. To map groups to Sequencing plans, see Managing Sequencing Access via SCIM.
Priority Hierarchy
When Nooks determines a user's access, it applies sources in the following order:
Admin Group Configuration (highest priority)
Individual User Entitlements from your IdP
No Access
The following examples show how overrides interact with individual entitlements.
Override individual entitlements
// User has: ["bullpen"]
// Admin configures group: powerDialerBullpen
// Result: User gets powerDialerBullpen
Remove group override
// User has: ["powerDialerBullpen"]
// Admin removes group config
// Result: User falls back to powerDialerBullpen
Add-on Group Pattern (Coaching, International)
You do not need to bundle Coaching or International entitlements into every group, for example by creating separate "Power-Dialer-with-Coaching" and "Power-Dialer-without-Coaching" groups. Instead, you can create a dedicated add-on group that grants only the add-on. Users receive the add-on by belonging to both a dialer-tier group and an add-on group. This pattern works well when only some users need an add-on because it keeps your group count manageable instead of doubling for every add-on dimension.
Note: This pattern only works if your entitlements attribute is set to Combine values across groups.
To set up a Coaching-only add-on group:
In your IdP, create a group such as
Nooks-Coaching. Add the users who need access to AI Coaching. These users must also belong to a dialer-tier group (Bullpen, Power Dialer, or Parallel Dialer) because the add-on group does not grant Dialer access on its own.Push the group to Nooks via SCIM.
In Nooks, go to Settings → All Settings → User Management → Identity and Provisioning. Find the SCIM Groups & Entitlements table. Click the pencil icon next to the group's name.
Configure the override as follows:
Field
Value
Why
Access
No Access
This group should not contribute a dialer seat — the user's dialer seat comes from their other group.
Role
(leave blank)
Role is set by other groups (or directly).
AI Coaching
☑ checked
This is what the group actually grants.
International Seat
☐ unchecked
Not granted by this group.
Click Save Configuration. Group members now receive Coaching access on top of the Dialer access they receive from their other group.
Important: A user belongs only to an add-on group, and to no dialer-tier group, ends up with no seat. Make sure every member of an add-on group also belongs to a dialer-tier group.
The same pattern works for International. Create a group such as Nooks-International, then follow the same steps, and check International Seat instead of AI Coaching.
If the same users always need both add-ons, you can also use a single group, such as Nooks-Coaching-and-International, with both AI Coaching and International Seat checked. If users sometimes need different levels of access, using separate add-on groups is more flexible.
How Access Merges Across Groups
When a user belongs to several groups with or without Admin Configuration Overrides, Nooks combines each field as follows. Note that an override takes precedence over a direct SCIM grant within the same group.
Field | Combination Rule |
| The highest tier across all the user's groups wins.
|
| The highest role across all the user's groups wins.
|
Training Seat | True if any group has it checked. |
International Seat | True if any group has it checked. |
Nooks Sequencing Plan | The most generous Nooks plan wins. |
For example, a user in a Nooks-Power-Dialer (Power Dialer, no add-ons) and Nooks-Coaching (no dialer access, AI Coaching checked) group ends up with a Power Dialer seat plus AI Coaching.
Managing Sequencing Access via SCIM
This section explains how to grant Nooks Sequencing access through your IdP and how Nooks assigns Sequencing plans to SCIM-provisioned users
How Sequencing Access Works
Granting Sequencing through SCIM consists of two parts. A user needs both to use Nooks Sequencing.
Sequencing entitlement: The sequencing entitlement in your IdP gives the user access to Nooks Sequencing.
Sequencing plan: A Sequencing plan sets the user's weekly AI credits. For example, a Pro plan grants 2,750 credits per week. Users receive a plan in one of two ways:
Through their SCIM group's override.
Through your Workspace's default plan (if they have a Sequencing entitlement but none of their groups have a plan override).
In Nooks, a Sequencing seat is a plan assignment. A user with no plan holds no Sequencing access.
Before You Begin
Confirm the following before you configure Sequencing through SCIM:
SCIM provisioning is enabled and your IdP is connected.
Every group that grants Sequencing has been pushed to Nooks.
The
sequencingentitlement is assigned in your IdP to every user who should have Sequencing.
Step 1: Turn on Sequencing Seats via SCIM
Sequencing became available as a SCIM entitlement in June 2026. Many existing Workspaces already had Sequencing access assigned directly in Nooks, so SCIM does not manage Sequencing until you opt in. This opt-in toggle exists so that turning on SCIM entitlement sync never silently removes Sequencing access from users who were provisioned before June 2026. If your Workspace is setting up SCIM for the first time, this setting is enabled automatically and you can skip to Step 1.
To turn on the setting:
Go to Settings → All Settings.
Under User Management, select. Identity & Provisioning.
Turn on the Sequencing seats via SCIM toggle on.
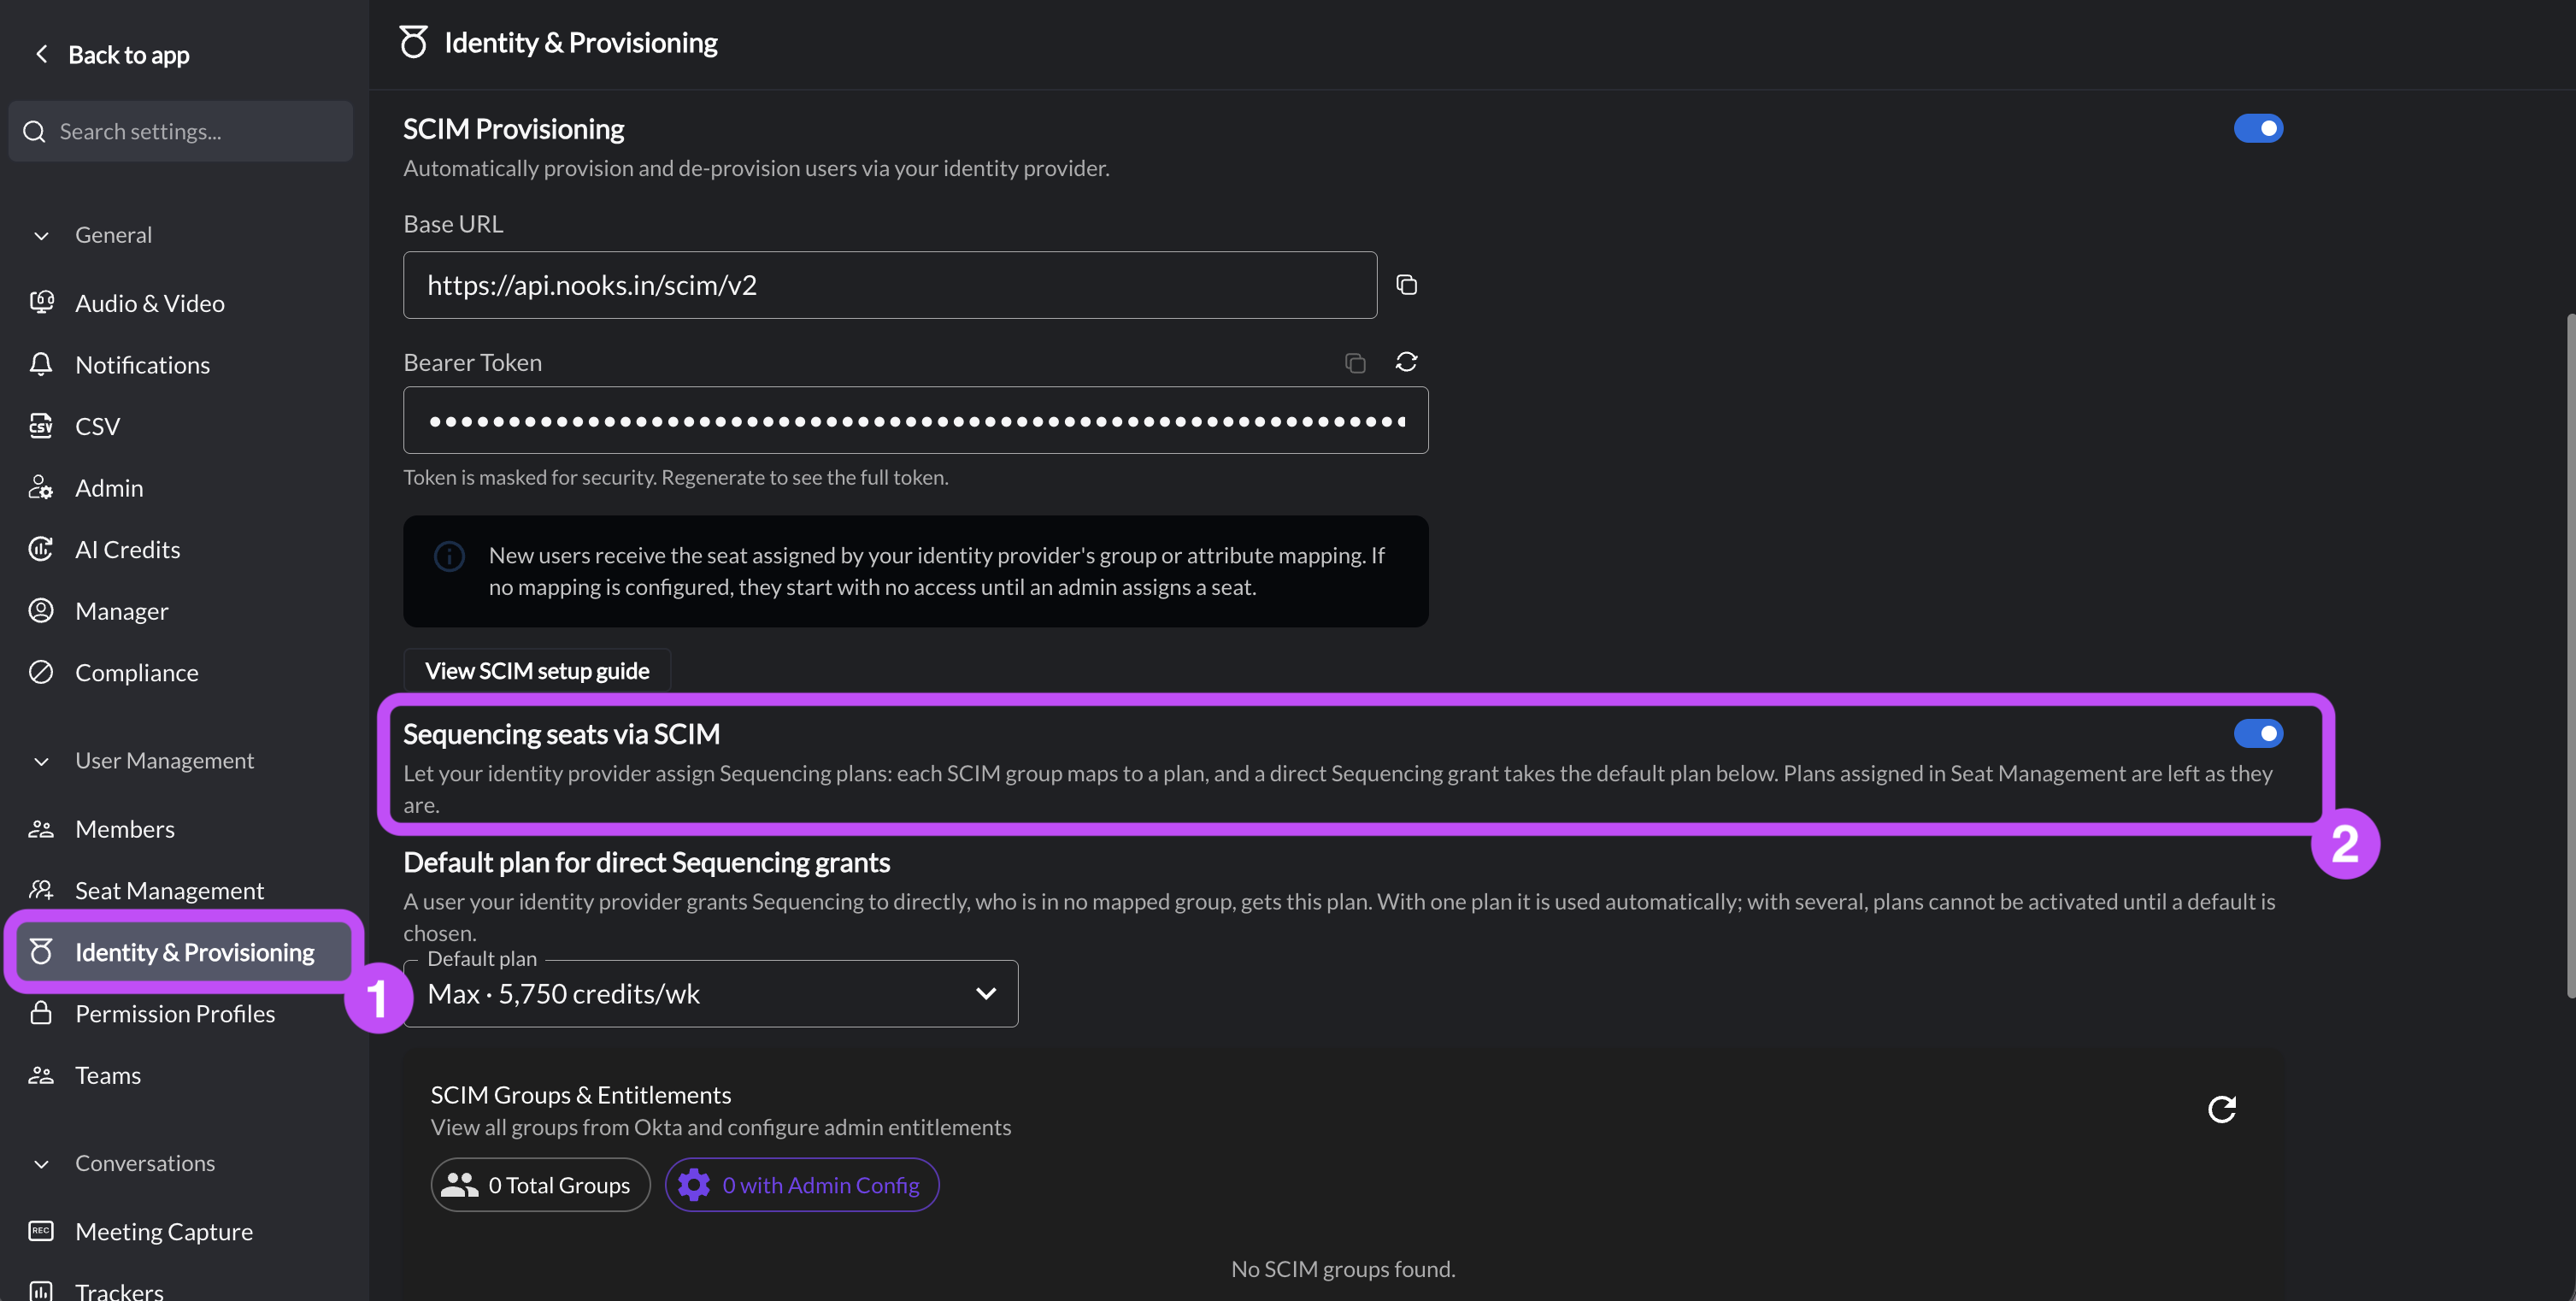
Once this toggle is on, your IdP assigns Sequencing plans. Each mapped group assigns its plan, and users granted Sequencing directly receive the default plan.
Step 2: Choose a Default Plan for Direct Sequencing Grants
Some users may receive the sequencing entitlement directly in your IdP but not belong to a mapped group. Those users receive your Workspace's default plan. What you need to do depends on how many plans your Workspace has:
One plan (only Basic plans): Nooks automatically uses that plan. No action is needed.
More than one plan (e.g., Basic and Pro plans): You must choose a default. Until you do, Nooks cannot assign plans to users who are granted Sequencing directly.
To choose a default plan:
Go to Settings → All Settings.
Under User Management, select. Identity & Provisioning.
In the Default plan for direct Sequencing grants field, select a plan.
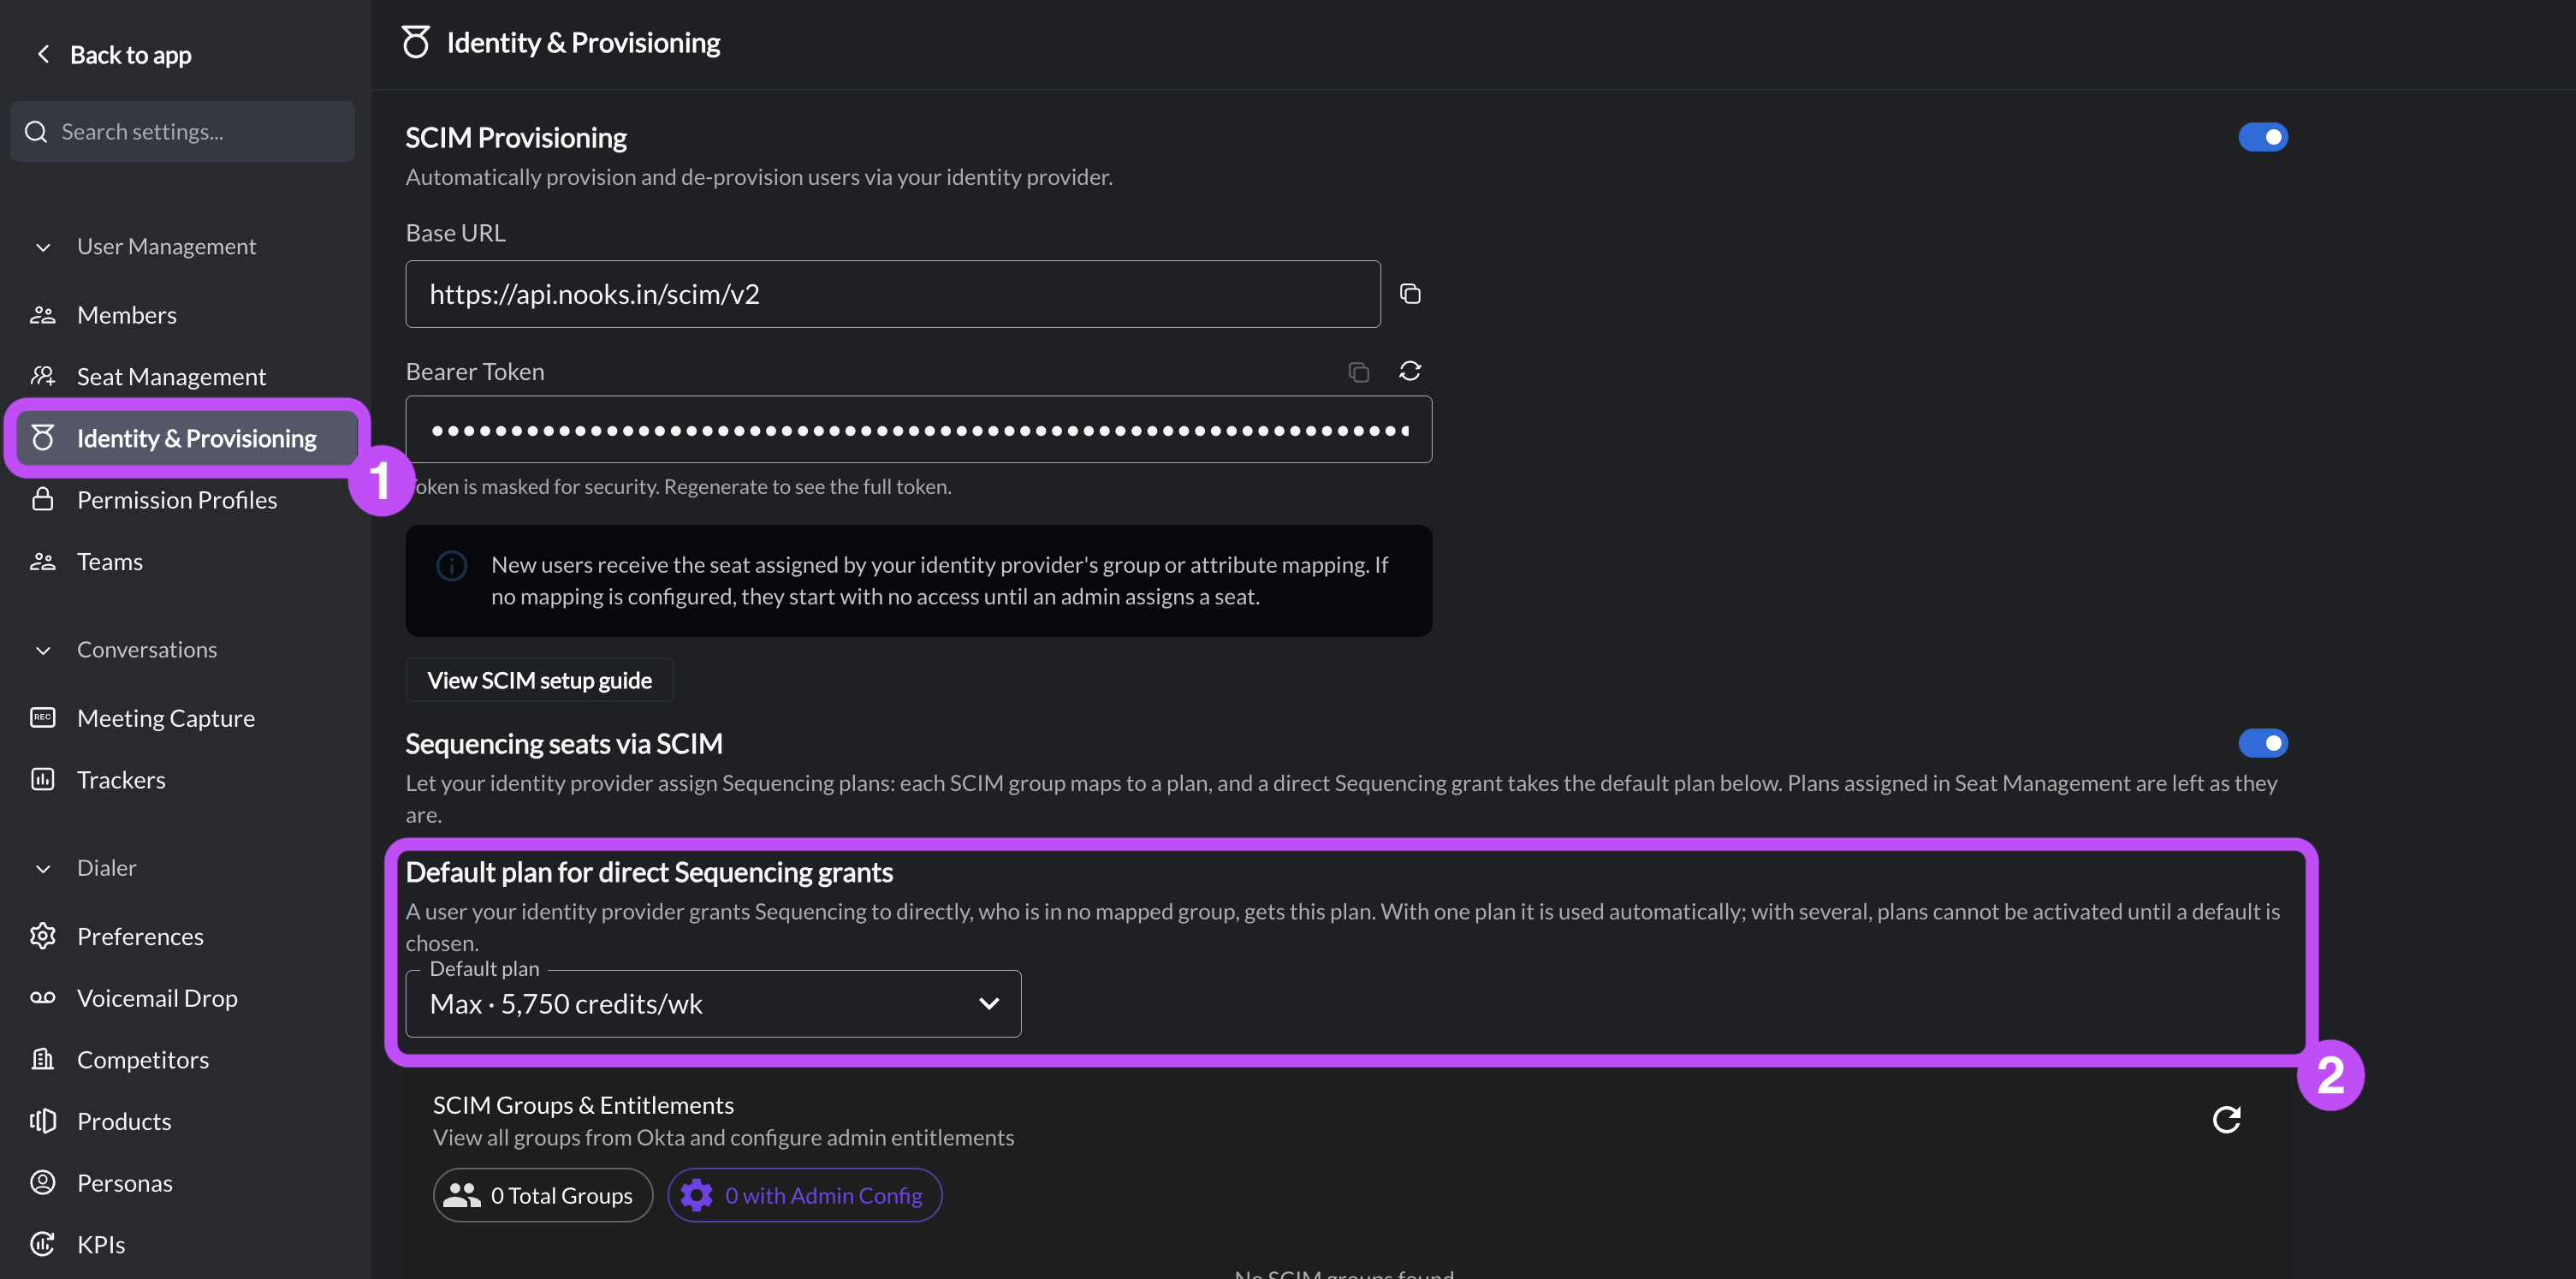
Step 3: Map SCIM Groups to Sequencing Plans
For each group that grants Sequencing needs a Sequencing plan in its Admin Group Configuration Override. Users who are directly granted the sequencing entitlement but are not in a group with a plan override receive your Workspace's default plan.
To map a group to a plan:
Go to Settings → All Settings.
Under User Management, select. Identity & Provisioning.
Scroll to SCIM Groups & Entitlements.
Click the pencil icon for each SCIM group that grants the Sequencing entitlement to configure Admin Overrides for the group.
In the Nooks Sequencing Plan field, select an AI Credit plan. You will see the plans available to your Workspace.
Click Save Configuration.
Repeat steps 4–6 for any other SCIM groups that grant the Sequencing entitlement.
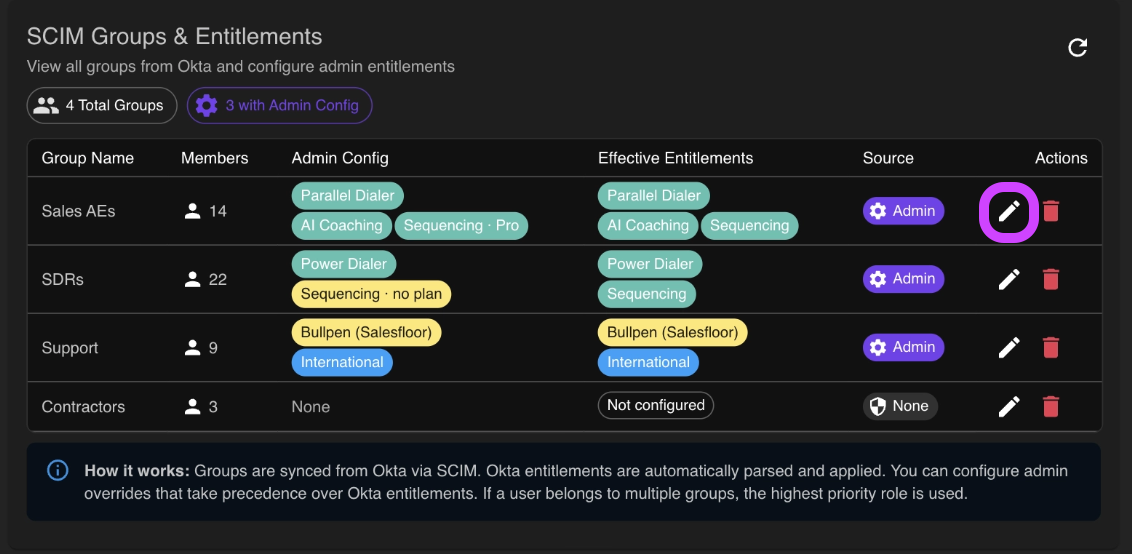
How SCIM Assigns and Releases Sequencing Plans
The following table lists how Nooks handles common situations once Sequencing is managed through SCIM.
Situation | What Happens |
User is in more than one group that grants a Sequencing plan | The user receives the most generous AI Credit plan. |
User is in a mapped group and also has Sequencing granted directly. | The mapped group takes priority over the default plan. |
The plan has no more open seats. | Your IdP does not receive an error. The user shows as "waiting for a plan" and receives one when a seat opens. A seat opens when seats are added to the plan; when another user is released, removed, or deactivated; or when a weekly hold expires. |
The user has not logged into Nooks yet. | The user can already hold a plan. Seat Management shows a "pending first login" tooltip, and the plan follows the user at first login. |
A user's Sequencing grant is withdrawn, or the user is deactivated. | SCIM releases only plans that SCIM assigned. Plans that admins assigned in Seat Management stay in place. Released seats may be help until Monday 00:00 UTC. See this guide for more information. |
Review Seat Management (Settings Alto review SCIM activity. The strip counts of your Sequencing seats indicate how many are currently being held by SCIM and how many users are currently waiting for a plan. For example, you might see "12 held via SCIM · 3 waiting for a plan."
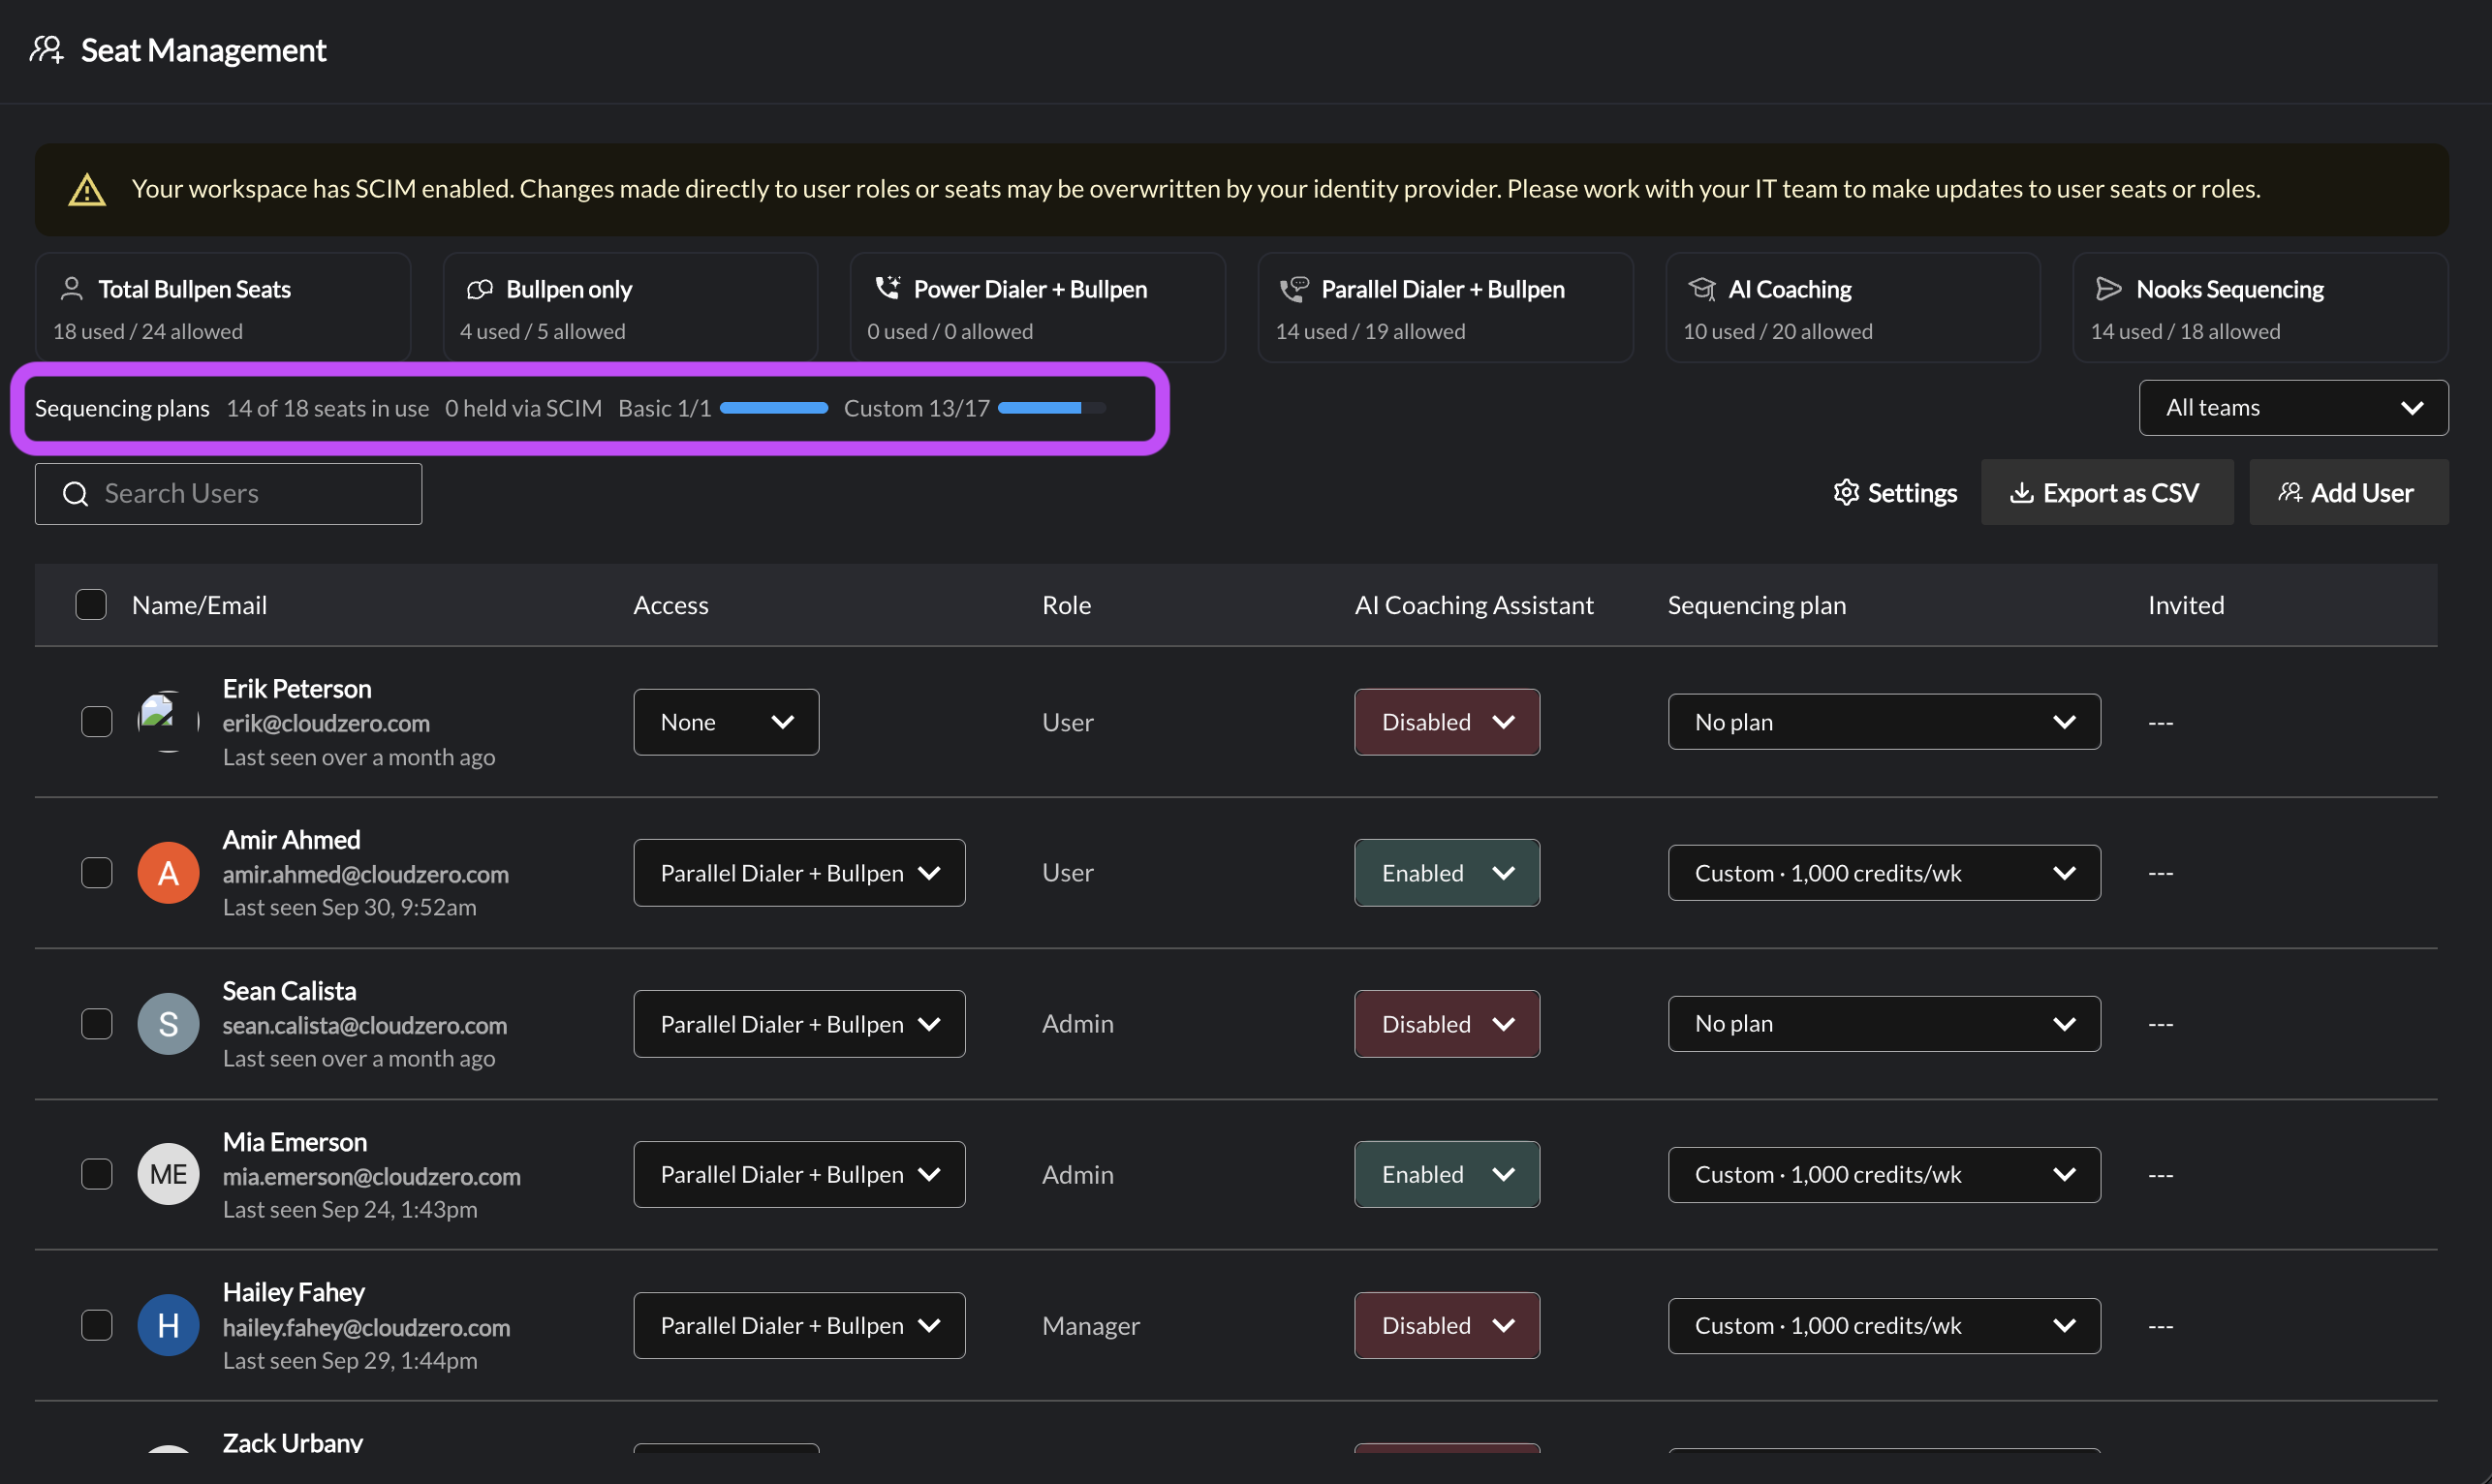
When a SCIM Sequencing grant is withdrawn, SCIM-assigned plans are released as well. Withdrawals of Sequencing AI Credit plans are subject to holds until the next Monday at 00:00 UTC if the user originally assigned the seat used any AI Credits in the current Credit period. See here for more.
Best Practices
Keep the following points in mind as you set up and maintain SCIM for your Nooks Workspace:
Plan your group structure. Design groups based on access requirements.
Document you configurations. Keep a record of each group's access level, add-on, and Sequencing plan.
Monitor seat usage. Group overrides consume seats, including AI Sequencing plan seats.
Test changes. Verify changes in test environment first.
Schedule changes to Sequencing entitlements. Perform changes to Sequencing grants shortly after Monday 00:00 UTC.
Common Scenarios
The following scenarios show how to handle common provisioning tasks.
Assigning a New User
Option A: Group Assignment (recommended)
Create user in identity provider
Add to a Nooks-relevant SCIM group (e.g.
Nooks-Bullpen,Nooks-Power-Dialer, etc.)Make sure that group has an admin override configured in Nooks Admin → SCIM Groups & Entitlements
Option B: Direct Assignment (only when no group has an admin override)
Create user in identity provider
Assign entitlements:
["bullpen"](basic access for new reps)
Use Option A in production. Option B is supported only for workspaces with zero group admin overrides; as soon as any group has an override configured, per-user entitlements stop applying for users in any configured group.
Worked Example: Full-stack SDR
An SDR who needs parallel dialing and AI Coaching:
In your identity provider (Okta / Azure AD / etc.), add Jane to your
Nooks-Parallel-Dialergroup and yourNooks-Coachingadd-on group. Push both groups via SCIM.In Nooks Admin → SCIM Provisioning → SCIM Groups & Entitlements, configure both groups:
Nooks-Parallel-Dialer:Access: Parallel Dialer + Bullpen,Role: User, AI Coaching Seat unchecked, International Seat unchecked.Nooks-Coaching:Access: No Access, Role blank, AI Coaching Seat checked, International Seat unchecked.
Result: Jane gets a Parallel Dialer seat as a
user, plus the AI Coaching add-on. Her entitlements merge from both group admin configs.
Alternatively, for workspaces with no group admin configs at all, you can send entitlements directly on the per-user SCIM payload:
{
  "schemas": ["urn:ietf:params:scim:schemas:core:2.0:User"],
  "userName": "jane.doe@acme.com",
  "name": { "givenName": "Jane", "familyName": "Doe" },
  "emails": [{ "value": "jane.doe@acme.com", "primary": true }],
  "active": true,
  "entitlements": ["parallelDialerBullpen"],
  "roles": ["user"]
}
This only works if no group in your Nooks workspace has an admin override configured. As soon as any group has an admin override, per-user entitlements are ignored for users in those groups; configure entitlements through group admin overrides instead.
Granting Coaching or International to a Subset of Users
Use the add-on group pattern described in the Admin Group Configuration Overrides section above. Setting training or international on the per-user entitlements array via your identity provider alone does not reliably apply the add-on — configure it through a group override in Nooks Admin instead.
Updating Dialer Access
Option A: Direct Update
Update entitlements to
["powerDialerBullpen"](upgrade to dialer access)
Option B: Group Transfer
Remove from "Sales Representatives" group.
Add to "Senior Sales" group.
Employee Leaves
Option A: Direct Removal
Set entitlements to
[]or["none"]
Option B: Group Removal
Remove from all groups
Option C: SCIM Unassign or Deactivate
Use the SCIM API to "unassign" the user by either:
Sending a PATCH or PUT request with
entitlements: []orentitlements: ["none"]to remove all access, orSetting
"active": falsefor the user. Whenactiveis updated tofalse, all entitlements will be reset and any assigned seats will be freed automatically.
Troubleshooting
Use this section to diagnose common access and seat issues.
User Not Getting Expected Access
Causes:
Entitlements field missing from SCIM request
Invalid entitlement values
Admin group configuration overriding user entitlements
Insufficient seats available
Solutions:
Check SCIM request payload includes entitlements
Verify entitlement values are correct
Check admin group configurations
Review seat availability
Access Removed Unexpectedly
Causes:
Empty entitlements array sent in SCIM request
User removed from all groups
Admin group configuration changed
Solutions:
Review SCIM provider configuration
Check group memberships
Verify admin group configurations
Seat Limit Errors
Causes:
Too many users assigned to high-tier access
Group configurations consuming too many seats
Seat plan needs upgrade
Solutions:
Review current seat usage
Consider upgrading seat plan
Optimize group configurations
Remove access from inactive users